Showing posts with label Homemade. Show all posts

Saturday, November 4, 2017

How to Make Baked Apple Hand Pies 蘋果批 (餡餅)


Are you enjoying the cooler temperature and the scenery of fallen red and golden Maple leaves?  I sure love them both.  But what I love even more are all the warm and hearty recipes that fit for Fall!  There should be no surprise that dessert always makes the top of my list!  These adorable and heart-warming Apple Hand Pies are definitely my favorite Fall dessert.  They are also both of my kids' favorite!  What a surprise!?  It’s seldom that they both love the same item or a dish!  So, I’m happy to bake up these cuties more often!

Welcome Fall with these Apple Hand Pies 蘋果批 (with video tutorial)  http://uTry.it

Many hand pie recipes are deep fried.  However, I don’t like to deep fry for obvious reasons.   To me, deep fry usually involved absorbing too much unnecessary oil and calories!  Besides, I don’t want to deal with a large pot of left-over oil and greasy smell in the kitchen as well.  So, I opt for a baked version!  These baked Apple Hand Pies are just as scrumptious and decadent, if not better, than the deep fried version!

Welcome Fall with these Apple Hand Pies 蘋果批 (with video tutorial)  http://uTry.it

The crust of these Apple Hand Pies is buttery and flaky, the apple filling is slightly sweet and tart, and very juicy.  The combination of earthy cinnamon and refreshing apples is simply heavenly!  These hand pies are fun to eat and very portable.  You can easily pack them for picnic or bring them to parties for sharing.  I shared them with some friends and they all loved them!

Welcome Fall with these Apple Hand Pies 蘋果批 (with video tutorial)  http://uTry.it

If you haven’t check out the video tutorial, please do so as I shared more tips and tricks in the video and you don’t want to miss them.   I hope you enjoy today’s post and recipe.  Please subscribe to my Youtube channel here.  That way, you won’t miss out on any future videos and you’ll be the first to know when I have a new tutorial published.  And remember, Eat, Drink, and Be Happy!  Stay tuned for more Fall and Holiday baking next week!

Welcome Fall with these Apple Hand Pies 蘋果批 (with video tutorial)  http://uTry.it


Ingredients and Tools Used:
Apple Shape Pocket Pie Mold (Click here for more information)
4-icnh Round Cookie Cutter (Click here for more information)
Mini Cookie Cutter Set (Click here for more information)
Organic Ground Cinnamon (Click here for more information)
Cooling Racks (Click here for more information)
Rolling Mat (Click here for more information)
Rolling Pin (
Click here for more information)
Measuring Spoons Set (Click here for more information)
Baking Sheets (Click here for more information)
Microplane Zester (
Click here for more information)
Whole Nutmeg (Click here for more information)
Organic Vanilla Extract (Click here for more information)
Kerrygold Butter (Click here for more information)
Organic All-Purpose Flour (Click here for more information)


Disclosure: uTry.it is a participant in the Amazon Services LLC Associates Program, an affiliate advertising program designed to provide a means for sites to earn advertising fees by advertising and linking to Amazon.com.



Saturday, August 5, 2017

Sumikko Gurashi Sushi Rice Balls 角落公仔壽司飯糰


Have you seen these cutie critters before?  They are called Sumikko Gurashi!  Aren’t they super adorable?  Today, I’m sharing a recipe with you that’s inspired by these super adorable characters from Japan: Sumikko Gurashi Sushi Rice Balls 角落公仔壽司飯糰.  If you’ve checked out my video tutorial above, you’ll also see the tools and ingredients that I used to make them.

Sumikko Gurashi Sushi Rice Balls 可愛壽司飯糰   http://uTry.it

It all started not long ago with a super soft and squishy plush toys that I got for my daughter from a Japanese store.  Ever since that day, we all fell in love with these cute little creatures!

Sumikko Gurashi Sushi Rice Balls 可愛壽司飯糰   http://uTry.it

Sumikko Gurashi Sushi Rice Balls 可愛壽司飯糰   http://uTry.it
Image from the web

What does Sumikko Gurashi means?  “Sumikko” means corner, and “Gurashi” means life.  Together, they can be translated to 'living in a corner,' as that’s what these little critters like to do.

Sumikko Gurashi Sushi Rice Balls 可愛壽司飯糰   http://uTry.it

From time to time when I see cute little Sumikko Gurashi products, I couldn’t resist but to take them home with me! 

Sumikko Gurashi Sushi Rice Balls 可愛壽司飯糰   http://uTry.it
Picture from web

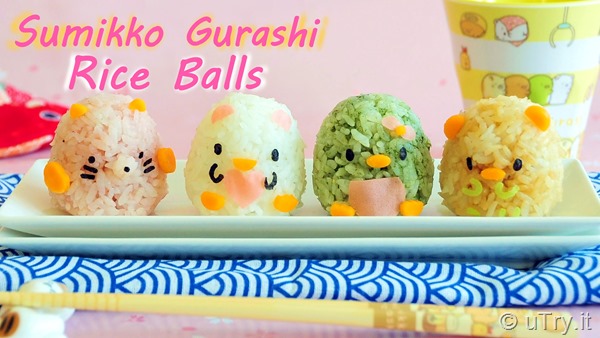
In today’s recipe, I’m making these sushi rice balls stuffed with a creamy and smoked salmon filling.  The rice itself is seasoned with different ingredients for their natural colors and flavors.

Sumikko Gurashi Sushi Rice Balls 可愛壽司飯糰   http://uTry.it

First off, we have Neko Cat.  The rice is seasoned with cod powder for the umami flavor and gorgeous pink color.  It compliment the salmon fillings really well.

Sumikko Gurashi Sushi Rice Balls 可愛壽司飯糰   http://uTry.it

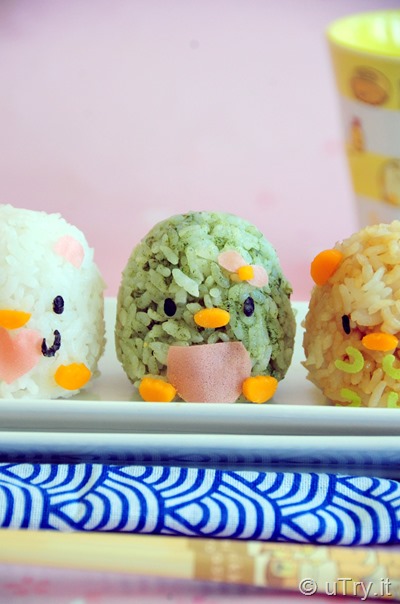
Next is Polar Bear.  I leave the rice plain on this one for the white color.  Its ears are decorated with pink Soy Wrappers that are so much fun and easy to use!  It’s mouth and legs are stamped out cheddar cheese and it’s eyes and hands are stamped out seaweeds.

Sumikko Gurashi Sushi Rice Balls 可愛壽司飯糰   http://uTry.it

Up next is Penguin!  The green color is from matcha green tea powder.  You can also substitute with spinach puree or other dark green vegetable puree if you have those on hand.  But the earthy green tea flavor truly balanced well with the smoky salmon inside these rice balls.

Sumikko Gurashi Sushi Rice Balls 可愛壽司飯糰   http://uTry.it

Last but not least, Tonkatsu!  Remember I shared my homemade Tonkatsu recipe with you not long ago?  It’s Japanese style pork cutlets!  See the resemblance?   For this one, I seasoned the rice with a little bit of light soy sauce for flavor and color.  They all turned out super yummy!

Sumikko Gurashi Sushi Rice Balls 可愛壽司飯糰   http://uTry.it
Image from web

How well did I I in in shaping and decorating these characters against the picture sample above?  Not bad, isn’t it?  I can’t wait to make “tail of fried shrimp”, “tapioca”, and “sparrow” next time!  They are all super duper cute!

Sumikko Gurashi Sushi Rice Balls 可愛壽司飯糰   http://uTry.it

I hope you enjoyed today’s video and recipe as much as we do.  My daughter and I had a fun time creating them together!  Thank you so much for reading and stay tuned for more fun and kawaii recipe next week!  Remember, Eat, Drink, and Be Happy! 

Sumikko Gurashi Sushi Rice Balls 可愛壽司飯糰   http://uTry.it


Products, ingredients, and tools used in this post:
Sumikko Gurashi Cat Plush Toy (Click here for more information)Sumikko Gurashi Rice Ball Mold  (Click here for more information)
Soy Wrappers  (Click here for more information)
Matcha Green Tea Powder (Click here for more information)
Sumikko Gurashi Chopsticks (Click here for more information)

Sumikko Gurashi Cup (Click here for more information)

Roasted Seaweed (Click here for more information)

Honey Smoked Salmon (Click here for more information)

Organic Soy Sauce (Click here for more information)

Japanese Sushi Rice (Click here for more information)

Japanese Mayo (Click here for more information)

Food Decorating Tongs/Tweezers (
Click here for more information)


Disclosure: uTry.it is a participant in the Amazon Services LLC Associates Program, an affiliate advertising program designed to provide a means for sites to earn advertising fees by advertising and linking to Amazon.com.


Friday, July 7, 2017

DIY Homemade Lavender and Rose Bath Bombs


My whole family love bath bombs!  They are a wonderful way to relax in the tub after a long day of work, school, cooking, or running around the house (that’s more of my activity, not my kids…in case you wonder!) If you haven’t tried them yet, I highly recommend that you give them a try. 


DIY Homemade Lavender and Rose Bath Bombs     http://uTry.it

The first time we tried them was during our family vacation.   We simply purchased a bag from the drug store while we were supposed to pick up a few bottled water for our hotel stay.  Boy oh boy, we were addicted to them right the way!    It’s smells wonderful, fun to use with the fizzing and make bath time so much more relaxing and enjoyable!  The only down side of the store bought bath bombs?  They could be quite expensive!

DIY Homemade Lavender and Rose Bath Bombs     http://uTry.it

That’s one of the main reason why I’m making my own now!  Besides saving money, I can also tailor these bath bombs to my own preferences of scents and ingredients!

DIY Homemade Lavender and Rose Bath Bombs     http://uTry.it

There are a few must-have ingredients and I’ll explained to you why.  First item on the list is baking soda. 

Baking Soda:

In addition to complementing the citrus acid, baking soda is also the key to create the fizzing reaction.  Kids went crazy (crazily happy and excited, I should add) when the fizzing started!   Which introduced to the second ingredient, citric acid.
(Get yours here: https://goo.gl/U4cAyF)


Citrus Acid:

Another requirement to generate the fizzing reaction is the citrus acid.  I usually get it online and I’ll list the link below for your convenience.  It’s so much fun to watch and feel the fizz in the tub!  I feel like I’m bathing in a tub of champagne!  The Citrus Acid also acts as a natural preservative.
(Get yours here: https://goo.gl/8wbV1a)


DIY Homemade Lavender and Rose Bath Bombs     http://uTry.it


Another ingredient for the recipe is corn starch. 


Corn Starch:

It yields a silky and smooth texture that you don’t get from other ingredients.  It also helps absorb the extra liquid in the bath bombs.  You can substitute with arrow root powder as well.  I usually have both in the kitchen as thicken agents in my cooking.
(Get your Corn Starch here: https://goo.gl/oXvfCo
(Get your Arrow Root Starch here: https://goo.gl/V7U379)


Epsom salt:

You can also use sea salt, or a mix of both as well.  It provides the minerals for your skin and help you relax and de-stressed! 
(Get your Epsom Salt here: https://goo.gl/b3XhjQ)
(Get your Sea Salt here: 
https://goo.gl/9cdcXX)


DIY Homemade Lavender and Rose Bath Bombs     http://uTry.it


Essential Oil and Coconut Oil:

Essential oil and coconut oil are also needed in this bath bomb recipe.  They help hydrate your skin and keep your skin feeling silky smooth and soft!  You can also use avocado oil or almond oil if you like them better.
(Get your Lavender Essential Oil here: https://goo.gl/viW48P)
(Get your Rose Essential Oil here: 
https://goo.gl/TvcbYJ)


DIY Homemade Lavender and Rose Bath Bombs     http://uTry.it


Witch Hazel Toner:

Last but not least, the witch hazel toner (you can use other alcohol-free toner as well).  If you don’t have it, water work just fine.  You do need the moisture in the mixture so that the bath bomb can come together for shaping.  The toner is also good for your skin and since I already have it available, it is what I used.  
(Get yours here: https://goo.gl/L3iV2b)

DIY Homemade Lavender and Rose Bath Bombs     http://uTry.it


Dried Lavender and Dried Rose Petals:


Besides looking gorgeous and adding a bit of natural colors to the bath bombs, they also add wonderful natural floral aromas into the bath bombs.
(Get your dried lavender here: https://goo.gl/nF3Koc)(Get your dried Rose tea buds here: https://goo.gl/qMpZrf)


Soap Coloring:

The soap coloring is pretty much optional.  I think they make the bath bomb look more fancy and perfect if you’re giving them as homemade gifts.  But please only use soap coloring and not food coloring.  You don’t want the bath bombs to stain your skin nor the bath tubs!
(Get yours here: https://goo.gl/uCL6Vo)


DIY Homemade Lavender and Rose Bath Bombs     http://uTry.it


That’s pretty much it!  I hope you’ll give this recipe a try and make some of these gorgeous bath bombs at home soon!  I’m sure you’ll love them! Please watch the video tutorial on the step by step instructions.  They are so much fun and so easy to make as well!


Tools and Ingredients Used:
Baking Soda (Click here for more information)
Citrus Acid
 (Click here for more information)
Corn Starch
 (Click here for more information)
Arrow Root powder
 (Click here for more information)
Lavender Epsom Salt
 (Click here for more information)
Sea Salt
 (Click here for more information)
Lavender Essential oil
 (Click here for more information)
Rose Essential Oil
 (Click here for more information)
Soap coloring
 (Click here for more information)
Witch Hazel
 (Click here for more information)
Bath Bomb Mold
 (Click here for more information)
Dried Lavender
 (Click here for more information)
Dried Rose Tea Buds
 (Click here for more information)
Small Spray Bottles
 (Click here for more information)
Small Funnel
 (Click here for more information)
Wilton Icing Flowers
 (Click here for more information)
Rose Shaped Silicone Mold
 (Click here for more information)


Disclosure: uTry.it is a participant in the Amazon Services LLC Associates Program, an affiliate advertising program designed to provide a means for sites to earn advertising fees by advertising and linking to Amazon.com.

Saturday, June 24, 2017

How to Make Unicorn Poop Rainbow Sour Lemon Meringue Cookies 檸檬彩虹蛋白曲奇:


Are you ready for another magical and whimsical recipe?  A recipe that involves a mysterious, fascinating, and imaginary create!  Yes, I'm talking about the Unicorn! After all, everything associated with the Unicorn has been so gorgeous and adorable, even with its byproduct such as... its poop!?

How to Make Unicorn Poop Rainbow Sour Lemon Meringue Cookies 檸檬彩虹蛋白曲奇 with all natural coloring.   http://uTry.it

Sorry, I just couldn’t help it!  I had so much fun making these Sour Lemon Meringue Cookies with my Little Girl.  We were laughing, joking, and goofing around in the kitchen as we bake and enjoy each other's company…and these cookies, of course!

How to Make Unicorn Poop Rainbow Sour Lemon Meringue Cookies 檸檬彩虹蛋白曲奇 with all natural coloring.   http://uTry.it

If you haven’t watched my video tutorial yet, you’ve got to check it out.  I guaranteed that you won’t be disappointed! I’ll show you step by step procedures on how to create the perfect rainbow swirls that shaped these cookies.  They are actually easier than you think.  Plus, you’ll get my tips and secret on how to make the perfect meringue cookies!        

How to Make Unicorn Poop Rainbow Sour Lemon Meringue Cookies 檸檬彩虹蛋白曲奇 with all natural coloring.   http://uTry.it

These rainbow colored Sour Lemon Meringue Cookies are made from all natural food coloring deprived from fruit and vegetables (I’ll link my food coloring tutorials below this post).  If you don’t have the time to make your own coloring, I’ve found out that my local health-food store/supermarket do carry some all natural coloring options.  I’ll list the product links below this post so that you can check them out as well. 

How to Make Unicorn Poop Rainbow Sour Lemon Meringue Cookies 檸檬彩虹蛋白曲奇 with all natural coloring.   http://uTry.it

If you’ve baked meringue cookies before, you know that they don’t like moisture!  So, we bake them at low temperature for a long time.  Plus, we need to be careful on the flavoring option as well.  Since I made these in lemon flavor, I use lemon zest to give these cookies the refreshing lemony aroma.  But for the tartness, I used citrus acid (which is really sour and in powder form) instead of fresh lemon juice.  That way, I won’t be adding too much moisture into the batter. 

How to Make Unicorn Poop Rainbow Sour Lemon Meringue Cookies 檸檬彩虹蛋白曲奇 with all natural coloring.   http://uTry.it

These cookies are so light, crispy, and packed with lemony aroma.  The sweetness and tartness is perfectly balanced!  Give them a try and you’ll fall in love with them.

How to Make Unicorn Poop Rainbow Sour Lemon Meringue Cookies 檸檬彩虹蛋白曲奇 with all natural coloring.   http://uTry.it


I hope you enjoyed today’s post and recipe!  Remember, Eat, Drink, and Be Happy!  Stay tuned for more fun recipe next week!


Ingredients and Tools Used:
All Natural Food Coloring (Click here for more information)
Wilton 1 A Round piping tip (Click here for more information)
Citrus Acid (Click here for more information)
Edible Gold Leaves (Click here for more information)

Disposable Piping Bag (Click here for more information)
Silver Dragees (
Click here for more information)
Freeze Dried Strawberry
(Click here for more information)
S
tand Mixer (Click here for more information)
Cooling Racks (
Click here for more information)
Corn Starch (粟粉) (
Click here for more information)
Edible Gold Stars (
Click here for more information)
Baking Sheets (
Click here for more information)
Silpat (
Click here for more information)

How to Make All Natural Blue Food Coloring Tutorial:
https://goo.gl/8nT8Sm

How to Make All Natural Red Food Coloring Tutorial:
https://goo.gl/zTcc2h

Disclosure: uTry.it is a participant in the Amazon Services LLC Associates Program, an affiliate advertising program designed to provide a means for sites to earn advertising fees by advertising and linking to Amazon.com.

Friday, February 17, 2017

Tonkatsu- Japanese Style Pork Cutlets (日式吉列豬扒):


Tonkatsu - Japanese Style Pork Cutlets (日式吉列豬扒) is one of my family’s favorite savory dish.  We used to order it a lot when we dine out.  The key word here is “used to”!  After trying my recipe at home, you can enjoy this dish at home whenever you feel like it! Why order out when you can make it tastier at home, right?

Tonkatsu- Japanese Style Pork Cutlets (日式吉列豬扒)   http://uTry.it

Tonkatsu is a pork cutlet that’s breaded with Japanese breadcrumbs (Panko) and deep-fried to golden brown perfection.  It’s quite irresistible because the flavor is wonderful.  The crust is super crispy and the pork chop inside is tender and juicy.  Instead of deep-frying the cutlets, I usually opt for a shallow fry as a healthier version.  If you haven’t watch my video tutorial, be sure to check it out because I’ll show you the tips and tricks on creating this amazingly crispy crust that stays put during the frying process.

Tonkatsu- Japanese Style Pork Cutlets (日式吉列豬扒)   http://uTry.it

To keep the pork chops juicy and tender, I used a half brining and half marinating method.  It’s important to let the pork chops to marinate overnight.  That way, they have a chance to absorb the moisture and flavors from the marinate.  You’ll be amazed by how juicy and tender your pork chops turn out!  Give this a try and you won’t be disappointed!  The list of ingredients for the marinate may seems quite long, but they are all pretty basic pantry ingredients for Asian cooking.  I’ll list the link of the products that I used at the end of the post for your reference.

Tonkatsu- Japanese Style Pork Cutlets (日式吉列豬扒)   http://uTry.it

I hope you enjoy today’s video and recipe.  Give it a try soon, I’m sure you and your family will love this dish as much as my family does!  Thank you for stopping by and have a wonderful week!

Tonkatsu- Japanese Style Pork Cutlets (日式吉列豬扒)   http://uTry.it


Ingredients and Tools used: 
Homemade Orange Marmalade:
https://goo.gl/lRjIra
Tonkatsu Sauce (Click here for more information)
Light Soy Sauce
 (Click here for more information)
ShaoXing Cooking Wine (Click here for more information)
Sesame Oil
 (Click here for more information)
Grapeseed Oil
 (Click here for more information)
Chicken bouillon powder 
 (Click here for more information)
White pepper powder
 (Click here for more information)
Corn starch
 (Click here for more information)
Zojirushi Rice Cooker (Click here for more information)
Cooling Racks (Click here for more information)
Baking Sheets
 (Click here for more information)
Chicken Broth
 (Click here for more information)
White Pepper Powder
 (Click here for more information)
Japanese Panko Bread Crumbs
 (Click here for more information)
Heavy Duty Copper Pan (Click here for more information)


Friday, January 13, 2017

Hello Kitty Red Bean Dumplings (凱蒂貓紅豆湯丸) for Chinese New Year


Do you enjoy Asian Style dessert dumplings (湯丸)?  Eating dessert dumplings is one of the “must-have” Chinese New Year tradition as the pronunciation of dumplings in Chinese represent the whole of the family, or the united of the family (團圓).  Many traditional Chinese New Year dishes represent good luck or some types of well wishes.  That’s because we all wanted to kick off the new year with a great start, don’t we?   

Hello Kitty Red Bean Dumplings (凱蒂貓紅豆湯丸) for Chinese New Year  http://uTry.it

As I mentioned in my previous blog post, I want to pass on as many of the Chinese cultures and traditions to my kids as possible.  One of my favorite ways to pass on the traditions is through food.  To get them more interested, I often get them into the kitchen to cook with me.  As I was testing recipes last week, My Baby Girl joined me in the kitchen to create these adorable Hello Kitty Dumplings together.  If you follow me on Instagram, you might have seen my “recipe testing video”.   You might have noticed that the Kitties on the Instagram video had much bigger noses, and they looked more like piggies!  So, I made some adjustments for this week’s video tutorial to reclaim Kitty’s beauty!   

Hello Kitty Red Bean Dumplings (凱蒂貓紅豆湯丸) for Chinese New Year  http://uTry.it

These dumplings turned out so adorable and delicious.  It was so much fun to make them together with my Kids.  If you haven’t done so, check out the video tutorial above for the step-by-step instructions.  In respond to many of my Dear Readers’ requests, I did a voice over on this video instructions instead of the usual captions-only format.  But by all mean, click on the “cc” button on lower right corner of the YouTube video for Close Captioning if you prefer.   

Hello Kitty Red Bean Dumplings (凱蒂貓紅豆湯丸) for Chinese New Year  http://uTry.it

In my video tutorial, I included a few tips to make these cute dumplings.  So, be sure to turn up the volume and follow along! 

Hello Kitty Red Bean Dumplings (凱蒂貓紅豆湯丸) for Chinese New Year  http://uTry.it

Last year, I shared with you the Black Sesame Dumplings with Ginger Syrup post.  (Please click here to get the recipe).  For these Hello Kitty Dumplings, I filled some with my homemade Red Bean Paste and left the remaining dumplings as plain.  I’ll post the homemade Red Bean Paste recipe below for your reference.  Or, you can also use canned/ready-made red bean paste from the Asian Supermarkets. 

Hello Kitty Red Bean Dumplings (凱蒂貓紅豆湯丸) for Chinese New Year  http://uTry.it

I hope you enjoy today’s recipe and tutorial, stay tuned for more fun Chinese New Year Recipe next week!

Tools and Ingredients used:
Glutinous Rice Flour (Click here for more information)
Food Decorating Tongs/Tweezers (
Click here for more information)
Organic Dried Red Beans (
Click here for more information)
Ready Made Red Bean Filling (
Click here for more information)
Wilton Edible Candy Marker (
Click here for more information)


Friday, December 23, 2016

Christmas Breakfast: Santa Claus and Snowman Pancakes


Christmas truly is one of my family’s favorite holidays.  I love that we get to share more precious time and create new memories together.  To make this holiday more magical, try to make these Christmas Breakfast for your Kids.  They will be waking up with big smiles on their faces at the dining table, I guaranteed it!  

Christmas Breakfast: Santa Claus and Snowman Pancakes  http://uTry.it

Check out my video tutorial above and you’ll see how easy it is to prepare this Christmas Breakfast.  Instead of decorating the pancakes yourself, you can also let the Kiddos decorate them on their own.  These festive and adorable Christmas Breakfast are made with Classic Buttermilk Pancakes that are truly scrumptious for any day breakfast.  With just a few more ingredients, such as strawberries, whipped cream, melted chocolate and chocolate chips, you can transform these delicious pancakes into Santa Claus and Snowman Pancakes as a special Christmas Breakfast!

Christmas Breakfast: Santa Claus and Snowman Pancakes  http://uTry.it

Gathering around the dining table to enjoy meals together is definitely one of my favorite things to do with my family.  Happiness is actually quite simply.  I guess the key is to appreciate the little things that we have, and remember not to take it for granted.  How about you?  What are some of your favorite things that you enjoy?  Please share in the comment below.  I can’t wait to hear from you!

Christmas Breakfast: Santa Claus and Snowman Pancakes  http://uTry.it

Wish you all a blessed and magical Christmas!  Stay warm and hope you’ll enjoy a wonderful time with your family and loved ones!  Stay tuned for more delicious recipe next week to ring in the New Year!  Merry Christmas!
 
Christmas Breakfast: Santa Claus and Snowman Pancakes  http://uTry.it


Saturday, December 3, 2016

How to Make Christmas Wreath and Christmas Tree Shortbread Cookies


How’s your holiday shopping so far?  I’m just glad that I did most of mine online these days.  I simply do not like the shopping malls' crowded parking lot nor the long lines at the check outs!  Are you the same?  Or do you think that’s part of the fun from holiday shopping?  Fortunately, some of my holiday gifts are going to be homemade edible gifts and DIYs that don’t require a trip to the mall. Gifts such as these adorable Classic Shortbread Cookies.      

Classic Shortbread Cookies – Christmas Wreath and Christmas Tree  http://uTry.it

As you can see, I decorated them as Christmas Wreaths and Christmas Trees for a more festive look.  I’ll list the cookie cutters and other tools that I used in this recipe, at the bottom of the post for your convenience.  These cookies are quite simple to make and lots of fun to decorate.  My kids had a blast decorating and eating their own creations. 

Classic Shortbread Cookies – Christmas Wreath and Christmas Tree  http://uTry.it

If you haven’t done so, please check out my video tutorial above.  You’ll see how easy it is to make these adorable cookies.  Best of all, I mostly just used chopped pistachios and dried cranberries for the decorations.  I simply love these natural and festive colors for the holidays!  Not to mention, they add some wonderful flavors and textures to the cookies.

Classic Shortbread Cookies – Christmas Wreath and Christmas Tree  http://uTry.it

There are only a few simple ingredients for this classic shortbread cookie recipe.  The key to a wonderful shortbread cookie is the butter!  Therefore, please use the best quality of butter that you can get your hands on.  They make a huge difference in the end product.  Also for your reference, you will find the butter that I trust and love... right below this post.

Classic Shortbread Cookies – Christmas Wreath and Christmas Tree  http://uTry.it

Baking and decorating cookies have became one of our holiday traditions.  We also bake and build gingerbread houses together.  If you haven’t check out my classic gingerbread cookie recipe from last week, simple click here.  You sure don’t want to miss that one!  What are some of your holiday traditions?  Share in the comment session below.  I can’t wait to hear from you. 

Classic Shortbread Cookies – Christmas Wreath and Christmas Tree  http://uTry.it

I have been baking these Classic Shortbread Cookies all year round and not just for the holidays because they are so delicious.  They are super buttery and a little crunchy, thanks to the pistachio nuts on top.  The pistachio adds a nice and subtle nutty flavor to these cookies.  Definitely a fun treat for holiday and everyday afternoon tea.  I hope you’ll give this recipe a try soon and add it to your holiday baking list.  Stay tuned for more festive holiday treats next week!  

Classic Shortbread Cookies – Christmas Wreath and Christmas Tree  http://uTry.it


Tools and Ingredients Used:
Scalloped Edges Round Cookie Cutter Set (Click here for more information)
Holiday Mini Cookie Cutter Set (
Click here for more information)
Star Shaped Sprinkles
(Click here for more information)
Silver Dragees (
Click here for more information)
Candy Cane Sprinkles (
Click here for more information)
Red Heart Sprinkle for Bowtie (
Click here for more information)
Multi Color Dragees as Ornamens (
Click here for more information)
Wilton #2 Small Round Piping Tip for Icing (
Click here for more information)
Silpat (
Click here for more information)
Cooling Racks (
Click here for more information)
Baking Sheets
(Click here for more information)
Food Decorating Tongs/Tweezers (
Click here for more information)
Meringue Powder (
Click here for more information)
Organic Vanilla Extract (
Click here for more information)
Kerrygold Butter (
Click here for more information)
Pistachios (
Click here for more information)
Dried Cranberries (
Click here for more information)
Powdered Sugar (
Click here for more information)

Current Giveaways:
1) Perfect Gift Wrapping Ideas Craft Book and Wrapping Paper (Open till December 4th, 2016)

2) Origami Zoo Kit (Open till December 18th, 2016)