Showing posts with label Arts and Crafts. Show all posts

Saturday, August 15, 2015

Ultimate Origami for Beginners Kit Review and Giveaway


Ultimate Origami for Beginners Kit Review and Giveaway

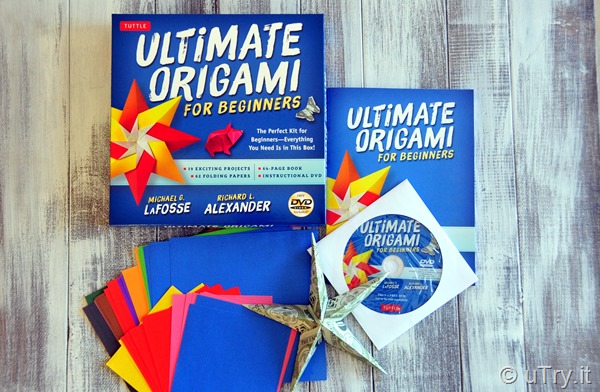
My kids and I had so much fun this summer.  Besides travelling, cooking a storm in the kitchen, visiting the parks and beaches, we also had a blast creating different origami together.  It’s definitely a fun art and craft activity to spend time with the kids.  If you’re new to origami, I have the perfect recommendation for you:  The Ultimate Origami for Beginners Kit!  

It has everything that you needed!  In this Ultimate Origami for Beginners Kit, there are 19 exciting projects to choose from, 64 pages instructional booklet with pictures, 62 sheets of colorful folding paper, and a step-by-step DVD with video instructions, all in one kit!  I know you’re going to love this kit, as much as I do.  Check out the video below for more details on the kit.


Wonderful, isn’t it?  You can purchase your own Ultimate Origami for Beginners Kit by clicking here.  Or, you can try your luck in entering this giveaway, courtesy of Tuttle Publishing.


Here are the details on how to enter.
One lucky uTry.it reader (worldwide) will win a copy of “The Ultimate Origami for Beginners Kit”.

To enter, simply
leave a comment on this post and tell me if you’ve try origami before.  Deadline to enter is August 31, 2015 by mid-night PST.  Winner will be selected through Random.org and announce shortly after the giveaway is closed.


This giveaway is currently closed.  Thank you all who participated.


For extra entries, do any or all of the following (leave a separate comment for each extra entry):
1)  Add me to your Google+ circle here
2) "Like" uTry.it's Facebook Page, click here.
3) Pin a picture from this post onto Pinterest.
4) Share this giveaway on Facebook (with a link back to this post please)
5) Share this giveaway on Twitter (with a link back to this post please)
That’s all and Good Luck everyone!


Disclaimer:  I received a copy of “The Ultimate Origami for Beginners Kit” for the purpose of this review and I was not compensated in any way to write this post.  All comments and opinions are 100% my own.

Wednesday, October 30, 2013

Pumpkin Carving and Happy Halloween!


Pumpkin Carving and Happy Halloween!

Boo!!!  Happy Halloween!!!  Do you carve pumpkins with your kids?  If not, you might want to give it a try next time.  I think it’s a really fun activity to do with the kids when the pumpkins are so bountiful around this time of the year.  Of course, I left this job for Daddy, as I’m not quite a crafty person.  See, they did a wonderful job, didn't they?

Look at those serious faces in the picture below.  Seemed like they were expecting something unusual, weird, scary, creepy or even horrifying inside that pumpkin!  Guess what they found inside……pumpkin seeds, of course! hahahaha….

Pumpkin Carving and Happy Halloween!


I love it when the carved pumpkins were lit.  So festive.  Maybe a little creepy? Cute? Beautiful? I’ll let you decide.  Wish you all a fun and safe Halloween!  

Pumpkin Carving and Happy Halloween!

Friday, December 14, 2012

It Starts to Feel Like Christmas!


065edited

Last night, we finally put the Christmas tree up.  Yay!  It really starts to feel more like Christmas when the tree is up; the festive lights are on and the presents piling high under the tree.  I thought we have the tree up a bit later than last year.  But guess what, it was about the same day as last year!  I couldn’t believe it until I went back to read last year’s post.

029edited

My Little Gentleman and Baby Girl helped in decorating the tree.  If you remember the post from last year, my Baby Girl still needed help in hanging the ornaments.  This year, she insisted to do it all on her own.  I have to say, they both did a wonderful job.  Won’t you agree?  My kids are really growing up. 

025edited

Here’s the “night view” of the tree.  Have you put up your tree yet?  If not, I think it’s about time. 

052edited


Friendly Reminder:  If you haven’t enter the OXO giveaway, here’s the link.  Deadline to enter is December 18th, 2012.  Good luck everyone!

Monday, November 19, 2012

Happy Thanksgiving—Turkey for Dessert, anyone?


098edited

Turkey for dessert, anyone?  I don’t see why not if they are as charming and sweet as these Oreo Turkeys!  I can’t believe there are only a few days left before Thanksgiving.  If you haven’t take the real turkey out of your freezer (or get one from the market’s freezer), it’s about time to do so.  If your recipe has a long marinating/brining process, it could be already too late.  Opps…if that’s the case, don't panic! Go get yourself a pack of Oreo, some mini Reese's and confetti's...stay calm and make these sweet turkeys instead!  You won’t regret it. I promise!  And for the Thanksgiving entree, get a honey glazed ham instead.  I'm sure it'll be just as delicious.  

045edited

When I was making these Oreo Turkeys with my kids the other day, we had a blast.  It’s always warm and sweet spending time with my kids in the kitchen.  Not to mention, we can sneak a few cookies and candies along the "production line"!  When the “glue” is actually sweet and tasty, that’s a big plus too.  When I’m in the kitchen with my kids, the list of “What I’m grateful for this year…” simply goes on and on.  I feel blessed to have my kids around me, that they are healthy and happy kids. 

075edited

I probably don’t say or show it enough, how grateful I am for my lovely husband.  He works hard and studies hard so that the kids and I can play hard.  Smile with tongue out (Sorry, can’t help it, Honey.)  Seriously, I’m really thankful for everything that he does for the family, big or small.  He’s always so thoughtful, supportive, and caring.  What more can a wife ask for, right?  He’s really the perfect role model for the kids.   I’m truly grateful for that because sometimes I act like a kid myself. 

I’m grateful for my Parents and In-Laws, they are always loving, generous, caring, and supportive.  I’m grateful for my dear friends.  Although we don’t see each other often, some even live thousands of miles away, but I know I can count on them to be there whenever I need them.  I’m truly thankful for that. 

I’m thankful for you, my readers and blog friends around the world.  Without you, your supports, comments, feedback and trust (to try my recipes), uTry.it probably won’t exist.  I’m truly thankful for that.

085edited

I’m grateful that you’re still here reading my post and didn't click away.  Winking smile I’m truly thankful for that!  As a way to say thank you, let me show you how to make these Oreo Turkeys.  First, gather all your ingredients.  Some Oreo for the base and rear end, Mini Reese’s as the body, Whoppers for the head, Cookie Icing for the eyes and act as “glue”, Candy Corn as the beak and feathers, tiny black confetti for the eye balls, pink Nerds as the waddle and some melted chocolate as “glue”.

005edited

Here’s the pictorial on how to get this turkey done without putting it into the oven.

1) Have all your ingredients ready, unwrap from plastic bags/wrapping papers, etc.

2) Split the Oreo open, gently press 5 candy corns to the edges (as feather).  Add some cookie icing on the candy corns tips and cover back the other side of the Oreo cookie, set aside.

3) Trim one side of the mini Reese’s as shown (for its body).

4) Take another Oreo cookie and smear a little bit melted chocolate on top (for base).

5) Take the Oreo with melted chocolate to a vertical position and place the “feathered” Oreo on the side.  Smear some melted chocolate on the cut side and flat side of the Reese’s and place on top of the “feathered” Oreo.  Slightly dip the Whopper into the melted chocolate and place on top of the Reese’s (as the head).

6) Place a small amount of cookie icing on top of the Whopper on both left and right side (as the eyes).  Top with black confetti as eye balls.  Cut the tip off a candy corn, dip the cut side of the candy corn tip in melted chocolate and place below the eyes (as the beak).  Dip the pink Nerd in melted chocolate and place below the beak (as waddle).  Leave the turkeys alone until the chocolate and icing are firmed up before transferring or packing.

Pictorial A

That’s it.  Pretty simple, right?  Oh yeah…I’m packaging these Oreo Turkeys and they will be delivered to some happy tummies.  Last but not least, I’m submitting this post to Kitchen-PLAY.  They’re having some fun contest and giveaway.  Check it out or join in for some fun.

109edited

So, what are you thankful for this year?  Please share because I always love to hear from you.  Take care, have a blessed and Happy Thanksgiving everyone!

069edited

Friday, May 4, 2012

Meyer Lemon Sugar Scrub—Homemade Gift for Mother’s Day


074edited

Before I post another recipe for Mother’s Day, I want to share a quick Homemade gift idea that you’ll love.  Meyer Lemon Sugar Scrub!  Who wouldn’t want to be pampered and have smooth and silky skin?  Plus, smelling amazing after a massage?  Yup, you can achieve all of the above with this budget friendly homemade gift.  Winking smile  This super simple Meyer Lemon Sugar Scrub is the answer!

021edited

Honestly, I love receiving homemade gift because it just shows how much someone cares to take the time and love to make me something from scratch.  This Meyer Lemon Sugar Scrub certainly is luscious, yet super simple to put together.  I made this sugar scrub for a few friends, who just became new Moms not long ago and they adore this scrub.  With this sugar scrub, they don't have to head to a salon, but still can feel beautiful and pamper themselves at home.

012edited

The ingredients in the scrub are super simple as well.  They are Meyer Lemon zest, sugar, organic virgin coconut oil, and organic extra virgin olive oil.  That’s all!  It smelled wonderful and amazing as I was putting it together.  Please try to refrain yourself from eating a spoonful of it during the process!  I know, it’s very tempting.  Yes, it’s completely edible, but I don’t recommend it.  Unless….unless….never mind.  Smile with tongue out

038edited

To use, simply take a spoonful (or more) of the scrub, gently massage it on your hands, your feet, elbows, or wherever your skin feels rough and needs some love.  Simply rinse it off with lukewarm water afterwards.  You’ll have the most amazing, soft, and silky skin after the massage.  Please consider doubling or even tripling the recipe if you’re making more than one jar.  It’ll be nice to make some extra for yourself to enjoy as well.  Remember, presentation counts.  So, try to decorate it a bit by adding a nice label and line a tissue paper/cloth with elegant prints on the lid.  I love storing the scrub in the mason jars.  They are so convenience.  Smile 

068edited


Tools I used in this post:
16 oz Mason Jars: Click here to see product link
Paper Labels or create your own with craft punch like this:
Click here for product link
Yellow Silk Rose for decoration: Click here for product link
Pretty Floral Wrapping Paper: Click here for product link

Microplane Zester for the recipe: Click here for product link