Sunday, October 14, 2012

Classic Pesto—With a Secret Ingredient


Nikon 116edited

I adore pesto.  I think it’s a sauce that I love so much, but haven’t really showcased it on my blog, as much as I should have been.  Pesto is a sauce that originated in northern Italy.  The traditional ingredients of pesto consist of garlic, basil, pine nuts, olive oil and Parmigiano Reggiano (Parmesan Cheese).  It’s such a versatile sauce that you can put it on…well, almost anything that your heart desires.  I've been making pesto for a while and use it on many of my recipes.  Those recipes are rather simple ones and that’s the main reason why I haven’t post them on my blog.  But I think it’s about time to do so.  And I have a secret.  A secret ingredient to keep your pesto vibrantly green and pretty.

Nikon 092edited

Yup, the mighty lemon is my secret ingredient.  The acid from the lemon not only adds freshness and flavor to your pesto, but also keeping it bright green instead of turning brown with the oxidation.  Try it, you’ll be amazed how beautiful your pesto can stay bright green in your fridge even after a week.  That is, if they even last that long in there without heading straight to your dishes and happy tummies. 

Nikon 106edited

It’s super simple to make.  So, try this recipe out instead of buying a jar from the store the next time you want to add pesto to your recipes.  You’re going to love the homemade version.  Below is a list of things you can do with your pesto.


Pesto Serving Suggestions:

1) Spread on toasts and sandwiches, hm…yum!
2) Toss with hot pasta, scrumptious!
3) Wrap in rolls and buns, stay tuned on the future blog post.  You don’t want to miss this one.
4) Use as a sauce on pizza…can’t wait to make this!
5) Top a dollop on hot grilled steak, fish or chicken.
6) Marinade shrimps or chicken before roasting or grilling.
7) Use as a dressing on salad.
8) Dollop on a bowl of hot soup to add more flavors.
9) Fill your omelet with pesto, mushroom, cheese, etc. You’re very welcome!
10) Add some to bake with your favorite hot dips.


Tuesday, October 9, 2012

Chili and Garlic Pickled Baby Cucumber—With Pictorial


Nikon 063edited

The first time I had these irresistible pickled cucumbers was at a Taiwanese dumpling restaurant in the San Gabriel Valley area of L.A.  This Taiwanese restaurant offers all kinds of dumplings and noodles, they also have many small plates for you to choose from, to go with your dumplings and noodles.  Some examples of the small plates items are soy sauce marinated fried Tofu, pickled cabbage, seaweed salad, jelly fish salad (another of my favorites too), and herbs marinated pig ears, etc.  The pig ears are for real, I’m not trying to mess with your minds here.  Chinese (or most Chinese) eat every single part of an animal so nothing goes to waste!  These pickled cucumbers were one of the choices from the long list of small plates items and I always get them every time when I dine there. 

Nikon 012edited

Since I moved away from that area long ago, I've been making my own pickled cucumbers.  They are the best appetizer/small plates item before a meal.  These Chili and Garlic Pickled Baby Cucumbers are so refreshing.  They really can increase your appetite. Isn't what an appetizer supposed to do?  To get your appetite up instead of filling you up before the main course?  Plus, they are super simple to make.  Instead of regular cucumber, I love to use the baby ones.  They are super tender and crunchy.  Best of all, you can eat the whole thing, skin, seeds and all (can’t you tell I’m a Chinese?)!  You don’t have to peel the skin nor scrape the seeds inside as in regular cucumbers.   In other words, perfect for time saving and lazy people, like me.

Before and After

Here’s what I did (see pictorial below).

1) Wash, drain and pat dry the cucumber with paper towel.  Cut them in half so they are in 2-inch length.

2) Split them in half again into “half circles”

3) Cut them into 1/2-by-1/2-by 2-inch chunks by cutting the “half circles” in half again.   (Gees, I’m so glad I took pictures of the process.) 

4) In a medium mixing bowl, all the rice vinegar in the water.

Pictorial A

5) Add the garlic, sugar, salt, toasted sesame oil

6) Last but not least, the Sambal chili sauce and stir until all sugar dissolved.

7) I like to line the cucumbers chunks into the non-reactive (glass) pickling jars neatly so I can fit as many as I could.

8) Fill the jars with the pickling liquid until the cucumbers are completely submerge in the liquid.  If there’s any garlic or chili sitting on the bottom of the pickling liquid, add those into the jars too (don’t waste anything!)  Close the lid and place the jars in the refrigerator for at least 4 hours before serving, preferably overnight.  Your patient will be rewarded!

Pictorial B

Simple enough, right?  They totally are.  They are super crunchy, tangy, slightly sweet with a hint of spiciness.  The hint of toasted sesame oil adds a little more savory flavor into this refreshing treat.  If you like it more spicy, feel free to add a little more chili sauce.  Just keep in mind the flavor will intensify the longer they are pickled, so, don’t add too much during the tasting.  Stay cool... just like the cucumbers and enjoy the recipe.  (sorry I can’t help the cheesy closing line!)

Nikon 056edited


Wednesday, October 3, 2012

Spiced Up Apple Chips to Welcome Fall—With Pictorial


127edited

It’s officially Autumn/Fall according to the calendar.  Somehow, the temperature in L.A. refuses to reflect that.  I can’t believe we’re still having high 90s F temperatures as we step into October!  My AC and my electric bill need serious help.  HELP!

075edited

Although the temperature is still summer-like in L.A., I’m already in the mood for Fall.  At least, my palates say so.  I’m sure most of you who are reading this post already wearing some nice sweaters when going out, maybe having the softest blanket as you roll yourself up while watching your favorite TV series on the couch (one of my favorite things to do to relax before I have kids), or even a mug of hot apple cider in your hands to get the chill off.  Yeah?  Please just say yes because I can totally imagine myself doing just that in Fall and Winter!  The key word here is imagine! Or should I just say I wish I can do just that!

039edited

Before it’s cool enough for me to enjoy a cup of hot apple cider, fortunately, I have these Spiced Up Apple Chips!  They taste just like a cup of hot apple cider, in the form of chips without all the heat.  I can still taste the warmth from the spices on them.  Another great thing is that they are baked in the oven at 200F degree, which won’t warm up my kitchen that much.  Thank goodness! 

057edited

In these Spiced Up Apple Chips, I coated them with the spiced-up sugar before baking them.  While they were in the oven, I can smell the cinnamon and cardamom sugar caramelizing.  My whole house smelled amazing and probably was the sweetest and warmest smell that Fall can get.  Forget about the scented candles, all you need are Spiced Up Apple Chips in the oven and it’s all natural. 

079edited

In case if you’re not familiar with cardamom, here’s how they look (see picture below).  Those on the left are in whole pods and the one on the right are ground up ones.  Cardamom is a popular spice in Indian cuisines, both in desserts and in beverages.  It has a strong and unique taste, very aromatic and fragrance.  It’s slightly spicy, comparable to fresh ginger, and has a hint of lemony freshness.  It go so well with the warmth of the cinnamon.

011edited

Want to follow me to the kitchen to make these Spiced Up Apple Chips?  Let’s go.

1) Place the sugar, cinnamon, and ground cardamom in a shallow dish.  Stir until it’s well combined.

2) Slice the apples as thin as you can, about 1/8-inch.  Noticed in the picture I have a Gala apple and a Granny Smith?  I like it better with the Gala, the green apple is a bit too tart for my liking.  They still taste great, but I love the Gala better.

3) Remove the core with a small cookie cutter, cute right? And it’s so easy.  Unless you have the apple corer, use it before slicing the apple.  Gently pat the apple slices with a paper towel so they are dried up.  Somehow, I missed a picture of that.  I must be too excited for the next step!  

4) Drench the apple slices in the spiced sugar, shake of excess and place them on the silpat/parchment paper lined sheet pan in a single layer.  And bake them away.
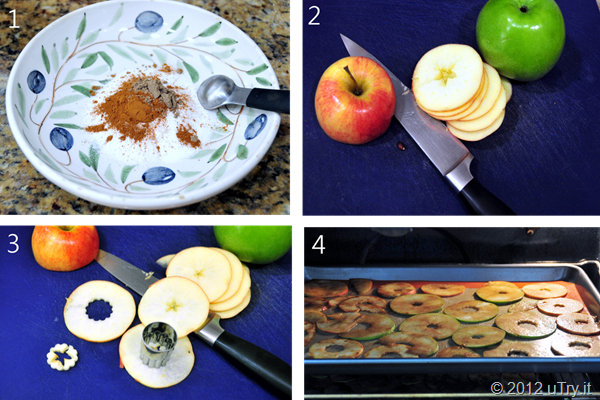
Pictorial

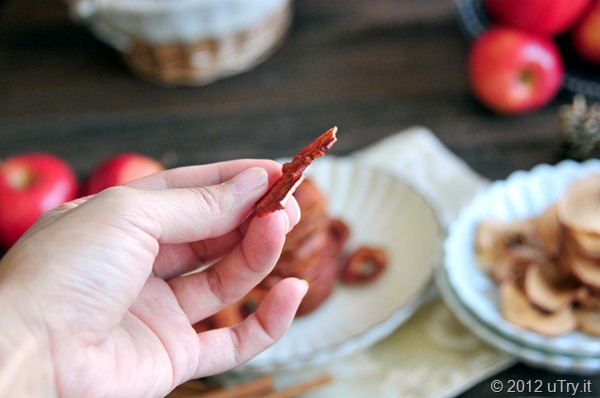
These Spiced Up Apple Chips are crispy and crunchy.  The perfect snack for Fall and Winter.  I love the warmth and sweetness from the cinnamon and the little hint of spiciness from the cardamom.  The caramelized sugar adds an additional crunch to these chips.  These are totally ADDICTIVE!  Did I say addictive?  Okay, you’re officially warned!

087edited

Time for another confession?  You bet.  Yes, you guess it right, I used to dislike cinnamon, a lot, when I was young.  It’s another ingredient that I grow to love and enjoy now.  I think the taste and fragrant of cinnamon reminds me of happy times with my good friends.  Friends I grew old with and shared many sweet memories.  Cinnamon reminds me of times when we were carefree, had some crazy fun time at the Theme Parks and enjoyed some cinnamon churros; Times we walked at the shopping mall until we couldn't walk anymore and sat down to share a cinnamon bun and a cup of coffee; Times when we didn't have to worry that the cinnamon bun will go straight to our behinds!  Those were the good old days.  That’s when I realized, I really love and enjoy cinnamon, after all.

150edited

But if you don’t like cinnamon, it’s okay too.  Noticed from the picture above that I have two different types of chips?  Those on the right are “naked” ones without the spiced coating.  For those, I simply sliced up the apples and baked them off.  And for the record, those plain chips are for my hubby.  Yeah, he’s still at the “growing” stage to enjoy cinnamon. 

159edited

I encourage you to try the spiced up version though.  The caramelized sugar just added a different type of crunch that you can’t get from the plain ones.  They are simply crisp, light, and packed with lost of spices and flavors.
175edited

Now, it’s time to get into the kitchen and make your own batch of Spiced Up Apple Chips.  I know you’re going to love them. 

129edited


Friday, September 28, 2012

Dark Chocolate Panna Cotta for Mid-Autumn Festival? Oh Yeah!


048edited

This Sunday, September 30th, would be the Mid-Autumn Festival.  The Mid-Autumn Festival is also known as the Moon Festival or 中秋節 in Chinese.   It’s a popular harvest festival celebrated by Chinese and Vietnamese, dating back over 3,000 years.  The Mid-Autumn Festival is held on the 15th day of the eighth month in the Chinese calendar, which is usually around late September or early October in the Gregorian calendar.   The moon is supposedly at its fullest and roundest. 

018edited

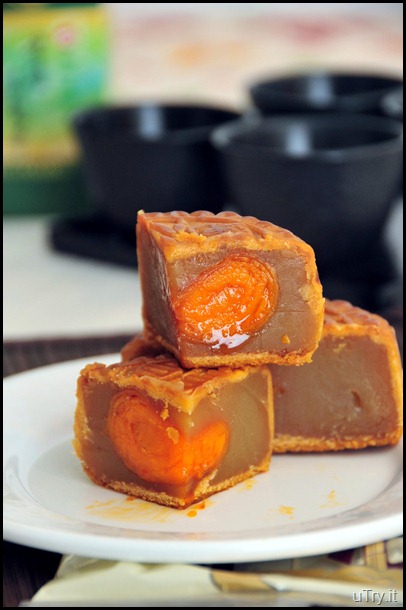
The traditional food of this festival is the mooncake, as shown in the picture right below.  The golden salty egg yolk in the mooncake resembles the full moon for the festival.  If you have been following my blog or happened to read this post here, you might know that I’m not a big fan of mooncake at all.

Moon Cakes

Even if I was a fan of mooncake, I haven’t master the art of baking a traditional mooncake, just yet.  Last year, I shared with you the recipe of Snow Skin Mooncakes as shown in the picture below, (you can read the post and recipe here), which are more trendy type of mooncakes with a different type of dough wrapped around different fillings compared to the traditional ones.  Those were pretty simple to make as long as you have the mold.

288edited

Since I don’t have a new mooncake recipe to share this year, I decided to make something similar to the shape of Iced-Skin Mooncakes I made last year, in a glance. They look similar in their shapes, but a LOT more decadent!  Aren’t they similar in their shapes?  No?  Not at all?  Never mind then.  Hm…..but who doesn’t like dark chocolate?  How about smooth, creamy, rich, and melt in your mouth kind of chocolate desserts? Are you convinced yet?

118edited

After a bite, I guaranteed you’ll be convinced!  I know my whole family was, that’s for sure.  We’re not going to miss the traditional mooncakes with these decadent Dark Chocolate Panna Cotta in our tummies this year! 
  174edited

I made mine in two different containers, the little glasses as shown in the picture below and with a silicone mold, such as this one, to create the mini ones shown in the picture above. 

043edited

With the small glasses, you can serve them in the glasses as is.  Maybe top with a dollop of whipped cream, shaved chocolate and a spring of mint.   You can also make these Panna Cotta in traditional ramekins and invert them onto a plate when ready to serve (see instructions on recipe below).

150edited

No matter what containers they are in, they would be your best dessert, ever!  I was hoping to do a little portion control and make the mini ones, for the kids.  But guess what, they ate 3 of those in a sitting!  haha…what a way to portion control.  Smile with tongue out I think 'portion control' just doesn’t work in my house. 

061edite

Recently, an incident happened with our extended family.  I’m not going into details here.  But it’s a wake up call, or a reminder for us to cherish our time together with family and loved ones!  As life is full of unexpected events and thing might not be the same tomorrow.  So, please, go give your love ones a big hug, a kiss, and tell them you love them. Not just on this special occasion, but everyday, hopefully!  Wish you all a wonderful Mid-Autumn Festival, 中秋節快樂 and 人月兩團圓.  Take care.

009edited

Update 9/30/2012:  We had a small celebration at home with lots of BBQ.  Yes, it’s still super hot in L.A. and it was perfect to have a little outdoor activities.  I was able to capture this gorgeous image tonight (see picture below) while having some fun time with my family.  Hope you had a wonderful weekend as well.

075edited


Monday, September 24, 2012

Egg Salad and Bacon Cups


099edited

As the Football season begin, I'd bet that many of you are looking for some easy and tasty appetizers and/or finger food that you can enjoy during the games.  Honestly, I’m not a fan of the games and probably have no idea of what’s going on at all.  My hubby is more into soccer than football, that’s probably why.  But, I do love appetizers and finger food... a lot (I guess that’s pretty obvious to many of you by now).  Anyway, these Egg Salad and Bacon Cups are easy to make and they are definitely something different than the usual game day food such as chicken wings, or meat balls.  Yet, they are very satisfying and tasty, especially with that crispy bacon on top. 

067edited

The “cups” are easy and fun to make as well.  Simply use a large flower shape cookie cutter to cut out some won ton wraps, place them on the “cups” of an up-side-down mini muffin pan.  I spray with a little cooking spray to make them crispy.  Bake them at 350 degree F for 7 to 8 minutes, or until golden brown.  Fill the cups with the Bacon and Egg Salad and that’s all.  Of course, you can fill these crispy won ton cups with whatever you fancy as well.

006edited

I have another tips for you today in making the egg salad.  Since we’re going to chop up the hard boil eggs anyway, I simply cut the cooked eggs in half, and spoon the egg out with a spoon instead of peeling them one by one.  It’s way faster and no mess at all! Amen.  And you’re very welcome, my friends. 

023edited

I hope you enjoy today’s recipe and tips.  Until next time, take care.

037edited