Thursday, December 31, 2015

Baked Mozzarella Cheese Sticks


Hope you had a wonderful Christmas celebration with your family.  Did Santa treated you well this year?  I certainly hope so.  My Brother hosted our family Christmas gathering at his place for the first time.  It was warm and wonderful.  We had a pot luck style party so we all brought a dish or two to share.  I’m really thankful to spend time with my family, to eat, talk, laugh, share, drink, and then eat some more.

Check out how to make Baked Mozzarella Cheese Sticks.  They are perfect everyday snack and make a wonderful appetizer to ring in the New Year!  http://uTry.it


As I promised last week, I’m sharing an appetizer recipe with you in case you’re hosting a party to ring in the New Year.  Let me present to you, Baked Mozzarella Cheese Sticks!  These are not just special occasion party food!  My kids love them so much that they asked me to make them every once in a while.  Best of all, they are super easy to prepare.  You can also prepare these ahead of time and keep them in the freezer right before your guests arrive.  They only take 10 minutes to bake and will turn out perfect every single time.  Have you checked out my video tutorial above?  You can even have a little competition to see whose melted cheese stretches the longest!


Check out how to make Baked Mozzarella Cheese Sticks.  They are perfect everyday snack and make a wonderful appetizer to ring in the New Year!  http://uTry.it


I hope you enjoy today’s video tutorial and recipe.  If you haven’t done so, please subscribe to my YouTube channel here.  You’ll be the first to know when I have new video tutorials published.  Last but not least, I want to wish you and your family a healthy and prosperous 2016 that is also filled with good food and great companies!  Please take care, until next time!  Cheers!

Check out how to make Baked Mozzarella Cheese Sticks.  They are perfect everyday snack and make a wonderful appetizer to ring in the New Year!  http://uTry.it


Tools and ingredients used:

Mozzarella String Cheese (Click here for more information)
Panko Bread Crumbs (Click here for more information)
Marinara Sauce (Click here for more information)
Organic Cooking Spray (Click here for more information)
Calphalon Nonstick 2-Piece Baking Sheet Set (Click her for more information)
Cooling Rack
 (Click here for more information
)


Thursday, December 24, 2015

Classic Bundt Cake--From Scratch


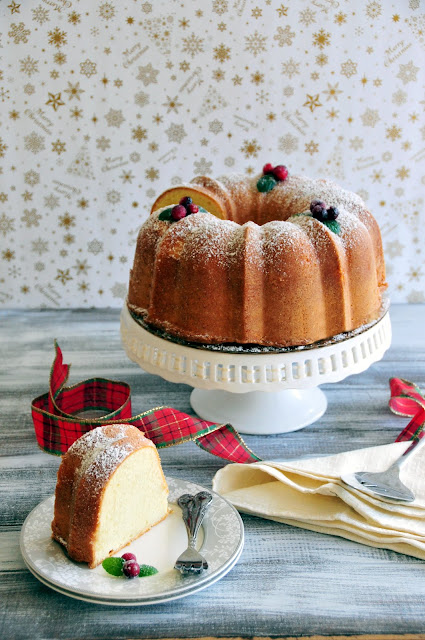
Did you have a chance to check out the Frosted Cranberries recipe and video tutorial from last week?  If not, simply click here to check it out.  Those cranberries make the most festive and gorgeous garnish on top of this Classic Bundy Cake?  Don't you agree?

Check out how to make this Classic Bundt Cake with step-by-step video tutorial.  It's gorgeous enough for your Holiday celebration, yet simple enough for everyday enjoyment.  http://uTry.it

It’s amazing how a few little edible gems and some fresh mint leaves can turn this simple cake into your best holiday dessert!  It’s gorgeous enough for the celebration, yet simple enough for everyday enjoyment.  Best of all, this cake can feed a village!  And yes, I make this cake quite often.  


Check out how to make this Classic Bundt Cake with step-by-step video tutorial.  It's gorgeous enough for your Holiday celebration, yet simple enough for everyday enjoyment.  http://uTry.it

This Classic Bundt Cake is wonderful when it’s freshly out of the oven.  You get the slightly crispy edges along with moist and tender interior.  But as I said, it’s a huge cake, and a small family like mine definitely won’t finish it all in a day, no matter how much we love cake!   The great news is, this cake freezes really well.   I usually let it completely cool to room temperature.  Slice the whole cake into desire thickness (usually around 1 1/2-inch).  Then, lay the slices flat into a tightly sealed freezer safe ziploc bag, and into the freezer they go.

Check out how to make this Classic Bundt Cake with step-by-step video tutorial.  It's gorgeous enough for your Holiday celebration, yet simple enough for everyday enjoyment.  http://uTry.it

 When I’m ready to serve them again, I take the desire number of slices I want.  Then, they go straight onto a non-stick saute pan.  You don’t need to grease the pan nor defrost the cake ahead of time.  Put on low heat and warm up the cake on both sides until the edges turn slightly golden brown and crispy.  You’ll get a nice crispy outer crust and super tender interior!  I say, they’re even better than the day it came fresh out of the oven!  Give this method a try and I’m sure you’ll love it too!

Check out how to make this Classic Bundt Cake with step-by-step video tutorial.  It's gorgeous enough for your Holiday celebration, yet simple enough for everyday enjoyment.  http://uTry.it

Last but not least, I want to wish you all a Blessed and wonderful Christmas!  It’s a wonderful time for most people, but please also remember that it could be hard for many out there who miss their loved ones.  Life is full of unexpected events.  So, cherish what you have and the people around you.   Give them an extra kiss, a tighter hug, and don’t forget to tell them that you love them!   
I’ll be back next week before the new year and share a fun appetizer/snack with you in case you’re throwing a party to ring-in the New Year!   Stay tuned!

Check out how to make this Classic Bundt Cake with step-by-step video tutorial.  It's gorgeous enough for your Holiday celebration, yet simple enough for everyday enjoyment.  http://uTry.it


Tools and ingredients used:

Classic 10-inch Bundt Cake Pan (click here for more information)
Mikasa Something Borrowed Desert Plates (Click here for more information)
10-Inch Ribbon Cake Stand (Click her for more information
)
Calphalon Nonstick 2-Piece Baking Sheet Set (Click her for more information)
KitchenAid Stand Mixer (Click here for more information)
Cake/Pie Server (Click here for more information)
Small Forks for Dessert (See similar product here)
Kerrygold Pure Unsalted Butter (Click here for more information)
Cooling Rack (Click here for more information)


Friday, December 18, 2015

Frosted Cranberries (Candied Cranberries)


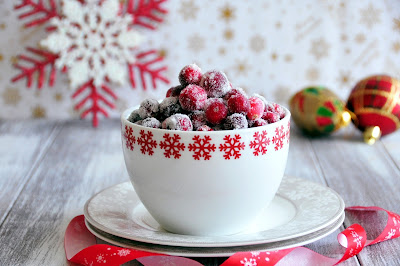
Are you ready for the holidays?  I can’t wait to spend some time with my family and friends.  We all need some time off, I guess.  Today, I wanted to share this easy recipe with you that will make your holiday treats a lot more festive! Say hello to these Frosted Cranberries!  They are gorgeous, festive, edible jewels, in my opinion.  Best of all, they are quite easy to make.  Be sure to check out my YouTube video above for the step-by-step instructions.   

How to make Frosted Cranberries (Candied Cranberries) with video tutorial. Festive holiday treats and garnisd.   http://uTry.it


These Frosted Cranberries are made with the fresh ones, not frozen.  If you’ve tried a fresh cranberry without anything else, you know they taste super sour.  That’s why you usually see them dried or turned into sauces.  For the same reason, these frosted edible jewels are perfect with the sugar coating!  The sweet and tart taste balance each other out really well.  I used some vanilla sugar in the soaking syrup (click here to see the vanilla sugar recipe).  Or, you can simply use regular sugar.


How to make Frosted Cranberries (Candied Cranberries) with video tutorial. Festive holiday treats and garnisd.   http://uTry.it

So besides eating these candied cranberries as is, you can also use them as a festive holiday garnish for your cakes and treats. 

How to make Frosted Cranberries (Candied Cranberries) with video tutorial. Festive holiday treats and garnisd.   http://uTry.it


They turn a regular bundt cake into a festive holiday centerpieces!  The Frosted Cranberries are also great in punches and cocktails!  I’ll post the Classic Bundt Cake (picture above) recipe on my next post.  So please stay tuned!

How to make Frosted Cranberries (Candied Cranberries) with video tutorial. Festive holiday treats and garnisd.   http://uTry.it


Thank you for stopping by today. I hope you enjoy the post and the recipe.  Until next time, please take care and stay warm!


How to make Frosted Cranberries (Candied Cranberries) with video tutorial. Festive holiday treats and garnisd.   http://uTry.it


Friday, December 11, 2015

Snowflakes Chocolate Peppermint Bark


When I was at the dentist earlier this week, the hygienist asked me if I’m ready for the holidays.  I immediately answered, “oh yes I am, more than ready!”  She was quite surprised and said, “oh, so you’ve finished all your holidays shopping?”  I paused for a few seconds and said I haven’t even started yet!  I guess I’m mentally ready for the holiday and time off to hang out with my family.  But the reality is that majority of people would associate the holidays with gifts and presents!  I can’t blame them though, especially these days the holiday is pretty much commercialized.     

Check out how to make these festive Snowflakes Chocolate Peppermint Barks with video tutorial.  http://uTry.it

It’s true that I still haven’t done my holiday shopping yet.  Am I procrastinating?  Maybe.   Laziness is also part of it, too.  Knowing that I can purchase pretty much anything online these days is another factor.  Although I might have been influenced by something that I read recently.  I don’t recall the exact wording but it means something like this, “I have the most because I needed the least.”  That really got me into thinking twice over my priorities. 

Check out how to make these festive Snowflakes Chocolate Peppermint Barks with video tutorial.  http://uTry.it

Will my kids still get gifts from me and Santa this year?  Oh yes they will!  But I guess the gifts will be practical or educational ones, rather than “luxury” gifts.  After all, time spend together as a family is way better than anything that money can buy!  It’s so true that the most precious things in life are usually free, such as love, family, friendship, health, etc.  So, don’t get stressed out this holiday!  Simply enjoy the time you have with your family and loved ones.  But just in case that you are already stressed out, check out this Snowflakes Chocolate Peppermint Bark video at the YouTube link above and I have a tip for you to release some stress!

Check out how to make these festive Snowflakes Chocolate Peppermint Barks with video tutorial.  http://uTry.it

Back to these Snowflakes Chocolate Peppermint Barks!  My Little Boy loves anything minty!  I created these for him and he loved them so much.  I used an adorable snowflake silicone mold for these peppermint barks (check out the link at the end of this post on where to get it).  It makes these chocolate barks more festive and gorgeous.  Isn’t it?


Check out how to make these festive Snowflakes Chocolate Peppermint Barks with video tutorial.  http://uTry.it


Please click here to read more on tempering chocolate, detailed in a post that I shared a while ago.  This simple step will not only make your chocolate shines, it will also make your chocolate more stable at room temperature!

Check out how to make these festive Snowflakes Chocolate Peppermint Barks with video tutorial.  http://uTry.it

Simply put these peppermint barks in little treat bags and tie them up with a pretty ribbon.  These peppermint barks make wonderful homemade treats for your friends and family.  I always cherish homemade gifts and love sharing them as well.

Check out how to make these festive Snowflakes Chocolate Peppermint Barks with video tutorial.  http://uTry.it


Last but not least, I wish you all a blessed and Merry Christmas in advance.  Stay tuned for more fun and festive treats for the holidays.  And don't forget to enter the current Giveaways: $100 Visa Gift Card Giveaway (Open to U.S. only, ending 12/31/2015)


Tools and ingredients used:
Snowflakes Silicone Mold (click here for more information)
Dark Chocolate (Click here for more information)
White Chocolate Chips (click here for more information)
Small White Cake Stand (see similar product here)
Small Treat Bags (Click here for more information)
Christmas Ribbons (Click here for more information)


Tuesday, December 8, 2015

Ultimate Paper Airplanes Worldwide Giveaway Winner Announcement


Ultimate Paper Airplanes for Kids Review and Worldwide Giveaway

Thank you everyone who participated in The Ultimate Paper Airplanes for Kids book giveaway.  Special thanks to Tuttle Publishing for providing the prize.  We have selected a winner through Random.org!

Random
The winner is Fiona N who siad,

”Yes, I have made paper airplanes when I was a kid, and I really loved them! I would love to win and make them for my son, too!
Thank You for the chance!
Fiona N”

Congratulations, Fiona N!  I’m sure you and your son will enjoy this book a lot! I’ll be in contact with you soon.

If you didn’t win the giveaway, you can still purchase a copy of the Ultimate Paper Airplanes for Kids here .

It’s a wonderful that you can enjoy with your kids.  Plus, the holiday is approaching, it’ll make a perfect stocking stuffer as well.

Thank you all for reading.  Stay tuned for more fun recipes, video tutorials and giveaway soon.

Friday, December 4, 2015

How to Make Raspberry Panna Cotta


I can’t quite believe it’s December already!  Time has past by a little too quickly this year, in my opinion.  Are you ready for the holidays?  If you’re looking for an entertaining, or a made-for-party, dessert recipe, you’ve stopped by at the right place at the perfect time.  Check out these gorgeous Raspberry Panna Cotta and I’m sure you’ll agree.  Click on the YouTube video above to watch the step-by-step video tutorial on how to make them.

Check out how to make Raspberry Panna Cotta with step-by-step video tutorial!  It's refreshing an very festive for the holiday.  Perfect recipe for entertaining.  http://uTry.it


The raspberry layer is slightly sweet and tart.  It’s super refreshing and packed with the floral fragrant of raspberries.  It pairs really well with the smooth and sweet vanilla bean panna cotta layer.  The red and white layers are so festive.  These gorgeous colors simply put me in the happy holiday mood. 

Check out how to make Raspberry Panna Cotta with step-by-step video tutorial!  It's refreshing an very festive for the holiday.  Perfect recipe for entertaining.  http://uTry.it


We’ve been tuning in to different radio stations when we’re on the road, and the Christmas songs always make me smile.  It’s probably one of the best time of the year for most people.  At the same time, I remember those who are less fortunate out there.  Just last week, I heard on the radio that a couple (whom preferred to remain anonymous) donated 500K to the Salvation Army!  It was probably one of the best news I’ve heard all year long!  That really touched me that there are still generous and kind people out there.  I know most of us don’t have that kind of money to donate, but there are many other things that we can do to help.  From pantry items to gently used clothes donated to your local non-profit organizations; or simply purchase a “Grab ‘N Give” bag at the grocery check out.  These are just some of the many ways that we can give-back to the community.

Check out how to make Raspberry Panna Cotta with step-by-step video tutorial!  It's refreshing an very festive for the holiday.  Perfect recipe for entertaining.  http://uTry.it

To me, it’s a privilege that I have the ability to help others, even in the smallest scale.  This holiday season, I want to encourage you to do the same.  It always makes me feel happy to know that a small gesture can bring big smiles on someone’s face.  

Check out how to make Raspberry Panna Cotta with step-by-step video tutorial!  It's refreshing an very festive for the holiday.  Perfect recipe for entertaining.  http://uTry.it


Last but not least, thank you for reading and stopping by my blog.  I hope you like today’s post and recipe.  I’ll be sharing more holiday recipes soon.  Stay tuned.

P.S.: Don't forget to enter the current Giveaways:

$100 Visa Gift Card Giveaway (Open to U.S. only, ending 12/31/2015)
Ultimate Paper Airplanes for Kids (Open Worldwide, ending 12/6/2015)


Check out how to make Raspberry Panna Cotta with step-by-step video tutorial!  It's refreshing an very festive for the holiday.  Perfect recipe for entertaining.  http://uTry.it


Tools and Ingredients used:

Libby Small Dessert Cups Set: (More information here)
Wilton Mini Muffin Pan: (More information here)
Pyrex 4 Cups Heat Proof Measuring Cup: (More information here)
Vanilla Bean Paste: (More information here)
Unflavored Gelatin Powder: (More information here)

Organic Cane Sugar (Click here for more information)

Wood Print Photography Backdrop (Click here to see similar product)


Friday, November 27, 2015

How to Make Blueberry Buttermilk Pancakes


Come check out How to Make Blueberry Buttermilk Pancakes with video tutorial.  They are super tender and fluffy.  http://uTry.it

I hope you all had a wonderful Thanksgiving celebration with your family and friends yesterday!  Did you have a chance to check out my previous post to discover the 3 secrets to making tender and fluffy pancakes?  If not, simply click here before you read on!   Yes, those tips are important and will guarantee you to tender and fluffy pancakes, every single time!

Come check out How to Make Blueberry Buttermilk Pancakes with video tutorial.  They are super tender and fluffy.  http://uTry.it

See how light and fluffy these Blueberry Buttermilk Pancakes turn out?  Every bite is heavenly!  The lemon zest in this recipe really brightens up these pancakes and compliment beautifully with the blueberries.  Make sure you serve these pancakes with some warm maple syrup.  A must!  I love a little dab of butter as well, but that’s truly optional. 

Come check out How to Make Blueberry Buttermilk Pancakes with video tutorial.  They are super tender and fluffy.  http://uTry.it

Ready to see how I made these Blueberry Buttermilk Pancakes?  Simply click on the YouTube video below for the step-by-step tutorial!


I hope you enjoy today’s video tutorial and recipe.  If you haven’t done so, please subscribe to my YouTube channel here.  You’ll be the first to know when I have new video tutorials published.


Come check out How to Make Blueberry Buttermilk Pancakes with video tutorial.  They are super tender and fluffy.  http://uTry.it


These pancakes are my absolute all time favorites.  They have the perfect balance of sweetness and tartness.  Quite refreshing with the lemon zest, yet decadent with the buttermilk richness.  What do you usually like in your pancakes?  Chocolate chips and strawberry?  Bananas and walnuts?  Or just simple plain ones?  Leave a comment below to let me know.  I can’t wait to hear from you!


Ingredients and Tools used:

Crepe Pan (
Click here for more information)
Maple Syrup (
Click here for more information)
Mikasa Something Borrowed Salad/Desert Plates (Click here for more information)
Large Spatula (Click here for more information)
Organic Vanilla Extract (Click here for more information)


Don't forget to enter the current Giveaways:

$100 Visa Gift Card Giveaway (Open to U.S. only, ending 12/31/2015)

Ultimate Paper Airplanes for Kids (Open Worldwide, ending 12/6/2015)


Friday, November 20, 2015

3 Secrets to Making Tender and Fluffy Pancakes!


How to Make Blueberry Buttermilk Pancakes—3 Secrets to Making Tender and Fluffy Pancakes!   http://uTry.it

What is your family’s favorite breakfast?  Lately, we’ve been devouring our fair share of pancakes.  From simple plain ones, to banana walnut chocolate chip loaded ones; all wonderfully fluffy and scrumptious!  I have to say, my personal favorite are these flavorful and fluffy Blueberry Buttermilk Pancakes.  Before I post the the video tutorial and recipe, I wanted to share with you the 3 secrets to making super tender and fluffy pancakes first!  The secrets are quite simple, and if you follow them, I guaranteed that you’re going to fall in love with your homemade pancakes all over again!  They are even better than those at the pancake house.  No exaggeration!     


How to Make Blueberry Buttermilk Pancakes—3 Secrets to Making Tender and Fluffy Pancakes!   http://uTry.it

Secret #1:  Use room temperature ingredients!                
With room temperature ingredients (especially the wet ingredients), your batter will combine smoothly without big lumps.  Imagine if you add melted butter into icy cold buttermilk and egg, the butter will seized up into lumps and it’ll be a mess when you add the liquid into the flour mixture!  Please don’t let that happen!

 
How to Make Blueberry Buttermilk Pancakes—3 Secrets to Making Tender and Fluffy Pancakes!   http://uTry.it


Secret #2: Use buttermilk!
What is buttermilk?  Buttermilk is simply the liquid left behind after cream was churned into butter.  Lactic-acid bacteria is usually reintroduced into pasteurized buttermilk, hence the tangy flavor.   When you use buttermilk in baked goods and pancakes, it adds a subtle tang and increases the rise when it interacts with baking soda!  That’s what makes your pancakes more fluffy! 


How to Make Blueberry Buttermilk Pancakes—3 Secrets to Making Tender and Fluffy Pancakes!   http://uTry.it

Secret #3: Do NOT over mix the batter!
After adding the wet ingredients to the flour mixture.  Only mix the batter until just combined, about 20 seconds or so.  When you over mix the better, the gluten will start to develop in the flour and that will make the pancakes tough and chewy!  I guess no one would appreciate cardboard texture pancakes, right?  So, please do NOT over mix.  It’s okay if you still see some lumps in the batter! 


How to Make Blueberry Buttermilk Pancakes—3 Secrets to Making Tender and Fluffy Pancakes!   http://uTry.it
Now, the 3 secrets to making tender and fluffy pancakes are not secrets anymore!  I promise to post the video tutorial and recipe of these Blueberry Buttermilk Pancakes soon.  Stay tuned and have a beautiful weekend!

Tuesday, November 17, 2015

Ultimate Paper Airplanes for Kids Review and Worldwide Giveaway


Ultimate Paper Airplanes for Kids Review and Worldwide Giveaway

Over the weekend, my kids and I checked out the Ultimate Paper Airplanes for Kids book.  This book is the ultimate collection of easy-to-fold, high-performance planes for kids who are fascinated by paper or origami airplanes.  Can you imagine how much fun we had?  I remember I love folding paper airplanes with my brothers when I was a little kid myself.  We would fold up our favorite paper planes and see who can fly them the furthest!  This book sure brings back lots of fun memories!

Ultimate Paper Airplanes for Kids Review and Worldwide Giveaway

What I love most about this book is that it opens with a fascinating primer to the principles of flight.  My kids read and learned about the forces that enable a plane to fly and affect the performance of their planes.  They had so much fun testing out the planes they made by coaxing the planes through their paces: doing loops, barrel rolls, glides and dives.

Ultimate Paper Airplanes for Kids Review and Worldwide Giveaway

This paper airplanes kit contains detailed instructions for each paper plane(12 designs in total), 48 pre-cut paper airplane models printed with colorful and realistic designs, over special durable lightweight cardstock.  The instructions were easy to follow and the marked lines on the paper really make it easy to fold the perfect lines where they should be.

Ultimate Paper Airplanes for Kids Review and Worldwide Giveaway

And what makes this book the ultimate?  It has to be the pull-out airport runway for landing maneuvers!  We were testing out the paper airplanes that we made and competing who can get the planes closest to the landing spot!  It was such an educational and fun weekend for us.   Yes, yours truly was included when I said “we” and “us”!  I guess I’m just a big kid, after all!  As you know, the holiday is fast approaching, this Ultimate Paper Airplanes for Kids book would be the perfect gift for the little ones.  The best part is that you can create some new and fun memories with your kids because of this book! 

Ultimate Paper Airplanes for Kids Review and Worldwide Giveaway

You can order your own copy of Ultimate Paper Airplanes for Kids book by clicking here.   Or, try your luck to win one because I’m giving  away a copy of Ultimate Paper Airplanes for Kids to one lucky uTry.it reader, courtesy of Tuttle Publishing.

Here are the details on how to enter.
One lucky uTry.it reader (open to my worldwide readers) will win a copy of “Ultimate Paper Airplanes for Kids”.

To enter, simply leave a comment on this post and tell me if you have made paper airplanes when you were a kid.  Please also leave your email address along with your comment so that I can contact you if you're the lucky winner!  Deadline to enter is December 6th, 2015 by mid-night PST.  Winner will be selected through Random.org and announce shortly after the giveaway is closed.

For extra entries, do any or all of the following (leave a separate comment for each extra entry):

1)  Subscribe to my YouTube Channel, click here.
2)  Follow me on Instagram, click here.
3) "Like" uTry.it's Facebook Page, click here.
4) Pin a picture from this post onto Pinterest.
5) Share this giveaway on Facebook (with a link back to this post please)
6) Share this giveaway on Twitter (with a link back to this post please)

That’s all and Good Luck everyone!

Disclaimer:  I received a copy of “Ultimate Paper Airplanes for Kids” for the purpose of this review and I was not compensated in any way to write this post.  All comments and opinions are 100% my own.


Ultimate Paper Airplanes for Kids Review and Worldwide Giveaway


Please click on the link below if you're interested to read more information about the authors of this book.


Friday, November 13, 2015

Roasted Brussels Sprouts


Brussels sprouts is one of my family’s favorite vegetable to enjoy.  I cooked them in many different ways, such as putting them on the grill, or boiling and tossing them in a garlic butter sauce, etc.  But lately, my family loves these sprouts even more when I simply roasted them in the oven!  The roasting really concentrate the nutty and earthy flavors of these sprouts.  Also, the roasting method retains the natural bright green color of the sprouts, way better than boiling does.  The slight golden brown and charred edges add a whole lot more flavors as well.

Check out how to make Roasted Brussels Sprouts: a quick, delightful and healthy side dish for any occasion.  http://uTry.it

Often, Brussel Sprouts come already being picked off their stalks and packaged into bags.  But if you do see them still on the stalks (see picture above and in the video), by all means grab these and take them home!  They are probably the freshest ones you can get your hands on.  The texture is a lot more tender and you can taste the freshness. 

Check out how to make Roasted Brussels Sprouts: a quick, delightful and healthy side dish for any occasion.  http://uTry.it

In this recipe, I tossed the Brussels sprouts with some lemon infused olive oil (please see the bottom of the post for more information).  Also, I added some fresh lemon zest right on top after roasting.  The citrus really brightens up this dish and makes it quite delightful.  I also used smoked salt instead of regular kosher salt for some smoky aroma (please see the bottom of the post for more information as well).  You can use kosher salt if you don’t have the smoked salt on hand.  Also, for a hint of spiciness, I added a pinch of red pepper flakes.  But if you’re making this for the kids or someone who doesn’t like anything spicy, you can skip the red pepper flakes.     

Check out how to make Roasted Brussels Sprouts: a quick, delightful and healthy side dish for any occasion.  http://uTry.it

This Roasted Brussels Sprouts is such an easy side dish to make for any occasion.  You can easily double the recipe if you’re feeding a crowd.  Just make sure the roasting pan is big enough so the sprouts will be roasting and not “steaming”, which is possible if the pan gets too crowded. 

Check out how to make Roasted Brussels Sprouts: a quick, delightful and healthy side dish for any occasion.  http://uTry.it

This is a naturally gluten-free and vegan friendly healthy dish that anyone can enjoy.  If you’re cooking for the upcoming gathering, by all means give this recipe a try.  I’m sure all your guests will love it!

Check out how to make Roasted Brussels Sprouts: a quick, delightful and healthy side dish for any occasion.  http://uTry.it

Stay tuned for more easy recipes and fun giveaway!

Current Giveaway on the blog:
$100 Visa Gift Card Giveaway (Open to U.S. only, ending 12/31/2015)

Ingredients and Tools used:
Lemon Olive Oil (Click here for more information)
Smoked Salt (
Click here for more information)
Red Pepper Flakes (
Click here for more information)
Calphalon Nonstick 2-Piece Baking Sheet Set (
Click her for more information)
Core Bamboo 3-Piece Cutlery Set  (
Click here to see product information)


Monday, November 9, 2015

The Best Homemade Soft and Chewy Chocolate Chunk (Chip) Cookies


We all need some classic recipes under our sleeves just in case of emergency, don’t you agree?  In this case, the emergency is the craving for the good old Soft and Chewy Chocolate Chip/Chunk Cookies!  If you have a gathering or school party that you need to bring some goodies, these cookies are simply perfect as well.  Tell me who doesn’t like a perfectly sinful and satisfying chocolate chip cookie?  So far, I haven’t met anyone yet. 

Check out How to Make the Best Soft and Chewy Chocolate Chip/chunk Cookies from scratch.  A must have recipe for everyone, especially around the holidays!!!   http://uTry.it

I’m sure you’ve heard me said this for the 3,258,726 times of how important it is to use the good quality ingredients for baking and cooking!  But I feel that I need to say it one more time here, just in case.  My philosophy is simple, you put good quality ingredients in, and you'll get good quality products out.  The same motto can be applied to many situations in life or in relationships, and not just for baking and cooking.  

Check out How to Make the Best Soft and Chewy Chocolate Chip/chunk Cookies from scratch.  A must have recipe for everyone, especially around the holidays!!!   http://uTry.it

For this recipe, I used dark chocolate chunks instead of chocolate chips.  I highly recommend that you use dark chocolate chunks for these cookies.  That way, you can use the best chocolate bars that you love and chop them up into the perfect size (I used 72% dark chocolate).  Honestly, I have yet to find a super good quality chocolate chips out there yet.  But if you have your favorites, by all means go for it.  Also, I prefer chocolate chunks in these cookies because they melt so beautifully, as you can see from my video tutorial at the top of the post.

Check out How to Make the Best Soft and Chewy Chocolate Chip/chunk Cookies from scratch.  A must have recipe for everyone, especially around the holidays!!!   http://uTry.it


The edges of these cookies are slightly crisp and the center is soft and chewy.  The difference in textures complement each other perfectly in every single bite.  When you bite into one, the melted chocolate chunks start oozing out.  I’m telling you, just one bite of these cookies will make you forget all the stress you have, well, at least for that moment!  And you’re officially warned, these Soft and Chewy Chocolate Chunk Cookies are addictive!!!  I bet no one can simply stop at just one!  After you’ve tried one, I’m sure you’ll agree with me that these are the best Soft and Chewy Chocolate Chunk Cookies you’ve ever had! 


Check out How to Make the Best Soft and Chewy Chocolate Chip/chunk Cookies from scratch.  A must have recipe for everyone, especially around the holidays!!!   http://uTry.it


As the holidays approach, don’t forget to add this recipe to your to-bake list!  Your friends and family will love you for sharing these cookies with them! 


Props and Ingredients Used:

Unbleached All-Purpose Flour (Click here for more information)
Brown Sugar (Click here for more information)
Kerrygold Pure Irish Butter (Click here for more information)
KitchenAid Stand Mixer (Click here for more information)
Calphalon Nonstick 2-Piece Baking Sheet Set
 (Click her for more information)
Silpat Baking Mat (Click here for more information)
Organic Cane Sugar (Click here for more information)
Dark Chocolate (Click here for more information)
One ounce Ice Cream/Cookie Scoop (Click here for more information)


Monday, November 2, 2015

Apple Harvest Cocktail


Are you ready for Fall yet?  I guess I’ve been ready since last winter!  However, the nature is not quite cooperating as we’re still having pretty warm temperature.  The good news is, this Apple Harvest Cocktail will sure put you in the mood for Fall, or at least help makes me feel Fall has arrived!

Come check out how to make this Apple Harvest Cocktail.  An easy and delightful cocktail that's perfect for Fall.  http://uTry.it

This is a delightful and crisp cocktail that you can enjoy any time of the year.  But the apple cider and cinnamon really helps set the tone for Autumn. 

Come check out how to make this Apple Harvest Cocktail.  An easy and delightful cocktail that's perfect for Fall.  http://uTry.it


I’ve also added some bourbon, which harmonized wonderfully with apple and cinnamon.  The maple syrup slightly sweetened the drink and gives a depth of flavor as well.

Come check out how to make this Apple Harvest Cocktail.  An easy and delightful cocktail that's perfect for Fall.  http://uTry.it

Of course, the dash of ground cinnamon on top isn’t just for garnish.  It adds the earthy and warmth to this drink which complement the apple cider perfectly. 

Come check out how to make this Apple Harvest Cocktail.  An easy and delightful cocktail that's perfect for Fall.  http://uTry.it

I top this cocktail with a little bit of ginger ale for the evanescent and the little carbonation really makes this drink crisp and refreshing.

Come check out how to make this Apple Harvest Cocktail.  An easy and delightful cocktail that's perfect for Fall.  http://uTry.it

Last but not least, this cocktail also serves as a small snack with the thin apple slice on top!  I hope you really enjoy today’s video tutorial and recipe.  Give this recipe a try on your next gathering, or simply because, it’s 5 o’clock!  Cheers!

Props and Ingredients used:

9 ounce Old Fashion Glasses (click here for more information)
Ground Cinnamon (click here for more information)
Cinnamon Sticks (Click here for more information)
Hard wood coasters (Click here for more information)


Please drink responsibly.  Health and General Disclaimers.