Showing posts with label Quick and Easy. Show all posts

Monday, November 18, 2019

How to Make Holiday Individual Turkey Pot Pie


Disclaimer: This post was sponsored by Better Than Bouillon as part of an Influencer Activation for Influence Central and all opinions expressed in my post are my own.  For more recipes and inspirations, please visit: http://goic.io/GpuqMV


My family loves the holiday season when we get to gather around the dinner table to share our favorite dishes and recipes.  When I host holiday gatherings at my place, I always prepare a main dish while my family and friends would bring appetizers and side dishes to share.  It's always wonderful to share and create memories with my family through food!  If you can't tell by now, everyone in my family are foodies!  I guess you can say that the apples don't fall far from the tree!  This year, I'll be sharing these amazing Holiday Individual Turkey Pot Pies with my friends and family!


If you haven't done so, be sure to check out my video tutorial above.  This recipe is so much fun and so easy to make, yet its super festive and scrumptious!  Best of all, you can prepare them a day in advance.  Simply prepared the pies (without the egg wash), covered, and keep them in the fridge until ready to bake.  On the day of the party, simply brush the egg wash on the pastry and pop them in the oven before your guests arrive.  This way, you can join in and enjoy the party, too!  As much as I enjoy a holiday feast, I don't think anyone should, or wanted to, slave inside the kitchen for the holidays!  This recipe is a perfect solution for you if you are hosting a gathering for your friends and family this holiday season!  Think of how easy it will be for the upcoming Thanksgiving, Friendsgiving, Christmas, or New Years' parties!   


The flavors of these Holiday Turkey Pot Pies are so amazing that your guests would think that you've spent hours in the kitchen preparing them!  Thanks to the Better Than Bouillon Turkey Base, it adds a depth of flavor in the turkey pie fillings in a cinch.  It truly elevates and transforms the flavors of your ingredients.  You would feel like you're enjoying a traditional slow roasted turkey, but in a pie form, which is a lot more fun to eat than just a traditional roasted turkey (sorry Mr. Turkey!)  Rather than the traditional bouillon cube, the Better Than Bouillon Turkey Base is a paste, which makes it a lot easier to incorporate with the ingredients because you don't have to wait for the cube to dissolve.  The flavor is so concentrated that it won't dilute your sauce at all!  It's truly a flavor bomb, in my opinion!


I'd been using Better Than Bouillon for many years now and always have them on hand.  Besides the Turkey Base, my favorites are Roasted Beef Base and Roasted Chicken Base.  I make my family's favorite beef stew at least once a week and Better Than Bouillon Roasted Beef Base is the secret ingredient that make it tastes so amazing!  Better Than Bouillon Roasted Beef Base intensifies the beefy flavors in the stew without diluting the sauce.  I also use it create a soup base, to build flavor in my sauces, to make a quick beef au jus for roasted beef, and to create gravy with it as well.  Also, you can substitute the turkey meat in this recipe with chicken (and swap in the Roasted Chicken Base) to make chicken pot pies.  And I promise, they will be the best chicken pot pie you'll ever had!  They are so good that my kids always wonder if I ordered and pick up the Chicken Pot Pies from the restaurant!  There are so many different flavors of Better Than Bouillon to explore, such as the Seasoned Vegetable Base, Roasted Garlic Base (perfect for making garlic bread), and Mushroom Base, & etc. Be sure to grab a few on your next grocery run to take your holiday recipes to the next level and make your life a whole lot easier and flavorful!  You can use the product locator on the Better Than Bouillon site or order online to get those hard to find flavors as well! 

For more product information, please visit:


Back to these Holiday Individual Turkey Pot Pies!  Imagine buttery and flaky pie crust, fresh mixed vegetables, and tender turkey meat surrounded by creamy and velvety sauce that has a "cooked all day" flavors, thanks to the Better Than Bouillon Turkey Base. This decadent turkey pot pie is served with sweet and tart cranberry sauce for a contrast of flavors!  Each bit is simply heavenly!   You'll definitely be making this recipe again and again!  What are your family's holiday traditions?  Do you have a family's favorite recipe?  Have you tried Better Than Bouillon products before?  If so, which one is your favorite?  Be sure to leave a commend below and share with me.  Can't wait to hear from you!  Happy Holidays, from my kitchen to yours!


Please follow Better Than Bouillon on other Social Media:

For more recipes and inspirations, please visit: http://goic.io/GpuqMV

Better Than Bouillon Facebook: https://www.facebook.com/BetterThanBouillon/
Better Than Bouillon Instagram: https://www.instagram.com/betterthanbouillon/
Better Than Bouillon Twitter: https://twitter.com/btbouillon
Better Than Bouillon Pinterest: https://www.pinterest.com/BTBouillon/


#HolidaysWithBTB #BTBHolidayRecipes #IC #ad


Holiday Individual Turkey Pot Pie Recipe
Makes: 6 (8 ounces Pies)

4 tablespoons butter
1 yellow onion, diced
1 cup pumpkin (frozen, diced)
1 cup mixed vegetables (frozen)
4 cups roasted turkey (diced)
1 tablespoon sage (chiffonade)
1 teaspoon thyme
1/3 cup all-purpose flour (plus more for rolling puff pastry)
2 tablespoons Better Than Bouillon Turkey Base
2 cups turkey stock (low sodium)
3/4 cup heavy cream
2 sheets puff pastry (thawed)
1 egg yolk
1 tablespoon water
Cranberry Sauce (for serving)
Fresh Cranberries and Sage leaves (optional, for garnish)

Preheat the oven to 425°F.  In a large pot, melt butter over medium heat.  Stir in onions and cook until translucent, about 3 to 4 minutes.
Add in pumpkin, mixed vegetables, turkey, sage, and thyme.  Sprinkle the flour over the ingredients,  stir gently, and let the flour cook for 1 minute.  Add in the Better Than Bouillon Turkey Base and turkey stock.  Let the sauce cook until thickened, about 3 minutes.  Remove from heat and stir in the heavy cream.  Let the fillings cool off slight while you prepare the puff pastry.

Gently roll out the seams of the puff pastry on a lightly flour-dusted surface.  Place your ramekins up-side-down on the pastry as a guide.  Cut out 3 pastry per puff pastry sheet.  Repeat with the remaining puff pastry sheet.

Evenly divide the turkey fillings into the 6 ramekins.  Top each one with a cut out puff pastry.  Place the filled ramekins onto a foil lined baking sheet.  Whisk the egg yolk and water to create an egg wash.  Brush a think layer of egg wash onto each puff pastry.

Bake for 22 to 25 minutes, or until the puff pastry is golden brown and cooked through.

Let cool slightly before serving.  Be very careful, fillings is extremely hot.  Garnish with cranberry and sage (if using.)  Serve these Holiday Turkey Pot Pies with cranberry sauce and enjoy!


Wednesday, October 2, 2019

Mermaid Chia Seeds Pudding (Pitaya Dragon Fruit & Butterfly Pea Flower Tea)


Are you enjoying the Fall weather?  I'm loving the cooler temperature and the fact that I actually needed a jacket in the morning! If you've been following me on Instagram and my YouTube Channel, you probably have seen this Mermaid Chia Seeds Pudding that I shared a while ago!  Sorry for the delay in posting this blog post and recipe.  The weather was still super hot when I created this recipe!  But nevertheless, it's still a delicious recipe, even in this Fall weather.   


Check out my YouTube video tutorial above, if you haven't done so.  You'll see this gorgeous Mermaid Chia Pudding is really easy to put together.  You can prepare it the night before and it's ready for you in the morning as breakfast.  But I personally enjoy this as a quick snack or "dessert" in the afternoon more than as a breakfast item.  Yes, it's sweet enough as a dessert, yet it's still healthy and good for you.  The pink bottom layer is make with whole milk (you can substitute with almond milk, or soy milk if you like), Chia Seeds, a touch of honey for sweetness, and this gorgeous Dragon Fruit Powder that makes it pink.  It's packed with vitamins and anti-oxidant!  I'll list the product link at the end of the post for your reference.   


The upper blue-ish and purple-ish layer is made from Butterfly Pea Flower tea. It's also a vitamin and anti-oxidant rich ingredient that will make you feel beautiful from the inside out after enjoying it!  I love pretty food that also have such health benefit.  But since I'm not a doctor or nutritionist, please don't hold me accountable for that.  You can google it and read more for yourself if you're interested.  The original color of the Butterfly Pea Flower Tea was blue.  After adding the honey, it changed to this gorgeous purple-ish color because of the acid.  


October is Breast Cancer Awareness Month.  I'll be wearing pink this month to raise awareness.  Hm....maybe I'll share more pink food and recipes too!  If you want to read more about Brest Cancer Awareness Month, here's the post that I shared last year:

Just this morning, I heard on the news that Beyoncé's Father, Mathew Knowles, was diagnosed with Breast Cancer!  This horrible disease not only affect women, but men as well.  I encourage you to do a regular self check because early detection is important and can save lives!  Check out my last years post on details and symptoms to look for.

Until next time, please take care!


Ingredients and Tools Used:
SunCore Organic White Chia Seeds:

SunCore Pitaya Dragon Fruit Powder:

Organic Butterfly Pea Flowers:

Organic Honey:

Mini Bowl Set:

Star Shape Cookie Cutter:


Disclosure: uTry.it is a participant in the Amazon Services LLC Associates Program, an affiliate advertising program designed to provide a means for sites to earn advertising fees by advertising and linking to Amazon.com.

Thursday, May 30, 2019

How to Make Baby Kale Shakshuka


What is your favorite vegetable?  For me, it's kale!  Not only it's packed with wonderful nutrients, such as Vitamin A, Vitamin K, Vitamin C, Calcium, and Potassium, just to name a few.  Kale is also the power house of  delightful flavors. I love the earthy, refreshing, and unique flavors from their dark green leafs. 


Unfortunately, I've heard many dislike kale because of its tough texture.  Today, I'm going to show you the secret to turn this healthy vegetable into a delectable dish that you would want to make it over and over again!  The secret, is to quickly sauteed them, instead of eating them raw in salads.  Also, I'm using baby kale in this particular recipe, so the leafs are particularly tender. 


Traditionally, Shakshuka is a dish with poached egg baked in a vegetable and tomato sauce.  Today, I'm making it lighter by replacing the tomato sauce with chicken stock instead.  You can also substitute with vegetable stock as well.  This way, you can truly taste the wonderful flavor of the kale and not over powered by the tomato sauce.


As you can see from my video tutorial, I topped the Baby Kale Shakshuka with a sprinkle of sumac for a refreshing and lemony punch.  If you haven't tried sumac yet, I highly recommended it.  It truly wakes up the dish and adds such a delightful freshness to this decadent dish.  I served this dish with a couple slices of toasts made from my 90 Seconds Low Carb Quick Bread.  Serving this dish with a slice of rusty bread or toasts is a must!  They will soak up the sauces and runny yolk in this dish.  You can find my low carb bread recipe in the link below.


I hope you enjoy today's video tutorial and recipe.   Stay tuned for more delicious and healthy recipes soon!


90 Seconds Low Carb Bread Recipe:
http://bit.ly/2WxBzzc

Tools and Ingredients Used:

Individual Baking Dish Set

Calphalon Nonstick Bakeware, Baking Sheet
https://amzn.to/2EG6hMj

Organic Sumac:
https://amzn.to/2VYQdeF


Baby Kale Shakshuka
Servings: 2

2 teaspoons olive oil
2 cloves garlic, minced
1 small shallot, chopped
8 ounces baby kale
2 teaspoons fresh lemon juice
3 tablespoons chicken or vegetable stock
1 ounce feta cheese, crumbled
2 large eggs
kosher salt
black pepper
1/2 teaspoon red pepper flakes
1/4 teaspoon sumac

Preheat the oven to 350 degrees F.  In a medium skillet, heat oil over medium heat.  Add garlic and shallots and cook until fragrant.

Add the kale in 2 batches.  They will wilt significantly as they cook. Continue to stir for even heat distribution. 

When the kale is slightly softened, add the salt, black pepper, red pepper flakes, feta cheese lemon juice, and chicken stock.  Stir well and taste the mixture.  Adjust the seasoning if needed. 

Evenly distribute the kale mixture into 2 oven safe baking dishes.  Gently create a well in the center of each one and crack an egg into each well.

Bake, uncovered, for 12 to 15 minutes.  Or until the egg whites are cooked but the yolks are still runny.

Sprinkle sumac on top.  Let cool slightly and serve warm with toasts or crusty bread.

Disclosure: uTry.it is a participant in the Amazon Services LLC Associates Program, an affiliate advertising program designed to provide a means for sites to earn advertising fees by advertising and linking to Amazon.com.

Friday, May 3, 2019

90 Seconds Low Carb Keto Quick Bread


If you follow me on Instagram, you might remember that I shared some pictures and videos of this 90 Seconds Low Carb Keto Quick Bread for a few times when I was testing out the recipe.  Well, it's finally here and I am super excited.  Thank you for your patience if you're one of the many that requested this recipe.


Every since I cut down on sugar and carbs after my breast cancer diagnoses last year, I had been testing out new ingredients and different ways to prepare old recipes that I love with healthier alternatives.  This 90 Seconds Low Carb Keto Quick Bread is one of them.  It doesn't contain any refine sugar, it's flour free, and it's gluten free.  Best of all, my kids are loving it too.


Best the fact that this bread tastes great, I also love how easy and quick it is to put together.  And as you can tell in my video, my kids enjoyed making this quick bread too.  This bread is made in a coffee mug in the microwave.  In my video tutorial, I shared some tips and what coffee mug (in terms of sizes) to use as well.  I'll list those information and mug size at the end of this post for your reference.


This quick bread doesn't contain any flour. Instead, I used almond flour as the main ingredient.  Please make sure to use almond flour from blenched almonds and not almond meal.  The texture of almond flour is more tender and smooth because the almond skin is removed.

The texture of this bread might not be exactly like your traditional sandwich bread.  I find it similar to a sponge cake actually.  However, giving the fact that it's so easy to make and only includes healthy ingredients, I would choose this bread, any day that I crave for a slice of bread or toast. 


This quick bread is wonderful for sandwiches, it also toast up nicely.  You do get a hint of nutty flavor after toasting because of the almond flour, which is quite a nice addition to the crunchy texture.  Next, I'm planning to cut this bread into cubes and give them a quick toast and turn them into croutons for salads!  I will share a picture on my Instagram when I do that.  


My daughter loves to use this bread to replace her bagel! Spread a little bit cream cheese, a couple of smoked salmon, top it with capers, chives, and dill and you get a gourmet Open-Face Smoked Salmon Sandwich!  Boy, what a foodie!  I guess the apple doesn't fall far from the tree! 


From this picture above, you see the 2 different sized of bread I made using different diameter coffee mugs.  I think the small one is perfect for party food and snacks while the bigger ones are perfect for sandwiches.  If you try this recipe, please kindly leave me a message and let me know how it goes.  Thank you for stopping by today and stay tuned for more delicious and healthy recipes soon.


Coffee Mug Measurements (Please refer to the video tutorial): Mug #1 (Sweetest Mom): 3-inch Diameter X 3 3/4-Inch Height Mug #2 (Star Wars): 3 1/4-inch Diameter X 5-inch Height Mug #3 (Starbucks/Disney): 3 3/4-inch Diamemter X 3 1/2-inch Height https://amzn.to/2Lm9g2z Ingredients and Tools Used in this Recipe: Monkfruit 1:1 Sugar Substitute: https://amzn.to/2WlZCxE Organic Almond Flour: https://amzn.to/2GZaQmI Mini Whisks: https://amzn.to/2LmB0Uz Recommended Starbucks/Disney Mug: https://amzn.to/2Lm9g2z

Aluminum-Free Baking Powder: 
https://amzn.to/2Y4OZjh


Disclosure: uTry.it is a participant in the Amazon Services LLC Associates Program, an affiliate advertising program designed to provide a means for sites to earn advertising fees by advertising and linking to Amazon.com.

Saturday, February 3, 2018

How to Make Chocolate Orange Bundt Cake - Super Easy Recipe


Last month, I celebrated my birthday, my 29th birthday!  Oh wait, I think I’m just getting too old that I simply stop counting since my 29th birthday!  What did I do on my birthday?  Besides enjoying a lovely dinner with my family in the evening, I baked myself a birthday cake!  This Chocolate Orange Bundt Cake, to be exact. 

How to Make Chocolate Orange Bundt Cake -  Super Easy Recipe   http://uTry.it

Some of you might think that it’s not right that I have to bake my own cake for my birthday.  But actually, I don’t mind at all.  In fact, it’s quite the opposite.  I quite enjoy spending time in the kitchen, even on my birthday!  Plus, this Chocolate Orange Bundt Cake is super easy to prepare, I promise.  It’s pretty much a foolproof recipe to any beginning bakers out there.  It’s super easy to make, thanks to this secret ingredient!  Although this secret ingredient doesn't usually show up in my pantry (as I mostly bake from scratch), it is easy to find and it might appear in the pantry of many homes!  Watch my video tutorial above to find out what it is!  

How to Make Chocolate Orange Bundt Cake -  Super Easy Recipe   http://uTry.it

This cake turned out to be very moist and tender.  It’s packed with decadent dark chocolate flavor and refreshing orange zest.  Dark chocolate and orange flavors are simply the perfect classic combination, in my humble opinion.  I made a chocolate crust on top for a contrast of texture as well.  Each bite, is simply heavenly!  If you’re still looking for a dessert recipe to end your Valentine’s Day dinner with the perfect sweet note, this is THE recipe to make! 

How to Make Chocolate Orange Bundt Cake -  Super Easy Recipe   http://uTry.it

If you make this cake and share with someone, be prepared that they will ask for the recipe!  Yes, this cake is that good!  I’ll leave it up to you to decide if you want to reveal the secret ingredient!  They might be shock that it’s the main ingredient in the cake!  If you have any recipe requests or suggestions, feel free to leave me a comment below.  I would love to hear from you.   Wish you and your loved ones a warm and sweet Valentine’s Day!  Stay tuned for more fun and easy recipes next week!

How to Make Chocolate Orange Bundt Cake -  Super Easy Recipe   http://uTry.it


Ingredients and Tools Used:

10-inch Bundt Pan (Click here for more information)
Edible Gold Leaf 
(Click here for more information)
Microplane Zester 
(Click here for more information)
Cooking Spray 
(Click here for more information)
Whisk 
(Click here for more information)
Measuring Spoons Set 
(Click here for more information)
Cooling Racks 
(Click here for more information)
Baking Sheets 
(Click here for more information)
Devil’s Food Cake Mix 
(Click here for more information)
Kerrygold Butter 
(Click here for more information)
Semi-Sweet Chocolate Chips 
(Click here for more information)
Food Decorating Tongs/Tweezers 
(Click here for more information)


Disclosure: uTry.it is a participant in the Amazon Services LLC Associates Program, an affiliate advertising program designed to provide a means for sites to earn advertising fees by advertising and linking to Amazon.com.


Friday, December 15, 2017

How to Make Popovers with Herb Butter (Foolproof Recipe)


Are you ready for the holidays?  My kids are almost out of school for their Winter Break and we’re already getting excited for the time off.   I personally can’t wait to hang out and spend time with the family.  We’ll have relatives visiting from overseas and everyone in the family is looking forward to that as well.  How about you?  What are your plans for the holidays?  Leave me a comment below and let me know.

How to Make Popovers with Herb Butter (Fail Proof Recipe)  http://uTry.it

For our holiday meals, my family prefer Prime Ribs over poultry or pork.  This past Thanksgiving, I even spared Mr. Turkey and made a Prime Rib Roast instead.  Besides all sorts of roasted vegetables, I also made these Popovers with Herb Butter as a side dish.  Everyone enjoyed them so much.  They are quite similar to Yorkshire pudding, which its batter consists of  eggs, flour, milk, etc.  I guess you can call these individual Yorkshire puddings?  But the traditional Yorkshire pudding often consists the roast beef’s dripping in the batter while these Popovers don’t.  However, these Popovers still packed with wonderful flavors and aromas from herbs and butter in the batter (and on the side).

How to Make Popovers with Herb Butter (Fail Proof Recipe)  http://uTry.it

These Popovers are simply amazing.  The crust is golden brown and crispy while the inside is fluffy and airy.  It’s heavenly when you serve them warm with a dab of Herb Butter.  Check out my video tutorial for tips and tricks on how to prepare both!  These popovers are pretty much fail proof if you follow my tips.  Your family will definitely love them and be prepare that they’ll ask for seconds.  My recipe makes exactly 12 popovers.  I’ll list the popover pans and other tools that I used at the end of the post for your convenience.  

How to Make Popovers with Herb Butter (Fail Proof Recipe)  http://uTry.it

When I made these popovers again to take pictures and videos, my Kids were so excited and couldn’t wait any longer (see the little hand in the picture above)?!  Yes, these Popovers are truly irresistible!  


How to Make Popovers with Herb Butter (Fail Proof Recipe)  http://uTry.it

Instead of making the traditional dinner rolls, I highly recommend that you try out this Popover with Herb Butter recipe.  You and your tummy will be glad that you did!  Thank you so much for stopping by today.  Stay tuned for more holiday recipe next week!

Tools and Ingredients Used:Popover Pan (Click here for more information)
Baking Sheets (Click here for more information)
Kerrygold Butter (Click here for more information)
Stand Mixer (Click here for more information)
Kitchen Scissors (Click here for more information)
Measuring Cups with Beaker (
Click here for more information)
Whisk (Click here for more information)
Cooling Racks (Click here for more information)


Disclosure: uTry.it is a participant in the Amazon Services LLC Associates Program, an affiliate advertising program designed to provide a means for sites to earn advertising fees by advertising and linking to Amazon.com.


Sunday, October 15, 2017

Kid’s Bento Lunch Boxes Ideas


Hello Kitty Witch Hat

One of my favorite activities of the day is packing cute bento lunch boxes for my Kiddos.  As soon as October started, I’ve been making the lunch boxes with Halloween theme.  These lunch boxes are fun and festive.  It’s a way for me to send some love for the kiddos while they are at school.  The picture above is a spaghetti lunch box with Hello Kitty wearing a witch’s hat.  Kitty is made out of a slice of Muenster cheese.  The decorations are seaweed and soy wrappers.  The little pumpkin is a slice of carrot decorated with cut out seaweed. 

Frankinstein2

I love the Frankenstein bento as well.  It’s made out of a slice of Muenster cheese topped with a piece of green soy wrapper.  Click here to check out the package of soy wrapper that I used.  (I’ll list the tools and other ingredients at the end of this post for your reference as well.)   I absolutely love the soy wrappers as they are so colorful and easy to use.  Best of all, they are made with natural ingredients such as spinach, turmeric, and paprika to obtain those gorgeous bright colors. 


Ghost and Broom

Here’s a simple one with ghosts and a broom stick.  Click here to check out the video tutorial on how to make the witch’s broom and the little ghosts were made out of mozzarella cheese balls decorated with cut out seaweeds.

Cat with Witch Hat


Miso Noodle Soup

The picture above is a bowl of Miso Noodle Soup that I made for my Hubby.  I’m sure we can all use some sunshine.  I feel happy just by looking at the cute face on the egg.

Gudetama

Have you heard of Gudetama?  It’s a Japanese cartoon character of an lazy egg (see picture above).  Click here to check out their Facebook page for some funny videos.  My kids and I always enjoy watching them together!

Little Girl Hair

This little girl with spaghetti hair is one of my favorite.  It’s simple and adorable!

Little Bird and Nest


Little Chick and Bird

The little chick above is made with smoked salmon filled egg, check out this video for the tutorial and recipe.

LIttle Piggy


Minced Beef Bento

My kids’ all time favorite got to be these piggy ham and cheese sandwiches along with Minions (see picture below)!  These lunch boxes are inspired by The Despicable Me 3 movie that we watched over the summer. The Minions are hard boiled eggs soaked in water and turmeric for the yellow color.  The decorations are cut out seaweeds.  I hope you enjoy today’s bento compilations and lunch box ideas!  If you have any questions, suggestions, or recipe requests, feel free to leave me a comment below. 

Minion and Piggy.

Tools and Ingredients Used for Bento Boxes:
Bento Box 1 (Click here for more information)
Bento Box 2 (Click here for more information)
Hello Kitty Shape Cutter (Click here for more information)
Sandwich Cutters (Click here for more information)
Seaweed (Click here for more information)
Soy Wrappers (Click here for more information)
Bento Picks 1 (Click here for more information)
Bento Picks 2 (Click here for more information)
Bento Picks 3 (Click here for more information)
Food Decorating Tweezers (Click here for more information)
Kitchen Scissors (Click here for more information)
Turmeric (Click here for more information)


Saturday, October 7, 2017

How to Make Witch's Fingers Shortbread Cookies - Halloween Recipe 女巫手指餅乾 - 萬聖節食譜


Do you like Halloween?  To be honest, it’s not my favorite holiday of the year.  However, I do enjoy creating fun treats and scary snacks for friends and family.   It’s one of the occasions where I can let my creativity runs wild!

How to Make Witch's Fingers Shortbread Cookies -  Halloween Recipe 女巫手指餅乾 - 萬聖節食譜  http://uTry.it

Today, I’m sharing these creepy Witch’s Fingers Shortbread Cookies with you.  This recipe is my classic go-to shortbread recipe, as I've shared here in the past.   It’s actually quite easy to shape them into “fingers” form.  The details and decorations couldn’t be any easier to add on as well.  Be sure to watch the video tutorial on my YouTube channel for all the details and tips.

How to Make Witch's Fingers Shortbread Cookies -  Halloween Recipe 女巫手指餅乾 - 萬聖節食譜  http://uTry.it

When I serve these Witch’s Fingers, my Little Boy likes to dip them in strawberry preserves for a bloody effect!  My Baby Girl is a bit less graphic, she chose a mud puddle, a.k.a chocolate sauce as her dipping option!  Either way, these cookies are super fun to eat and just as finger licking good as-is.

How to Make Witch's Fingers Shortbread Cookies -  Halloween Recipe 女巫手指餅乾 - 萬聖節食譜  http://uTry.it

These Witch’s Fingers are perfect for Halloween Party.  Last year, I packed them up to share with some school friends and they were a big hit!  You can make them a day or two in advance and store them in an air-tight container.  They stay fresh for at least 5 to 6 days if you store them well without direct sunlight.

How to Make Witch's Fingers Shortbread Cookies -  Halloween Recipe 女巫手指餅乾 - 萬聖節食譜  http://uTry.it

How’s your Halloween planning so far?  Do you or your kids dress up?  It’s was such a surprised that my Kiddos have decided so early on what/who they want to be this Halloween.  It’s even more surprising to me that I’ve their costumes already prepared!  They only need a few final touches here and there and that’s it.  Yes, this year's costumes are partially handmade.  But luckily, nothing too complicated.  Phew…. just a side note, I’m just happy that the kiddos are not into scary costumes, at least not yet! 

How to Make Witch's Fingers Shortbread Cookies -  Halloween Recipe 女巫手指餅乾 - 萬聖節食譜  http://uTry.it

I hope you enjoyed today's recipe and tutorial.  Stay tuned for another fun and easy Halloween treat next week!  BOO!

How to Make Witch's Fingers Shortbread Cookies -  Halloween Recipe 女巫手指餅乾 - 萬聖節食譜  http://uTry.it


Tools and Ingredients Used:
Valrhona Unsweetened Cocoa Powder (Click here for more information)
Sliced Almonds 
(Click here for more information)

Organic Vanilla Extract (Click here for more information)

Kerrygold Salted Butter (Click here for more information)

Measuring Spoons Set (Click here for more information)

Silicone Pastry Brush 
(Click here for more information)

Stand Mixer (Click here for more information)

Cooling Racks (Click here for more information)

Rolling Mat (Click here for more information)

Baking Sheets 
(Click here for more information)


Disclosure: uTry.it is a participant in the Amazon Services LLC Associates Program, an affiliate advertising program designed to provide a means for sites to earn advertising fees by advertising and linking to Amazon.com.

Saturday, September 23, 2017

How to Make S’more Ice Cream Pie


Yesterday marked the first day of Fall!  The weather has been comfortable and mostly cooled down.  But it’s still nice and warm in the afternoon so my Kids are stilling craving for cool desserts most of the time.  The solution?  This scrumptious S’more Ice Cream Pie!

How to Make S'more Ice Cream Pie (No-Bake Dessert)  http://uTry.it

S’more is one of my Kids’ favorite treats.  I don’t make them too often, so it remains as a special and occasional treat for them.  But before I am ready for the cozy campfire and traditional S’more, this S’more Ice Cream Pie is the best transitional treat in between the Summer and Fall.  It combines the best of both world with the comforting gooey and charred marshmallow on top as well as refreshing ice cream filling.  Plus, who doesn’t like magic chocolate shells and chocolate graham cracker crust?  Yes, these are all the components of this pie.  The perfectly sinful and delicious combination, all in one easy-to-prepare pie!  If you haven’t watch the video tutorial above, please check it out.  You’ll agree that this pie is super easy to put together.

How to Make S'more Ice Cream Pie (No-Bake Dessert)  http://uTry.it


This recipe calls for a total of 3 cups of softened vanilla ice cream.  You can use homemade ones or store bought ones.  However, when I was making this pie, I realized that I didn’t have enough vanilla ice cream while preparing for the 2nd layer!!!  As much as I prefer my homemade ice-cream recipe over store bought ones, I also didn’t want to drive to the store for just 1/2 a cup of ice cream!  So, I improvised and substituted with coffee ice cream instead.  It turned out quite delicious with a more complex of flavor.  Next time, I’m going to try with a layer of chocolate ice cream as well!  So, by all means, explore and experiment with different flavors of ice cream when you make this pie!  Just like everything else in life, we need to learn to be flexible.  My new motto of the week, “Keep Calm and Eat Pie!”

How to Make S'more Ice Cream Pie (No-Bake Dessert)  http://uTry.it

For the coming weeks, I’ll be posting some traditional recipes for the Chinese Mid-Autumn festival as well as fun treats for Halloween.  If you have any recipe request or suggestion, please feel free to leave a comment below and I’ll try my best to post them before the festivals.  Remember, Eat, Drink, and Be Happy!  Thank you for stopping by today and I’ll see you next week! 

Tools and Ingredients Used:
Kitchen Torch (Click here for more information)
Butane for Torch (Click here for more information)

9-inch Pie Plate (Click here for more information)

Organic Semi-Sweet Chocolate Chips (Click here for more information)

Organic Honey Graham Crackers (Click here for more information)

Ninja Food Processor Set (Click here for more information)

Mini Marshmallows 
(Click here for more information)


Disclosure: uTry.it is a participant in the Amazon Services LLC Associates Program, an affiliate advertising program designed to provide a means for sites to earn advertising fees by advertising and linking to Amazon.com.


Saturday, August 5, 2017

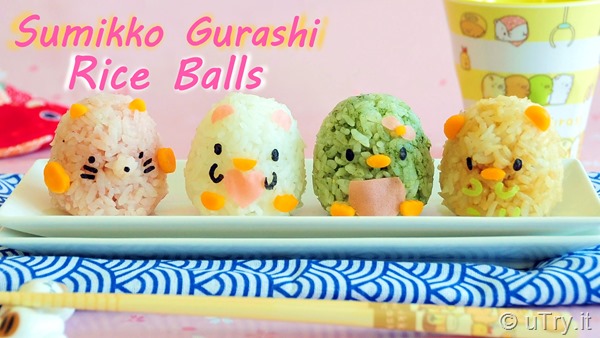
Sumikko Gurashi Sushi Rice Balls 角落公仔壽司飯糰


Have you seen these cutie critters before?  They are called Sumikko Gurashi!  Aren’t they super adorable?  Today, I’m sharing a recipe with you that’s inspired by these super adorable characters from Japan: Sumikko Gurashi Sushi Rice Balls 角落公仔壽司飯糰.  If you’ve checked out my video tutorial above, you’ll also see the tools and ingredients that I used to make them.

Sumikko Gurashi Sushi Rice Balls 可愛壽司飯糰   http://uTry.it

It all started not long ago with a super soft and squishy plush toys that I got for my daughter from a Japanese store.  Ever since that day, we all fell in love with these cute little creatures!

Sumikko Gurashi Sushi Rice Balls 可愛壽司飯糰   http://uTry.it

Sumikko Gurashi Sushi Rice Balls 可愛壽司飯糰   http://uTry.it
Image from the web

What does Sumikko Gurashi means?  “Sumikko” means corner, and “Gurashi” means life.  Together, they can be translated to 'living in a corner,' as that’s what these little critters like to do.

Sumikko Gurashi Sushi Rice Balls 可愛壽司飯糰   http://uTry.it

From time to time when I see cute little Sumikko Gurashi products, I couldn’t resist but to take them home with me! 

Sumikko Gurashi Sushi Rice Balls 可愛壽司飯糰   http://uTry.it
Picture from web

In today’s recipe, I’m making these sushi rice balls stuffed with a creamy and smoked salmon filling.  The rice itself is seasoned with different ingredients for their natural colors and flavors.

Sumikko Gurashi Sushi Rice Balls 可愛壽司飯糰   http://uTry.it

First off, we have Neko Cat.  The rice is seasoned with cod powder for the umami flavor and gorgeous pink color.  It compliment the salmon fillings really well.

Sumikko Gurashi Sushi Rice Balls 可愛壽司飯糰   http://uTry.it

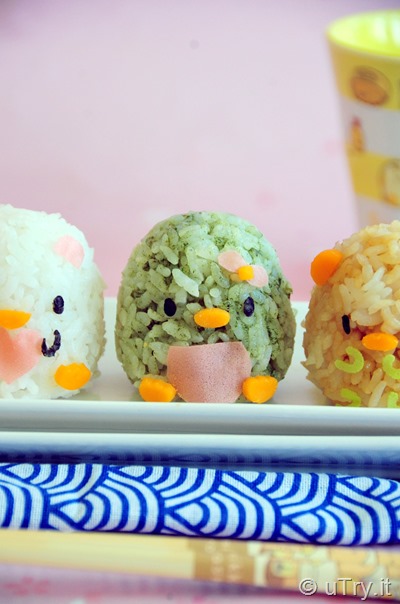
Next is Polar Bear.  I leave the rice plain on this one for the white color.  Its ears are decorated with pink Soy Wrappers that are so much fun and easy to use!  It’s mouth and legs are stamped out cheddar cheese and it’s eyes and hands are stamped out seaweeds.

Sumikko Gurashi Sushi Rice Balls 可愛壽司飯糰   http://uTry.it

Up next is Penguin!  The green color is from matcha green tea powder.  You can also substitute with spinach puree or other dark green vegetable puree if you have those on hand.  But the earthy green tea flavor truly balanced well with the smoky salmon inside these rice balls.

Sumikko Gurashi Sushi Rice Balls 可愛壽司飯糰   http://uTry.it

Last but not least, Tonkatsu!  Remember I shared my homemade Tonkatsu recipe with you not long ago?  It’s Japanese style pork cutlets!  See the resemblance?   For this one, I seasoned the rice with a little bit of light soy sauce for flavor and color.  They all turned out super yummy!

Sumikko Gurashi Sushi Rice Balls 可愛壽司飯糰   http://uTry.it
Image from web

How well did I I in in shaping and decorating these characters against the picture sample above?  Not bad, isn’t it?  I can’t wait to make “tail of fried shrimp”, “tapioca”, and “sparrow” next time!  They are all super duper cute!

Sumikko Gurashi Sushi Rice Balls 可愛壽司飯糰   http://uTry.it

I hope you enjoyed today’s video and recipe as much as we do.  My daughter and I had a fun time creating them together!  Thank you so much for reading and stay tuned for more fun and kawaii recipe next week!  Remember, Eat, Drink, and Be Happy! 

Sumikko Gurashi Sushi Rice Balls 可愛壽司飯糰   http://uTry.it


Products, ingredients, and tools used in this post:
Sumikko Gurashi Cat Plush Toy (Click here for more information)Sumikko Gurashi Rice Ball Mold  (Click here for more information)
Soy Wrappers  (Click here for more information)
Matcha Green Tea Powder (Click here for more information)
Sumikko Gurashi Chopsticks (Click here for more information)

Sumikko Gurashi Cup (Click here for more information)

Roasted Seaweed (Click here for more information)

Honey Smoked Salmon (Click here for more information)

Organic Soy Sauce (Click here for more information)

Japanese Sushi Rice (Click here for more information)

Japanese Mayo (Click here for more information)

Food Decorating Tongs/Tweezers (
Click here for more information)


Disclosure: uTry.it is a participant in the Amazon Services LLC Associates Program, an affiliate advertising program designed to provide a means for sites to earn advertising fees by advertising and linking to Amazon.com.