Showing posts with label TangZhong Method. Show all posts

Friday, January 5, 2018

Cinnamon Pull-Apart Star Bread (Tang Zhong Method 湯種法)


Happy New Year!  Hope you’re having an awesome start to 2018 so far!

Cinnamon Pull-Apart Star Bread (Tang Zhong Method 湯種法)   http://uTry.it

So sorry for the lack of posts in the past few weeks.  I was going to share this recipe with you before Christmas so that you can make it and share it with your family during the holidays!  Oh well, I guess things don’t always turn out the way we have planned. 

Cinnamon Pull-Apart Star Bread (Tang Zhong Method 湯種法)   http://uTry.it

This Cinnamon Pull-Apart Star Bread might look fancy, but it’s actually quite easy to shape.  Simply follow my tips and tricks in the video tutorial and I’m sure you’ll agree.  I created this recipe using my favorite bread making method: Tang Zhong Method 湯種法!  Tang Zhong Method is a natural way to make soft and fluffy bread.  Best of all, the bread will stay soft even after a few days.  Read more about Tang Zhong Method 湯種法 here if you’re interested to learn more.

Cinnamon Pull-Apart Star Bread (Tang Zhong Method 湯種法)   http://uTry.it

This Cinnamon Pull-Apart bread is scrumptious as is, or you can sprinkle some powdered sugar on top to make it extra pretty!  I love that you can see the layers and layers of cinnamon sugar in between the bread.  It totally reminds me of the infamous cinnamon rolls from the mall!  This bread is best served warm, in my opinion.  If you have any leftover bread, simply wrap it up tightly with plastic wrap and store it at room temperature.  To reheat, unwrap and place the bread on a baking pan, loosely tent with a foil and warm it in a 350 F preheated oven for 10 to 15 minutes.  To heat it up in the microwave, simply warn each wedge of bread for 20 seconds.    

Cinnamon Pull-Apart Star Bread (Tang Zhong Method 湯種法)   http://uTry.it

Thank you so much for stopping by today.  I hope you enjoy the recipe and tutorial.  Stay tuned for more fun recipe next week!  Wish you all a healthy, happy, and prosperous 2018!

Cinnamon Pull-Apart Star Bread (Tang Zhong Method 湯種法)   http://uTry.it


Tools and Ingredients Used:
Wooden Spatula with Flat Top (Click here for more information)
Powdered Sugar Shaker
 (Click here for more information)
Active Dry Yeast
 (Click here for more information)
Kitchen Scale
 (Click here for more information)
Round Cookie Cutter Set
 (Click here for more information)
Sharp Pairing Knife
 (Click here for more information)
Baking Sheets
 (Click here for more information)
Kerrygold Butter
 (Click here for more information)
Stand Mixer
 (Click here for more information)
Cooling Racks
 (Click here for more information)
Organic All-Purpose Flour
 (Click here for more information)
Pastry Brush
 (Click here for more information)
Organic Vanilla Extract
 (Click here for more information)
Organic Ground Cinnamon
 (Click here for more information)
Rolling Pin
 (Click here for more information)
Measuring Spoons Set
 (Click here for more information)
Infrared Thermometer (Click here for more information)


Disclosure: uTry.it is a participant in the Amazon Services LLC Associates Program, an affiliate advertising program designed to provide a means for sites to earn advertising fees by advertising and linking to Amazon.com.

Friday, August 25, 2017

How to Make Hawaiian Buns (Tang Zhong Method) 夏威夷麵包-湯種法


Do you love Hawaiian Buns?  My family is a big fan of these buns!  Today, I want to share this homemade copy cat recipe with you.  After several recipe testing, I have finally ended up with this amazing recipe that our family absolutely loved!  The verdict?  We all agreed that my homemade version is way better than the store bought ones!  After all, it’s quite difficult to beat freshly baked buns that are still warm right out of the oven.  This is especially true since these buns are made with all natural ingredients and packed with amazing sweet aromas!  When you bake these buns, your whole house would smell amazing, like a bakery.  As my Son puts it, these buns are simply irresistible! 

Hawaiian Buns (Tang Zhong Method) 夏威夷麵包-湯種法    http://uTry.it

If you had been following my blog for a while, you probably know that I like making bread and buns with the Tang Zhong Method 湯種法.  This Hawaiian Bun recipe is no exception.  Tang Zhong Method is a bread making method that involved a partially cooked dough added into the main bread dough.  This method yields the most amazing soft and fluffy texture of breads and buns.  The most amazing part is that the softness will last for a few days (that is if you haven’t finished these buns by then!)  You can read more about the science behind the Tang Zhong Method by clicking here

Hawaiian Buns (Tang Zhong Method) 夏威夷麵包-湯種法    http://uTry.it

For the unfinished portions, simply wrap them tightly in plastic wraps.  To reheat, simply unwrap the buns and heat them up for a few seconds in the microwave.  They will be warm and soft just like they are fresh out of the oven!  If you haven’t try the Tang Zhong method of making bread, I highly recommend that you give it a try.  Once you have done it, you would not go back!  
  
Hawaiian Buns (Tang Zhong Method) 夏威夷麵包-湯種法    http://uTry.it

To give these Hawaiian Buns their tropical flavor, I used pineapple juice in the bread dough.  They are slightly sweet because of the brown sugar and vanilla extract.  There’s no egg in the bread dough, but I added some custard powder to give these buns a hint richness of egg aromas.  I used custard powder quite often in a few of my other recipes.  It’s a more common ingredient in Asia countries.  Unfortunately,I haven’t seen them in the local supermarkets in the States yet and I always have to order them online.  I’ll list the ingredients and tools used in this recipe below this post for your convenience.

Hawaiian Buns (Tang Zhong Method) 夏威夷麵包-湯種法    http://uTry.it

Although these Hawaiian Buns are just perfect the way they are, they are even more irresistible if you put a little butter and let it melt in the middle!  Each bite is simply heavenly!  If you are a Hawaiian Buns lover, you’ve got to give this recipe a try and thank me later!  After trying this recipe, you’ll never go back to the packaged version!

Hawaiian Buns (Tang Zhong Method) 夏威夷麵包-湯種法    http://uTry.it

Thank you so much for visiting, stay tuned for more fresh and delicious recipe next week!  Remember, Eat, Drink, and Be Happy!

Ingredients and Tools Used:
9X13 Rectangular Baking Pan (Click here for more information)
Infrared Thermometer (Click here for more information)
Wooden Spatula (Click here for more information)
Dole’s 100% Pineapple Juice (
Click here for more information)
Active Dry Yeast (
Click here for more information)
Custard Powder (
Click here for more information)
Dry Milk Powder
(Click here for more information)
Kerrygold Salted Butter (
Click here for more information)
Measuring Spoons Set (
Click here for more information)
Kitchen Scale (
Click here for more information)
Dough/Bench Scraper (
Click here for more information)
Silicone Pastry Brush (
Click here for more information)
Brown Sugar (
Click here for more information)
Stand Mixer (
Click here for more information)
Cooling Racks (
Click here for more information)
Rolling Mat (
Click here for more information)
Rolling Pin (
Click here for more information)
Organic Vanilla Extract (
Click here for more information)
Heat Proof Measuring Cups (
Click here for more information)

Disclosure: uTry.it is a participant in the Amazon Services LLC Associates Program, an affiliate advertising program designed to provide a means for sites to earn advertising fees by advertising and linking to Amazon.com.


Friday, June 28, 2013

Mini Azuki Buns 迷你紅豆麵包 (TangZhong method 湯種法)


166edited-1

Just realized that I haven’t share a bread/buns recipe on my blog for a while.  So, I guess it’s about time to do so.  I make loaf breads and filled buns at least two to three times a week.  That’s how much my family loves bread.  Besides the usual Sausage Buns, Pastrami And Muenster Blossom Buns, and Prosciutto with Smoke Gouda Crescent, these sweet Mini Azuki Buns (迷你紅豆麵包) are also my family’s favorites. 

Still remember the Azuki Bean Paste recipe that I shared not long ago?  Great!  If not, please check out this post here for the recipe and pictorial.  You’re going to need that for today’s recipe.  Of course, you can get the ready-made red bean fillings for this bread recipe.  But why?  When you can easily make your own and enjoy it any time you like.  Plus, it’s a lot cheaper to make your own and you can control the sweetness in your bean paste.

093edited

These buns are really mini in size.  I can easily eat three of them just for breakfast.  Yes, they are that tiny.  Or yes, I have a big appetite!  They fit perfectly in my Little Girl’s hands.  Don’t you think everything is more adorable in mini-size?  Well, I guess my hubby’s tummy would disagree on that.  But the rest of the family do think so. 

116edited

You might noticed from the title of this post that this bun recipe uses the TangZhong method (湯種法).  If you’re a long time follower of my blog, you might remember this method is my favorite way of making bread.  In summary, the TangZhong method is adding a cooked dough into the main bread dough to create a soft and fluffy bread/buns, with its softness lasting for a few days.  You can read more about this method here if you're interested.

244edited-1

Are you ready to get into my kitchen to see how I made these Mini Azuki Buns?  Come on over.

First, we prepare the TangZhong the day before (See picture below)

**Note, please excuse me that the TangZhong Pictorial picture is from a previous post.

1) In a small saucepan, add 1/2 cup of water and 1/4 cup bread flour together. 

2) With a wooden specula, stir until there’s no big lumps.

3) Cook the mixture on low heat, stirring constantly. 

4) When the dough turns slightly translucent and thicken, remove from heat and let it cool slightly.

5) I usually double the TangZhong for another recipe.  So, I used a scale to divide the TangZhong.  If you’re just making a single recipe, please ignore this step.

6) Wrap the TangZhong with a piece of plastic wrap and refrigerate it overnight before use.

Pictorial of making Tang Zhong

After the mixer is done with kneading the dough for you (thank you), let the dough proof for an hour.  Divide the dough into 24 equal parts, let them rest for 15 minutes and follow the steps below to fill the buns.  (see picture below)

1) Simply roll the red bean paste into 24 1-inch balls.  Set aside.

2) On a lightly floured surface, work with one portion of the dough at a time.  Gently knead the dough a few times. Form it into a smooth round ball. 

3) With a lightly floured rolling pin, gently roll the dough into an 3-inch circle.

4) Place one of the red bean paste ball in the middle of the rolled-out dough. 

Pictorial A

5) Gently pull the sides up and pinch the dough to close the seams. 

6) Place the filled dough seams side down into a mini tin foil cup (or onto a silpat lined baking sheet).  Repeat with the rest of the dough and fillings.  Place filled buns in a warm place to proof a second time.  About 30 to 40 minutes, or until double in size.

7) Preheat oven to 350°F. Prepare the egg wash by beating the egg and a teaspoon of water until well combined.  Gently brush egg wash on top of the buns.

8) Sprinkle with sesame seeds and bake for 12 to 15 minutes, or until slightly golden. Cool on wiring rack.

Pictorial B

Pretty straight forward, isn't it?  The steps are actually quite easy.  But please note that, the whole process of bread making takes more than 3 hours from start to finish.  So, it could well be your weekend “project”, especially if you have a 9-5 full-time job.  The good news is, the bread stays nice and soft for many days for your enjoyment.  Because of the hot summer weather, you might want to keep the buns in the refrigerator.  Simply reheat them slightly in the microwave (without the foil) or toaster oven and they will taste like they are fresh out of the oven.  (I usually use the microwave so the buns won’t get dried up and turn crispy).

203edited

These are the perfect two-biters, or 6, if you’re like me, eating 3 buns in one sitting.  So, do you make your own bread at home?  Have you ever tried the TangZhong method of making bread?  I would love to hear from you.  Let me know if you have a favorite bread recipe to share.  Until next time, please take care. 

321edited


Tuesday, April 17, 2012

Pastrami and Muenster Cheese Blossom Buns using Tang Zhong Method (湯種法)—With Video Tutorial

246edited

I used to love my bread machine, yup, used to!  Technically, it’s my husband’s bread machine.  He already had it when I met him.  So, this machines is 10+ years old!  (Oh, and I still love my husband very very much, in case if you wonder! Open-mouthed smile)  I only used the bread machine to knead the dough for my loaf breads and buns and selfdom use it to bake a loaf from start to finish.  That is because I like to shape the loaf bread myself such as this.  Its very convenience to have the machine because it saves me 15 to 20 minutes of kneading time.  About a month ago, the results of my bread began to varies.  Sometimes they came out wonderful, sometimes they came out awful, and sometimes the dough didn't rise properly.  My husband blamed it on the change of weather!  hahaha….See how cute he is?

188edited

On the other hand, I was thinking it could be the problem of the yeast since it’s a new bag that I had just purchased.  So, I did a simple test on the yeast by putting a small amount of yeast in a bowl of warm water along with some sugar.  A little bit to my surprise, it bubbled up nicely in a few minutes.  So, the yeast was alive!  I guess I was kind of hoping it was the problem of the yeast and not the machine because it’s definitely easier (and cheaper) to get a new bag of yeast than a bread machine!  But after the yeast test, I pretty much confirmed it’s the problem of the bread machine!  What am I going to do?  I didn’t want to knead the dough by hand!  And my family is not going to stop eating bread any time soon either.  Luckily, I have my trusty stand mixer to turn to!  Open-mouthed smile

218edited

Needless to say, my dough came out nice and pretty.  In fact, much nicer than it was from the bread machine!  So, I’ve been making my bread dough from the mixer since a month ago and couldn’t be happier with the consistent results.  Turn out, there were a few times the bread machines didn’t knead the dough enough for the gluten to develop and the dough came out wrinkle like this instead of smooth and shiny. 

330edited

I was in the market to purchase a new bread machine at the beginning.  But after a few batches of beautiful breads using the dough kneaded by the stand mixer, I decided I don’t need a bread machine (at least for now)!  Yay….I can free up some pantry space to store more______(fill in the blanks for whatever you think they might be, hahaha…)

324edited

Back to these Pastrami and Muenster Cheese Blossom Buns.  They are beautiful and delightful.  I used the same Tang Zhong bread dough as the base so the buns are soft and fluffy.  I love the combination of smoky flavor in the pastrami along with the mild and smooth muenster cheese.  You can substitute the pastrami with ham, turkey or any kind of sliced meat from the deli and match with your favorite cheese in this recipe.  The picture below shows you the inside of the bun.  Yup, light and fluffy.  And best of all, you get a piece of pastrami and cheese in every bite because of the way I shaped the buns.

316edited

Before you go, don’t miss the video tutorial on how to shape these Pastrami and Muenster Cheese Blossom Buns.  They are very simple and easy to make.  Enjoy.


Last but not least, I'm submitting this post to Yeast Spotting!  Check them out and be ready to drool a little!  :)

Wednesday, January 25, 2012

Hong Kong Bakery-Style Sausage Bun (腸仔包) Using Tang Zhong Method (湯種法) with Video Tutorial

389edited

If you’ve been following my blog for a while, you would probably remember the different types of bread recipes that I created with the Tang Zhong Method (湯種法).  Think of the Tang Zhong Method (湯種法) as the “starter” or dough base for your bread.  This method yields the softest and fluffiest bread you’ll ever experienced.  Unlike the traditional homemade bread, which often turns into “stone” the very next day; in contrast, the softness of the bread made with the Tang Zhong Method (湯種法) lasts for days.  Simply reheat the bread in the microwave and it tastes and feels as it’s just came out of the oven.  If you’ve missed the previous recipes and video, no worries, here they are again: A Loaf of White Bread, The Prosciutto di Parma with Smoke Gouda Crescent, Friendship Braided Bread, and The Brown Wheat Bread - Cheesecake Factory Style


377edited

Ever since I’ve discovered how easy and tasty homemade breads are, I’ve been making bread and buns more often at home.  The “demand”  had also increased, hence, I’ve been using a new method in preparing the Tang Zhong.  In my previous 4 bread recipes mentioned above, I recommend pouring the boiling water over the bread flour to create the Tang Zhong.  This works wonderfully when you’re preparing a single batch of Tang Zhong for 8 buns OR a loaf of bread in an 9 by 5-inch loaf pan such as this one below. 

However, I’ve switched to a different loaf pan long ago because of the increase in demand. I often found myself baking 2 loaves of bread in a day, one for my family and one for my In-Laws.  Or, a loaf of bread with another batch of (a dozen instead of 8) buns, such as these Hong Kong Bakery-Style Sausage Buns.  Back to this new loaf pan below, it has the capacity of 1.5 times of the one above.  Which means that I often find myself creating 3 times the amount of Tang Zhong.  Plus, the end result just look much better with the rigid/straight corners. Winking smile  At the end of this post, I’ll show you in a short video on how the new loaf of  bread looks like after it’s out of the oven!  So what is the new method of preparing Tang Zhong?  Simply prepare it on the stove top! 

Focus Foodservice Commercial Bakeware 1 1/2 Pound Pullman Pan

Here’s a simple pictorial on how to prepare the Tang Zhong on the stove top.

1) In a small/medium saucepan, add 1 1/2 cup of water and 3/4 cup bread flour together.

2) With a wooden specula, stir until there’s no big lumps.

3) Turn on the stove to low heat and continue to stir.  The dough will start to thicken.

4) When the dough turns slightly translucent and thicken, remove from heat and let it cool slightly.

5) Line a kitchen scale with plastic wrap, evenly divide the dough into 2, I always use a digital kitchen scale such as this one for accuracy (I’ve been using this scale for a while now.  I love it because the price is reasonable, very accurate and easy to use.  Besides, you will need one for making French Macarons anyway…okay, that’s another post.  Sorry….hehehe…)  I always get 200 gram (about 7 ounces) of Tang Zhong for each of this recipe.

6) Wrap each one up and refrigerate it overnight before use.

Pictorial of making Tang Zhong

The next day when you’re ready to bake, follow my recipe’s instructions at the bottom of this post.  This video below shows you how to form these Hong Kong Bakery-Style Sausage Buns, after the dough finishes the first round of proofing (refer to Step III and Step IV from the recipe).  Please enjoy the video.  


Pretty easy, huh?  In fact, they are, and very tasty as well.  Nothing beats the aroma of bread baking in the oven.  The whole house smells wonderful, just like home.  Oh well, some days my home smells like a bakery!  hahaha….

I usually use all beef kosher sausage to make these buns because my family prefers the taste.  But you can use your favorite kind of sausages, such as chicken, turkey or pork.  Another note, when you’re ready to make these buns, the whole process from start to finish takes about 3 1/2 hours.  However, there are a lot of “down time” in between because of the proofing, resting and baking.  The real hands on time is approximately 20 to 30 minutes, depending on how fast you can form these buns. Winking smile So, you might want to make sure you have sufficient time before you get started.   


379edited

Here’s a closer look at the inside of these sausage buns below.  See how light and fluffy they are?  I just love them.  Especially, when I don’t have to pay $1.75 to $2.00 per bun at our local bakery. Smile with tongue out


486edited

If I still haven't convinced you to make your own Tang Zhong bread, you’ve got to watch this short video below.  This video will show you how light and fluffy a loaf of Tang Zhong bread could possibly be! Unlike commercially produced bread, this one has NO artificial ingredients nor hard to pronounce “stuffs”/chemicals in the bread to make it light and fluffy for days.  It’s all NATURAL and basic ingredients.  Winking smile It’s the “method” and LOVE that do the magic!


Wednesday, August 3, 2011

Brown Wheat Bread - Cheesecake Factory Style using TangZhong Method (湯種法)

066edited

If you’ve been to Cheesecake Factory, you probably know about the Brown Wheat Bread that they serve before your order arrives.  They are addictive!  There were times I ate so much of this bread that I couldn’t even finish 1/3 of my entrée.  I’ve been searching high and low over the internet for the recipe, but with no luck.  As you know, I love baking bread at home especially with the TangZhang method (湯種法).  If you’re not familiar with the TangZhong method, please refer to my posts here, here and here. You’ll see why I love this method so much.  Lately, I’ve been experimenting this recipe to incorporate the TangZhang method for this brown wheat bread.  The result was Ah—mazing!

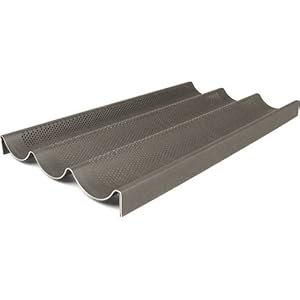
Chicago Metallic 17x9-in. Nonstick Professional Nonstick Perforated Baguette Pan
Product Picture from Amazon

I used this baking pan as shown from the picture above to make these baguettes.  They are perfect for this recipe.  The perforated pan keeps the bread baking evenly and the unique shape helps the loaves stay in their round shape.  For more details about this pan, please to go the “Equipment” tab above this post or simply click here.

131edited

Just like how they'd serve it in Cheesecake Factory, a small tab of butter or margarine is all you need for this amazing brown wheat bread.  Its flavor is rich and complex.  You’ll taste a hint of molasses and rye in the background along with the cocoa.  The texture is smooth and soft (thanks to the TangZhong method, the bread stays soft and tender for a few days) with a bit of crunch from the oaks on top.  Hm…now, I can enjoy this wonderful bread anytime at home without the wait and the noise from Cheesecake Factory! 

110edited


Saturday, February 5, 2011

Philly Friendship Braided Bread

I believe every dish and every new recipe has a story behind it.  The story could be cooking with your loved ones' favorite ingredients, so that you can cheer him/her up after a long day of work.  Or it could be a story of eating healthy for yourself and/or for the family.  How about a story to celebrate friendship?  This Philly Friendship Braided Bread I created is especially made for Suzanne, someone I know and connected through food, to celebrate our friendship.


Philly Friendship Braided Bread 

I know Suzanne through The Philadelphia Cream Cheese Recipe Contest less than 6 months ago.  We’ve never met but I felt like she’s my long lost sister.  We shared recipes, ideas, and our life’s stories through the Philly community, and later on, through my blog.  Little did I know, a recipe competition site is so welcoming and supportive.  The Philly community is filled with love and caring, pretty much to my surprise and totally not what I had expected when I submitted my very first entry.

Besides Suzanne, there are many other “brothers and sisters” I get to know through that site.  Hop over and check it out here.  I promise you won’t be disappointed.

Back to this particular recipe.  What inspired me to create this bread?  It started with a comment left by Suzanne on my Birthday Post

“Happy Birthday Amy!!! I tried your TangZhong style white bread and my family is now your best friend! It was amazing, easy to make and really fun. Best of all it was so delicious. I made my son's lunch sandwich with it and my daughter and her boyfriend ate a whole loaf (he snuck it home with him). I've made it twice with the same great results. I can't wait to try something like the angel cake soon. Thanks for this amazing blog.”

It was the best birthday gift I’ve received this year!  As a blogger and foodie, nothing makes me more happy than knowing my readers and my friends tried my recipes and loved them.  (especially with my blog name, hello…?) I know many of you might have tried my recipes, but might not had posted a comment to let me know.  (hey, it’s never too late.  I still accept belated birthday gifts! LOL)  So, thank you Suzanne, from the bottom of my heart. 

Then we went on exchanging emails and talked about what we can make with this basic bread recipe.  I shared with Suzanne some other fillings I’ve tried and loved.  Then, I was thinking to myself, I knew Suzanne through the Philadelphia recipe contest, why not create a recipe for her using Philly Cream Cheese?  So, here we go.  Philly Friendship Braided Bread.  It’s as beautiful as Suzanne herself, both inside and out. 

Philly Friendship Braided Bread

By the way, Suzanne sent a picture of her creation of a loaf bread using my TangZhong recipe.  Isn’t it amazing!? 

Suzannes Loaf

Thank you again Suzanne for your inspiration.  I know you love visual tutorial.  So, I included the step-by-step pictures instructions here, just for you!  ;)  I hope you and your family enjoy this recipe as much as my family does!  These Philly Friendship Braided Breads are my family’s new favorites now. 

This pictures below shows step number 4 and 5 from the recipe below.  After you roll out the dough to a 5 by 5-inch square, cut off the 4 corners of the dough as shown.  Then cut the two sides of the dough a few times to make even sized strips(about 1/2-inch wide each).  Then, spread a tablespoon of cream cheese in the middle and top with a tablespoon of your favorite preserves.  I used orange marmalade here.  You can use, strawberry preserve, lemon curd, or blueberry preserves.

Philly Friendship Braided Bread

Then, fold the top and bottom parts of the dough to the center.

Philly Friendship Braided Bread

Take one strip of dough from one side and fold it over the fillings at an angle, alternating with the other side like crossing arms, until all pieces are done.  Make sure to overlap the strip in the middle so they stick together during second proof. 

 Philly Friendship Braided Bread


Philly Friendship Braided Bread

Let the filled dough proof the 2nd time in a warm place for 30 to 45 minutes, or until doubled in size.  Brush egg wash on top and bake.  They turned out really soft, fluffy and delicious.  I love the oozing creamy filling inside.  They are best served warm or at room temperature.  My kids love the Blueberries and Strawberries preserves fillings the most.  I personally love the orange marmalade and lemon curd.  Of course, you can make different kinds of filling in the same batch too.  That’s the fun part.

Philly Friendship Braided Bread

I'm submitting this recipe to the Holiday Recipe Swap.  Come join the fun at the My Baking Addiction and GoodLife Eats Holiday Recipe Swap sponsored by Red Star Yeast.