Showing posts with label Copy Cat Recipe. Show all posts

Friday, August 25, 2017

How to Make Hawaiian Buns (Tang Zhong Method) 夏威夷麵包-湯種法


Do you love Hawaiian Buns?  My family is a big fan of these buns!  Today, I want to share this homemade copy cat recipe with you.  After several recipe testing, I have finally ended up with this amazing recipe that our family absolutely loved!  The verdict?  We all agreed that my homemade version is way better than the store bought ones!  After all, it’s quite difficult to beat freshly baked buns that are still warm right out of the oven.  This is especially true since these buns are made with all natural ingredients and packed with amazing sweet aromas!  When you bake these buns, your whole house would smell amazing, like a bakery.  As my Son puts it, these buns are simply irresistible! 

Hawaiian Buns (Tang Zhong Method) 夏威夷麵包-湯種法    http://uTry.it

If you had been following my blog for a while, you probably know that I like making bread and buns with the Tang Zhong Method 湯種法.  This Hawaiian Bun recipe is no exception.  Tang Zhong Method is a bread making method that involved a partially cooked dough added into the main bread dough.  This method yields the most amazing soft and fluffy texture of breads and buns.  The most amazing part is that the softness will last for a few days (that is if you haven’t finished these buns by then!)  You can read more about the science behind the Tang Zhong Method by clicking here

Hawaiian Buns (Tang Zhong Method) 夏威夷麵包-湯種法    http://uTry.it

For the unfinished portions, simply wrap them tightly in plastic wraps.  To reheat, simply unwrap the buns and heat them up for a few seconds in the microwave.  They will be warm and soft just like they are fresh out of the oven!  If you haven’t try the Tang Zhong method of making bread, I highly recommend that you give it a try.  Once you have done it, you would not go back!  
  
Hawaiian Buns (Tang Zhong Method) 夏威夷麵包-湯種法    http://uTry.it

To give these Hawaiian Buns their tropical flavor, I used pineapple juice in the bread dough.  They are slightly sweet because of the brown sugar and vanilla extract.  There’s no egg in the bread dough, but I added some custard powder to give these buns a hint richness of egg aromas.  I used custard powder quite often in a few of my other recipes.  It’s a more common ingredient in Asia countries.  Unfortunately,I haven’t seen them in the local supermarkets in the States yet and I always have to order them online.  I’ll list the ingredients and tools used in this recipe below this post for your convenience.

Hawaiian Buns (Tang Zhong Method) 夏威夷麵包-湯種法    http://uTry.it

Although these Hawaiian Buns are just perfect the way they are, they are even more irresistible if you put a little butter and let it melt in the middle!  Each bite is simply heavenly!  If you are a Hawaiian Buns lover, you’ve got to give this recipe a try and thank me later!  After trying this recipe, you’ll never go back to the packaged version!

Hawaiian Buns (Tang Zhong Method) 夏威夷麵包-湯種法    http://uTry.it

Thank you so much for visiting, stay tuned for more fresh and delicious recipe next week!  Remember, Eat, Drink, and Be Happy!

Ingredients and Tools Used:
9X13 Rectangular Baking Pan (Click here for more information)
Infrared Thermometer (Click here for more information)
Wooden Spatula (Click here for more information)
Dole’s 100% Pineapple Juice (
Click here for more information)
Active Dry Yeast (
Click here for more information)
Custard Powder (
Click here for more information)
Dry Milk Powder
(Click here for more information)
Kerrygold Salted Butter (
Click here for more information)
Measuring Spoons Set (
Click here for more information)
Kitchen Scale (
Click here for more information)
Dough/Bench Scraper (
Click here for more information)
Silicone Pastry Brush (
Click here for more information)
Brown Sugar (
Click here for more information)
Stand Mixer (
Click here for more information)
Cooling Racks (
Click here for more information)
Rolling Mat (
Click here for more information)
Rolling Pin (
Click here for more information)
Organic Vanilla Extract (
Click here for more information)
Heat Proof Measuring Cups (
Click here for more information)

Disclosure: uTry.it is a participant in the Amazon Services LLC Associates Program, an affiliate advertising program designed to provide a means for sites to earn advertising fees by advertising and linking to Amazon.com.


Friday, April 28, 2017

Unicorn Frappuccino – With All-Natural Coloring


Last week, Starbucks introduced a special drink that was only available for a limited time.  Yes, it was offer to the general public for less than a week only!   Many of my friends and family rushed to their nearest Starbucks locations and lined up for this specialty drink: The infamous Unicorn Frappuccino! Were you one of them who tried?

Unicorn Frappuccino–With All-Natural Coloring   http://uTry.it

Unfortunately, the review and feedback of this drink was not as positive as the enthusiasm of the Starbucks fans!  It was quite a mixed review, I must say.  Some described it as a refreshing sour mango-flavored drink.  Some said it was a waste of money and tasted too artificial, etc.  I guess, the artificial came from the coloring of the drink?

Unicorn Frappuccino–With All-Natural Coloring   http://uTry.it

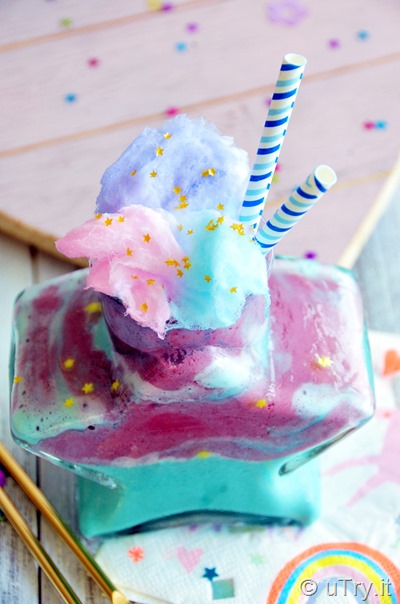
Hence today, I’m sharing my sort of copycat version of the Starbucks’ Unicorn Frappuccino with you!  Why “sort of”? Because my version would probably taste nothing closed to the original version of this drink.  But the look and color is definitely a replica!  Only, I’m using all-natural coloring in my recipe!

Unicorn Frappuccino–With All-Natural Coloring   http://uTry.it

Yes, all natural color in my recipe, including this gorgeous hue of blue!  If you haven’t watch my video tutorial above, what are you still waiting for?  You’ll discover the secret ingredient that I used to create this gorgeous blue color!  It was truly magical to see the transformation of the color! 

Unicorn Frappuccino–With All-Natural Coloring   http://uTry.it

My homemade version of the Unicorn Frappuccino is a Blue Vanilla Frappuccino, layered with Purple Blackberry Frappuccino, topped with cotton candy and edible gold stars!  It’s whimsical, magical, refreshing and oh so delicious!  The sweetness from the Vanilla Frappuccino balanced really well with the tangy Blackberry Frappuccino layer!  Of course, you can top these with whipped cream instead of cotton candy.  But I think the cotton candy adds a layer of dreaminess to this special drink!  If you’re hosting a Unicorn themed party, this drink will definitely be the star of the show! 

Unicorn Frappuccino–With All-Natural Coloring   http://uTry.it

Thank you so much for stopping by!  Leave me a comment below and tell me if you’ve tried the Starbucks’ Unicorn Frappuccino and what did you think about it?  If you tried my homemade version, be sure to let me know as well!  I would love to hear from you!  Stay tuned for more fun and magical recipe next week!


Tools and Ingredients used:
Star-shaped jars (Click here for more information)
Rainbow Cotton Candy (Click here for more information)
Edible Gold Stars (Click here for more information)
Blue Paper Straws (Click here for more information)
Gold Stirring Spoon (Click here for more information)
Baking Soda (Click here for more information)
Ninja Blender (Click here for more information)
Agave (Click here for more information)
Ice Cream Scoop (Click here for more information)
Organic Vanilla Extract (Click here for more information)
Measuring Spoons Set (Click here for more information)
Strainer Set (Click here for more information)


Friday, February 17, 2017

Tonkatsu- Japanese Style Pork Cutlets (日式吉列豬扒):


Tonkatsu - Japanese Style Pork Cutlets (日式吉列豬扒) is one of my family’s favorite savory dish.  We used to order it a lot when we dine out.  The key word here is “used to”!  After trying my recipe at home, you can enjoy this dish at home whenever you feel like it! Why order out when you can make it tastier at home, right?

Tonkatsu- Japanese Style Pork Cutlets (日式吉列豬扒)   http://uTry.it

Tonkatsu is a pork cutlet that’s breaded with Japanese breadcrumbs (Panko) and deep-fried to golden brown perfection.  It’s quite irresistible because the flavor is wonderful.  The crust is super crispy and the pork chop inside is tender and juicy.  Instead of deep-frying the cutlets, I usually opt for a shallow fry as a healthier version.  If you haven’t watch my video tutorial, be sure to check it out because I’ll show you the tips and tricks on creating this amazingly crispy crust that stays put during the frying process.

Tonkatsu- Japanese Style Pork Cutlets (日式吉列豬扒)   http://uTry.it

To keep the pork chops juicy and tender, I used a half brining and half marinating method.  It’s important to let the pork chops to marinate overnight.  That way, they have a chance to absorb the moisture and flavors from the marinate.  You’ll be amazed by how juicy and tender your pork chops turn out!  Give this a try and you won’t be disappointed!  The list of ingredients for the marinate may seems quite long, but they are all pretty basic pantry ingredients for Asian cooking.  I’ll list the link of the products that I used at the end of the post for your reference.

Tonkatsu- Japanese Style Pork Cutlets (日式吉列豬扒)   http://uTry.it

I hope you enjoy today’s video and recipe.  Give it a try soon, I’m sure you and your family will love this dish as much as my family does!  Thank you for stopping by and have a wonderful week!

Tonkatsu- Japanese Style Pork Cutlets (日式吉列豬扒)   http://uTry.it


Ingredients and Tools used: 
Homemade Orange Marmalade:
https://goo.gl/lRjIra
Tonkatsu Sauce (Click here for more information)
Light Soy Sauce
 (Click here for more information)
ShaoXing Cooking Wine (Click here for more information)
Sesame Oil
 (Click here for more information)
Grapeseed Oil
 (Click here for more information)
Chicken bouillon powder 
 (Click here for more information)
White pepper powder
 (Click here for more information)
Corn starch
 (Click here for more information)
Zojirushi Rice Cooker (Click here for more information)
Cooling Racks (Click here for more information)
Baking Sheets
 (Click here for more information)
Chicken Broth
 (Click here for more information)
White Pepper Powder
 (Click here for more information)
Japanese Panko Bread Crumbs
 (Click here for more information)
Heavy Duty Copper Pan (Click here for more information)


Friday, April 22, 2016

Mango Crêpe Cakes 芒果法式薄餅千層蛋糕 – To Celebrate Mother’s Day


Mother’s Day is just a couple of weeks away.  Any plans on how to celebrate the mothers in your life?  How about preparing a gorgeous and scrumptious cake for her?  This Mango Crêpe Cakes (芒果法式薄餅千層蛋糕) will sure put a smile on anyone’s face.

How to Make Mango Crêpe Cakes 芒果法式薄餅千層蛋糕 with step-by-step video tutorial.  http://uTry.it

So far, I’m totally enjoying this wonderful mango season by preparing all kinds of mango treats.  From Mango Pudding, Mango Mochi Roll, Mango Panna Cotta, to Mango Shaved Ice, etc, all refreshing and delicious.  But this Mango Crêpe Cakes surely is the most special and spectacular among all! 


How to Make Mango Crêpe Cakes 芒果法式薄餅千層蛋糕 with step-by-step video tutorial.  http://uTry.it

In this recipe, I used the Ataulfo mangoes.  The Ataulfo Mangos are also known as Manila Mangos or Champagne Mangos.  The flesh from the Ataulfo mango is very tender and smooth.  It’s very refreshing, sweet and have a pleasant floral tone, which is perfect for this dessert.  On the other hand, Tommy Atkins mangoes (which are more commonly found in the U.S.) are overall bigger in size, and the skin color is a combination of red and green even when fully ripen.  Also, the flesh is more fiber-ous and firmer.  Therefore, please only use Ataulfo mangoes for this recipe.   

How to Make Mango Crêpe Cakes 芒果法式薄餅千層蛋糕 with step-by-step video tutorial.  http://uTry.it

There are 22 layers of mango crêpes in this cake, each crêpe alternate with a layer of mango cream.  And there’s a layer of thinly sliced fresh mango in every 5 layers of crêpe.  It might sound complicated, but actually quite easy to prepare.  Check out the video tutorial above and you’ll agree with me!  However, I must warn you... since there are quite a few steps involved, the prep time for this cake is rather time consuming.  This is partly due to the cooking and layering of the crêpes.  But fear not!  The steps are nothing too difficult at all.

How to Make Mango Crêpe Cakes 芒果法式薄餅千層蛋糕 with step-by-step video tutorial.  http://uTry.it

My recommendation to you is to prepare the crêpes a day ahead and assemble the cake on the next day.  Sounds like a labor of love?  It surely is, but so does the job of being a mother, isn’t it?!  Therefore, I think Mom deserves a gorgeous cake like this!  And I can assures you, this cake tastes even better than it looks!

How to Make Mango Crêpe Cakes 芒果法式薄餅千層蛋糕 with step-by-step video tutorial.  http://uTry.it

So, head to the kitchen and make this cake!  Whether it’s for Grandmas, Moms, Mother-in-Laws, or Mothers-to-be, they all deserve a little of our time, as well as this delicious cake!  Life is too short and we should always remember to celebrate.  I just want to take this opportunity to thank my Grandmas, my Mom, and my Mother-in law for everything that they’ve done for me, my husband, and my children.  I’m truly blessed and grateful to have them in my life!   

How to Make Mango Crêpe Cakes 芒果法式薄餅千層蛋糕 with step-by-step video tutorial.  http://uTry.it


Ingredients and Tools used:

Crepe Pan (
click here for more information)
Crepe Spreader (
click here for more information)
Crepe Maker (
click here for more information)
Ninja Blender (
click here for more information)
Horizon Organic Heavy Whipping Cream (
Click here for more information)
OXO Egg Turner (
Click here for more information)
Organic Vanilla Extract (
Click here for more information)
Mango Extract (
See similar product here)
Mascarpone Cheese (
Click here for more information)
Kerrygold Butter (
Click here for more information)
 

Friday, October 2, 2015

Whole Wheat Smoked Cheddar Crackers (a.k.a. Smoky Cheez-It)


Check out how to make these fun and healthy snacks, Whole Wheat Smoked Cheddar Crackers (a.k.a. Smoky Cheez-It), with a step-by-step video tutorial.   http://uTry.it

My kids and I survived a month long of school days, that involved miles high of homework, and never ending school projects!  Phew….we still have a long way to go, so please wish me luck!  This year seems to be a lot tougher than previous ones as the workload increased tremendously.  I need to constantly remind myself to breath in, breath out, and keep calm!   


Check out how to make these fun and healthy snacks, Whole Wheat Smoked Cheddar Crackers (a.k.a. Smoky Cheez-It), with a step-by-step video tutorial.   http://uTry.it


What do we do to de-stress?  Bake some yummy food!  Whole Wheat Smoked Cheddar Crackers (a.k.a. Smoky Cheez-It), to be exact.  I  almost named this post with just “Smoky Cheez-It”.  However, these little golden gems are quite different than just Cheez-It in a few ways.  In this recipe, I used whole wheat pastry flour instead of white ones, along with freshly grated smoked cheddar cheese instead of the regular ones.  Of course, ingredients are all natural without any preservatives.  So, they are more healthy than the boxed version.  My kids and I really enjoyed baking these little crackers together over the weekend. 

Check out how to make these fun and healthy snacks, Whole Wheat Smoked Cheddar Crackers (a.k.a. Smoky Cheez-It), with a step-by-step video tutorial.   http://uTry.it

These Whole Wheat Smoked Cheddar Crackers are crispy and flaky at the same time.  Packed with wonderful cheddar flavor along with a hint of smoky aroma.  They are perfect snacks to pack in the school bags or to the office.  Also, they are easier to prepare than you might think.  Check out my step-by-step video tutorial below to find out how. 


I hope you enjoyed watching my video tutorial.  If you haven’t done so, please subscribe to my YouTube channel here.  You’ll be the first to know when I have new video tutorials published.
Until next time, please stay tuned for more easy recipes and fun giveaways.


Check out how to make these fun and healthy snacks, Whole Wheat Smoked Cheddar Crackers (a.k.a. Smoky Cheez-It), with a step-by-step video tutorial.   http://uTry.it


Ingredients and Props used:
Whole Wheat Pastry Flour (Click here for more information)
Smoked Cheddar Cheese (
Click here for similar product)
Pastry Wheel (
Click here for more information)
White Rectangular Plate (
Click here for similar product)
Silpat Non-Stick Baking Mat (
click here for more information)
Calphalon Baking Sheet Pans (
Click here for more information)
Organic Heavy Cream (Click here for more information)