Showing posts with label Dinner. Show all posts

Saturday, August 5, 2017

Sumikko Gurashi Sushi Rice Balls 角落公仔壽司飯糰


Have you seen these cutie critters before?  They are called Sumikko Gurashi!  Aren’t they super adorable?  Today, I’m sharing a recipe with you that’s inspired by these super adorable characters from Japan: Sumikko Gurashi Sushi Rice Balls 角落公仔壽司飯糰.  If you’ve checked out my video tutorial above, you’ll also see the tools and ingredients that I used to make them.

Sumikko Gurashi Sushi Rice Balls 可愛壽司飯糰   http://uTry.it

It all started not long ago with a super soft and squishy plush toys that I got for my daughter from a Japanese store.  Ever since that day, we all fell in love with these cute little creatures!

Sumikko Gurashi Sushi Rice Balls 可愛壽司飯糰   http://uTry.it

Sumikko Gurashi Sushi Rice Balls 可愛壽司飯糰   http://uTry.it
Image from the web

What does Sumikko Gurashi means?  “Sumikko” means corner, and “Gurashi” means life.  Together, they can be translated to 'living in a corner,' as that’s what these little critters like to do.

Sumikko Gurashi Sushi Rice Balls 可愛壽司飯糰   http://uTry.it

From time to time when I see cute little Sumikko Gurashi products, I couldn’t resist but to take them home with me! 

Sumikko Gurashi Sushi Rice Balls 可愛壽司飯糰   http://uTry.it
Picture from web

In today’s recipe, I’m making these sushi rice balls stuffed with a creamy and smoked salmon filling.  The rice itself is seasoned with different ingredients for their natural colors and flavors.

Sumikko Gurashi Sushi Rice Balls 可愛壽司飯糰   http://uTry.it

First off, we have Neko Cat.  The rice is seasoned with cod powder for the umami flavor and gorgeous pink color.  It compliment the salmon fillings really well.

Sumikko Gurashi Sushi Rice Balls 可愛壽司飯糰   http://uTry.it

Next is Polar Bear.  I leave the rice plain on this one for the white color.  Its ears are decorated with pink Soy Wrappers that are so much fun and easy to use!  It’s mouth and legs are stamped out cheddar cheese and it’s eyes and hands are stamped out seaweeds.
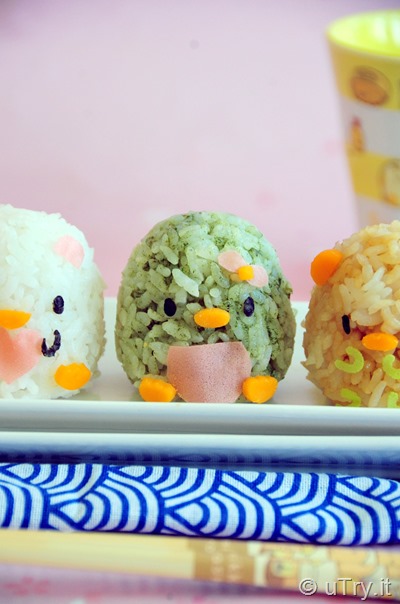
Sumikko Gurashi Sushi Rice Balls 可愛壽司飯糰   http://uTry.it

Up next is Penguin!  The green color is from matcha green tea powder.  You can also substitute with spinach puree or other dark green vegetable puree if you have those on hand.  But the earthy green tea flavor truly balanced well with the smoky salmon inside these rice balls.

Sumikko Gurashi Sushi Rice Balls 可愛壽司飯糰   http://uTry.it

Last but not least, Tonkatsu!  Remember I shared my homemade Tonkatsu recipe with you not long ago?  It’s Japanese style pork cutlets!  See the resemblance?   For this one, I seasoned the rice with a little bit of light soy sauce for flavor and color.  They all turned out super yummy!

Sumikko Gurashi Sushi Rice Balls 可愛壽司飯糰   http://uTry.it
Image from web

How well did I I in in shaping and decorating these characters against the picture sample above?  Not bad, isn’t it?  I can’t wait to make “tail of fried shrimp”, “tapioca”, and “sparrow” next time!  They are all super duper cute!

Sumikko Gurashi Sushi Rice Balls 可愛壽司飯糰   http://uTry.it

I hope you enjoyed today’s video and recipe as much as we do.  My daughter and I had a fun time creating them together!  Thank you so much for reading and stay tuned for more fun and kawaii recipe next week!  Remember, Eat, Drink, and Be Happy! 
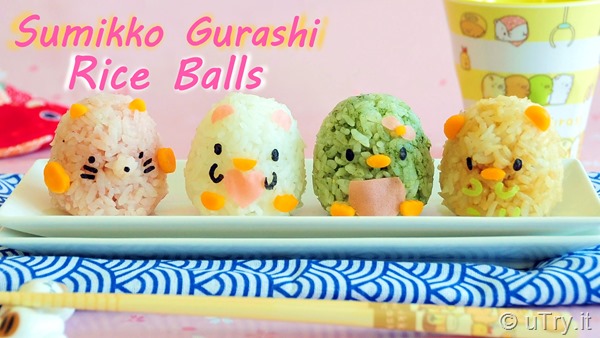
Sumikko Gurashi Sushi Rice Balls 可愛壽司飯糰   http://uTry.it


Products, ingredients, and tools used in this post:
Sumikko Gurashi Cat Plush Toy (Click here for more information)Sumikko Gurashi Rice Ball Mold  (Click here for more information)
Soy Wrappers  (Click here for more information)
Matcha Green Tea Powder (Click here for more information)
Sumikko Gurashi Chopsticks (Click here for more information)

Sumikko Gurashi Cup (Click here for more information)

Roasted Seaweed (Click here for more information)

Honey Smoked Salmon (Click here for more information)

Organic Soy Sauce (Click here for more information)

Japanese Sushi Rice (Click here for more information)

Japanese Mayo (Click here for more information)

Food Decorating Tongs/Tweezers (
Click here for more information)


Disclosure: uTry.it is a participant in the Amazon Services LLC Associates Program, an affiliate advertising program designed to provide a means for sites to earn advertising fees by advertising and linking to Amazon.com.


Friday, May 5, 2017

Vietnamese Summer Rolls (Gỏi cuốn) 越式春捲


My family enjoys dining out at Vietnamese restaurants.  One of our favorite appetizers is this Vietnamese Summer Roll.  Check out my step by step video tutorial above to learn how to make them.

Vietnamese Summer Rolls (Gỏi cuốn) 越式春捲 http://uTry.it

Vietnamese Summer Rolls are very light and refreshing.  Definitely a healthier choice when compared to the deep fried egg rolls.  The fillings usually consist of many different types of vegetables, herbs, a choice of protein (I’m using shrimps today), and some bean threads or rice noodles.  The veggies are usually raw and the protein is cooked in boiling water.  Therefore, the flavor is rather mild.  That’s why, they are usually served with a flavorful dipping sauce.

Vietnamese Summer Rolls (Gỏi cuốn) 越式春捲 http://uTry.it

In my video tutorial, I’ll show you how to make both the Peanut Dipping sauce, and the Sweet and Spicy Dipping Sauce to accompany these delightful Summer Rolls.

Vietnamese Summer Rolls (Gỏi cuốn) 越式春捲 http://uTry.it

The Peanut Dipping Sauce consists of Hoisin Sauce, many describe it as the Asian version of B.B.Q. sauce.  It’s super easy to prepare and tastes very rich and earthy.  It’s one of the classic sauce to pair with these Vietnamese Summer Rolls.

Vietnamese Summer Rolls (Gỏi cuốn) 越式春捲 http://uTry.it

I personally love the Sweet and Spicy Dipping Sauce better.  I simply love spicy food, plus, this sauce is super refreshing.  In my video, I used both the Sambal Chili Paste and a chopped Thai Chili.  But if you prefer a milder taste, you can skip the Thai Chili and just use Sambal.  It’s not too spicy at all and packed with wonderful aroma that you won’t get from other chili sauce!

Vietnamese Summer Rolls (Gỏi cuốn) 越式春捲 http://uTry.it

I hope you enjoy today’s recipe and tutorial.  Stay tuned for more fun and delicious next week!

Ingredients used:
Rice Paper 
(Click here for more information)
Hoisin Sauce (Click here for more information)
Creamy Peanut Butter
 (Click here for more information)
Fish Sauce
 (Click here for more information)
Sambal Chili Paste
 (Click here for more information)
Bean Threads
 (Click here for more information)


Friday, February 17, 2017

Tonkatsu- Japanese Style Pork Cutlets (日式吉列豬扒):


Tonkatsu - Japanese Style Pork Cutlets (日式吉列豬扒) is one of my family’s favorite savory dish.  We used to order it a lot when we dine out.  The key word here is “used to”!  After trying my recipe at home, you can enjoy this dish at home whenever you feel like it! Why order out when you can make it tastier at home, right?

Tonkatsu- Japanese Style Pork Cutlets (日式吉列豬扒)   http://uTry.it

Tonkatsu is a pork cutlet that’s breaded with Japanese breadcrumbs (Panko) and deep-fried to golden brown perfection.  It’s quite irresistible because the flavor is wonderful.  The crust is super crispy and the pork chop inside is tender and juicy.  Instead of deep-frying the cutlets, I usually opt for a shallow fry as a healthier version.  If you haven’t watch my video tutorial, be sure to check it out because I’ll show you the tips and tricks on creating this amazingly crispy crust that stays put during the frying process.

Tonkatsu- Japanese Style Pork Cutlets (日式吉列豬扒)   http://uTry.it

To keep the pork chops juicy and tender, I used a half brining and half marinating method.  It’s important to let the pork chops to marinate overnight.  That way, they have a chance to absorb the moisture and flavors from the marinate.  You’ll be amazed by how juicy and tender your pork chops turn out!  Give this a try and you won’t be disappointed!  The list of ingredients for the marinate may seems quite long, but they are all pretty basic pantry ingredients for Asian cooking.  I’ll list the link of the products that I used at the end of the post for your reference.

Tonkatsu- Japanese Style Pork Cutlets (日式吉列豬扒)   http://uTry.it

I hope you enjoy today’s video and recipe.  Give it a try soon, I’m sure you and your family will love this dish as much as my family does!  Thank you for stopping by and have a wonderful week!

Tonkatsu- Japanese Style Pork Cutlets (日式吉列豬扒)   http://uTry.it


Ingredients and Tools used: 
Homemade Orange Marmalade:
https://goo.gl/lRjIra
Tonkatsu Sauce (Click here for more information)
Light Soy Sauce
 (Click here for more information)
ShaoXing Cooking Wine (Click here for more information)
Sesame Oil
 (Click here for more information)
Grapeseed Oil
 (Click here for more information)
Chicken bouillon powder 
 (Click here for more information)
White pepper powder
 (Click here for more information)
Corn starch
 (Click here for more information)
Zojirushi Rice Cooker (Click here for more information)
Cooling Racks (Click here for more information)
Baking Sheets
 (Click here for more information)
Chicken Broth
 (Click here for more information)
White Pepper Powder
 (Click here for more information)
Japanese Panko Bread Crumbs
 (Click here for more information)
Heavy Duty Copper Pan (Click here for more information)


Friday, November 4, 2016

Wish Upon A Star - Rilakkuma Bear Bento


If my memory serves me right, playing with food was one of the big “no no” when I was young!  Maybe because of culture?  Or maybe different generations?  I don’t know.  Probably because my parents don’t want us to ended up wasting food.  How about you?  Were you allowed to play with food when you were young?  Well, I’m just glad that I can play with my food everyday in the kitchen now!  Oh, and of course, my kids are encouraged to do so as well!  After all, I think that’s a great learning and bonding time for us as a family.  Plus, the kiddos are definitely enjoying the food more if they prepare it themselves.  If you haven’t watch the video above, go ahead and check it out.  My kids and I had a good laugh after they urged me to add on the sound effects!   

How to Make Wish Upon s Star - Rilakkuma Bear Bento with step-by-step video tutorial  http://uTry.it

We enjoyed this Rilakkuma Bear dinner so much!  And the great news is that you can easily pack it into a bento box for lunch as well.  The Rilakkuma Bear was made with rice and a little soy sauce (for the brown color).  You can use brown rice instead and omit the soy sauce if you prefer.  You’ve got to watch the video to find out how to make the eggy blanky though.  It’s easier to make than you think.  Isn’t it super adorable with the flower and heart shape patterns?  I served the rice on a bed of lettuce, some grape tomatoes, and a Sweet and Savory Chicken Drumstick on the side.  Chick here for the Chicken Drumstick recipe.  These chicken drumsticks are one of my family’s favorites and I make them quite often.   
  How to Make Wish Upon s Star - Rilakkuma Bear Bento with step-by-step video tutorial  http://uTry.it

Tucking this little bear in reminded me of tucking my kiddos in every night!  They are equally adorable!  Don’t forget to make a wish upon the star and have a sweet dream!  May all your wishes come true!  Have a Funny and fascinated Friday!

Ingredients and Tools used:
Light Soy Sauce (Click here for product information)
Nori (seaweed) (
Click here for product information)
Food Decorating Tongs/Tweezers (Click here for product information)
Zojirushi Rice Cooker (Click here for product information)
Japanese Short Grain Rice (Click here for product information)
Small Cookie Cutter Set (Click here for product information)
Bento Cutter and Tongs Set (Click here for product information)


Friday, September 16, 2016

Hawaiian Poke Bowl


Every once in a while, my family loves to dine out and try new restaurants.  We can’t help but noticed one of the latest restaurant trend is Poke Bowl!  It sure seems like there’s a new Poke Bowl restaurant open up every month in the nearby cities!  Poke (pronounced as poʊˈkeɪ) is a raw fish salad served as an appetizer in Hawaiian cuisine.  Poke is the Hawaiian verb for "section" or "to slice or cut".  Traditionally, the fish/seafood used for poke are ahi tuna, octopus, or salmon.  You can definitely explore and make it with different type of shellfish or seafood that you prefer.  Today, I chose salmon and made the poke with a hint of spiciness.  You can definitely adjust the level of spiciness by adding more or less chili sauce to your liking.

How to Make Hawaiian Poke Bowl  http://uTry.it

If you follow me on Instragram, you might recall that I shared a picture of my Homemade Salmon Poke a few months ago.  Since some of you asked me about the recipe, I decided that it would be best to share it here on my blog along with a video tutorial.  Thank you for your patience in waiting so long.  Well, what can I say.  This recipe is totally worth the wait!  Also, this Hawaiian Poke Bowl is super easy to prepare and only needs a few ingredients.  It’ll be one of the best poke bowl that you’ll ever eaten, no exaggeration!

How to Make Hawaiian Poke Bowl  http://uTry.it

The key to a successful Poke Bowl?  Make sure you use the best quality of seafood.  I used the sashimi-grand salmon here and the marinate ingredients for the poke are just a few Asian pantry staples.  I’ll list all these ingredients at the end of this post for your reference.  This recipe is so easy that you can put dinner on the table in less than 15 minutes!  Check out the video at the beginning of this post for the complete tutorial.  You’ll also find out how to make this gorgeous avocado flower as well.  It’s super easy and the creaminess texture of the avocado is the perfect compliment to the slightly tangy and spicy salmon poke as well. 

How to Make Hawaiian Poke Bowl  http://uTry.it

I hope you enjoy today’s video and recipe.  Please stay tuned for more fun and easy recipe next week.

Ingredients and Tools used:
Light Soy Sauce (Click here for more information)

Rice Vinegar (Click here for more information)
Hawaiian Salt
(Click here for more information)

Zojirushi Rice Cooker (Click here for more information)

Japanese Short Grain Rice (Click here for more information)

Sesame Oil (Click here for more information)

Black Sesame Seeds (Click here for more information)

White Sesame Seeds (Click here for more information)
Sriracha (Click here for more information)
 
Don’t forget to subscribe to my YouTube channel here.  That way, you won’t miss out on any video and you’ll be the first to know when I have a new tutorial published.

Friday, August 26, 2016

Ice Bowl Chilled Udon with Onsen Tamago (Hot Spring Egg) 冰鎮烏冬配温泉蛋

Aloha!  If you follow me on Instagram or Twitter, you might have noticed that my family was in Hawaii this summer.  It was one of our best summer vacation, ever!  Now that we’re back to reality, all of us are suffering from a severe case of VWS, a.k.a, Vacation Withdrawal Syndrome!  Yes, I just made that term up.  You don’t need to Google it!    
How to Make Ice Bowl Chilled Udon with Onsen Tamago (Hot Spring Egg) 冰鎮烏冬配温泉蛋   http://uTry.it
While in Hawaii, we visited two islands: Oahu and the Big Island.  I’ll share with you, in other posts in the near future, the details on the places we visited, things we did, and restaurants that we tried and loved!
 
Marukame Udon Waikiki http://uTry.it
One of the restaurants that we tried was Marukame Udon in Waikiki.  The rating of this place from a popular restaurant review sites was really high.  Of course, we wouldn’t miss the chance to check this place out.  It was near our hotel and we actually passed by this restaurant on a few different occasions.  During the peak lunch and dinner hours, the line outside of the restaurant was super long!  Yes, my kids love udon, but I doubted if they would really love udon that much to patiently stand and wait for more than an hour for a bowl of udon!  So, we planned our visit in the late morning before the lunch rush hour started.  The good news was that we only had to wait about 15 minutes before placing our order (This restaurant offers a semi self-serving type ordering approach that is very similar to cafeteria style).   
Marukame Udon Waikiki http://uTry.it
To be honest, I was a little bit disappointed by their udon.  My hubby and I both ordered hot udon with beef along with some other side dishes.  The flavor of our beef udon was great, but the udon itself was a bit too soft to our liking.  On the other hand, both of our kids ordered cold udon and that was totally a different story!  The udon was cooked perfectly to el dente, perfectly chilled, super bouncy, and had the wonderful slightly chewy texture that I enjoy in my udon!  Guess the grown up ordered the “wrong” thing!  I have to say though, they have some awesome and delicious side dishes to choose from and the Onsen Tamago (Hot Spring Egg) was one of the item that I think is a must try!    
How to Make Ice Bowl Chilled Udon with Onsen Tamago (Hot Spring Egg) 冰鎮烏冬配温泉蛋   http://uTry.it
As a result of this restaurant visit, I was inspired to recreate this awesome cold udon recipe!  Let me introduce to you, Ice Bowl Chilled Udon with Onsen Tamago (Hot Spring Egg) 冰鎮烏冬配温泉蛋!  It’s perfect for the hot summer days!  Yes, summer vacation might be over, but the temperature sure is not coming down any time soon!  If you still long for a refreshing recipe that can cool you down instantly, you’ve got to try this one out.  
How to Make Ice Bowl Chilled Udon with Onsen Tamago (Hot Spring Egg) 冰鎮烏冬配温泉蛋   http://uTry.it
If you haven’t watch the video tutorial at the top of this post yet, please make sure you don’t miss it.  In the video, I’ll show you step-by-step on how to put this cold udon dish together, including the homemade dipping sauce, the ice bowl that the udon is served in, as well as this super decadent hot spring egg!  The egg is truly the star of this dish and adds so much flavors and decadent aromas to the udon!  Follow my video tutorial closely and you’ll get the perfect hot spring eggs.  The egg white is cooked to perfection, yet the yolk is still runny.  It’s really amazing how you can crack the cooked egg right from its shell onto the serving bowl!  The ice bowl will keep your udon cold while you eat.  Not to mention, it’s a super fun presentation as well.     
How to Make Ice Bowl Chilled Udon with Onsen Tamago (Hot Spring Egg) 冰鎮烏冬配温泉蛋   http://uTry.it
If you love spicy food, I highly recommend that you add a small amount of wasabi and mix it into the udon.  It’ll add a nice kick to this dish and balance the flavor perfectly.  I know I’ll be making and enjoying this dish over and over again!  It’ll certainly reminds me of the wonderful summer vacation that we had in Hawaii!  Aloha!
How to Make Ice Bowl Chilled Udon with Onsen Tamago (Hot Spring Egg) 冰鎮烏冬配温泉蛋   http://uTry.it
 

Tools and ingredients used:
Don’t forget to subscribe to my YouTube channel here.  That way, you won’t miss out on any video and you’ll be the first to know when I have a new tutorial published.

Friday, July 8, 2016

Hello Kitty Rice with Tomato and Egg Stir Fry 吉蒂貓飯配蕃茄炒蛋


Can’t believe we’re stepping into the month of July already!  Despite the soaring hot temperature in Southern California, July also means celebrating birthdays in our family.  There are a couple of birthdays happening this month and one of them is my Baby Girl’s.  

How to Make Hello Kitty Rice with Tomato and Egg Stir Fry 吉蒂貓飯配蕃茄炒蛋  with step-by-step video tutorial http://uTry.it

The Birthday Girl gets to pick her favorite birthday cake and this one is her choice for this year.  It’s perfect for birthday celebration during the summer because it’s a gorgeous "no-bake" cake.  Like Mother like Daughter, you have very good taste, Baby!  For this special occasion, Mommy is also making Baby Girl’s favorite dish, Tomato and Egg Stir Fry (蕃茄炒蛋).  It’s a very refreshing and appetizing dish to enjoy especially in the summer months.  This dish is slightly sweet, a little bit tart, and perfectly savory at the same time.  Like most Asian recipes, this dish has a well balanced flavors.  It’s a very popular everyday homemade dish from Hong Kong.  As you can see, I didn’t just stop there, I paired it with the super adorable Hello Kitty Rice, another favorite of my Little Girl.  Although Mommy herself is not really a Hello Kitty fan, she did enjoy making this dish as she knows how much the Birthday Girl loves it.  I am secretly wishing the boys in the house are as easy to please as Baby Girl does! Shhh….   

How to Make Hello Kitty Rice with Tomato and Egg Stir Fry 吉蒂貓飯配蕃茄炒蛋  with step-by-step video tutorial http://uTry.it

If you haven’t done so, remember to check out the YouTube video tutorial with step-by-step instruction on how to prepare this dish (the link is at the top of this post).  It’s easier to make than it looks, especially the shaped rice.  Best of all, you don’t need any mold or special equipment to make it, except for a pair of kitchen scissors and a few minutes of your time, and your love of course.  If you have a Hello Kitty fan in your house like I do, you’ve got to check this out! Everything is edible in this dish, all natural and really healthy as well.  You can also make this dish with your kids together.  My Baby Girl always enjoy creating fun dishes with me in the kitchen and this is definitely one of her favorite ones to make.    

How to Make Hello Kitty Rice with Tomato and Egg Stir Fry 吉蒂貓飯配蕃茄炒蛋  with step-by-step video tutorial http://uTry.it

I hope you enjoy today’s recipe and tutorial.  Stay tuned for more fun and easy recipe next week.  Don’t forget to subscribe to my YouTube channel here.  That way, you won’t miss out on any video and you’ll be the first to know when I have a new tutorial published.

Tools and Ingredients used:
Nori (seaweed): (
Click here for more information)
Whole Kernel Corn: (Click here for more information)
Corn starch: (Click here for more information)
Serrated Knife for cutting tomato: (Click here for more information)
Vegetable oil: (Click here for more information)
Zojirushi Rice Cooker: (Click here for more information)
Japanese Short Grain Rice: (Click here for more information)
Food Decorating Tongs/Tweezers: (Click here for more information)
Hello Kitty Cupcake Plush: (Click here for more information)
Hello Kitty Flatware Set: (Click here for more information)
 

Friday, June 3, 2016

Easy French Tomato Tart 簡易法式蕃茄撻


Ever since my very first trip to France a couple years ago, I’ve fallen in love with the French pastry and their roasted tomatoes!  You can read more here, here, and here! I had them almost every morning for breakfast during my stay in France!  What a great way to start the day, right?  Today, I combined the two scrumptious ideas into one delicious recipe: Easy French Tomato Tart 簡易法式蕃茄撻!


Elegant and gorgeous brunch idea!  How to Make Easy French Tomato Tart 簡易法式蕃茄撻, a perfect way to use up the tomatoes in the garden!   http://uTry.it

This French Tomato Tart looks elegant and gorgeous!  It’s a wonderful entree for Sunday brunch or as a side dish.  Best of all, it’s quite easy to prepare.  In fact, I made this tart for brunch on a weekday when my hubby was working from home.  We both enjoyed this tart so much! 

Elegant and gorgeous brunch idea!  How to Make Easy French Tomato Tart 簡易法式蕃茄撻, a perfect way to use up the tomatoes in the garden!   http://uTry.it


This tart is packed with earthy and refreshing herbs, along with tangy and creamy goat cheese on top.  The tomatoes are roasted to perfection!  The sweet and tart tomato flavors truly concentrate when the moisture evaporated during baking at a rather high temperature.  The tangy goat cheese elevated the sweetness from the tomatoes.  They are absolutely the perfect pairing! 

Elegant and gorgeous brunch idea!  How to Make Easy French Tomato Tart 簡易法式蕃茄撻, a perfect way to use up the tomatoes in the garden!   http://uTry.it

I also brushed the crust with a little Dijon mustard and added a drizzle of honey on top of the tart right before baking.  Boy oh boy, the combination of flavors was complex with only a few basic ingredients.  It’s amazing how the flavors turned into one scrumptious and harmony treat!  However, I have to point out that my kids are not big fans for goat cheese, just yet.  They still need a more mature palate to appreciate this fine cheese.  That’s another reason why I prepared this tart while they were at school!  Nevertheless, this is one beautiful and delicious tart that I will be making over and over again, for the grown ups, at least! 

Elegant and gorgeous brunch idea!  How to Make Easy French Tomato Tart 簡易法式蕃茄撻, a perfect way to use up the tomatoes in the garden!   http://uTry.it

If you haven’t check out the video tutorial at the beginning of this post, please take a few minutes to watch it.  You’ll agree that this tart is rather easy to prepare.  Take advantage of the tomato season and make this tart!  It’s the perfect way to use up those abundant tomatoes in your garden!


Tools and ingredients used:

9-inch Round tar pan (Click here for more information)

Baking Sheets (Click here for more information)
Cooling Racks (Click here for more information)
Lemon Infused Olive Oil (Click here for more information)
Organic Honey (Click here for more information)
Core Bamboo 3-Piece Cutlery Set (Click here to see product information)


Friday, April 29, 2016

6 Secrets to Juicy and Succulent Umami Pan Seared Pork Chops (鮮味香煎豬排)


“What’s for dinner tonight?” is the BIG question that I hear every day!  On a typical day, I’ll be asked this exact same question, for at least three times.  I’ll be lucky if they’re not from the very same person each time!  Yes, believe me, sometimes they’ll ask me “what’s for dinner” over and over again.  I always wonder, is it that they forgot what I said earlier, or do they hope for a different answer the second, or third time around?  Does this happen in your family too?  Or am I the only lucky one out here? 

Check out the secrets on how to make these Umami Pan Seared Pork Chops.  They are golden brown on the outside, tender and juicy on the inside.  http://uTry.it

One thing for sure, is that I can tell you what we’re having for dinner tonight: Umami Pan Seared Pork Chops!  This dish is so easy to prepare and super delicious!  Lately, I've been serving this dish at least once a week, and everyone loves it!  Yes, these pork chops are that good!


Check out the secrets on how to make these Umami Pan Seared Pork Chops.  They are golden brown on the outside, tender and juicy on the inside.  http://uTry.it

These pork chops are golden brown and slightly crispy on the outside, juicy, tender and succulent on the inside.  They are packed with wonderful umami flavors as well.  These pork chops are the ultimate combination of sweet and savory flavors as well as contrast in texture.  There are a few secrets to achieve all these wonderful characteristics and elements on these pork chops. 

Check out the secrets on how to make these Umami Pan Seared Pork Chops.  They are golden brown on the outside, tender and juicy on the inside.  http://uTry.it


Here are the secrets:

1) Instead of using a regular marinading method, I use a combination of brinding and marinading method.  As you can see from the video tutorial above, I added a cup of chicken broth in the brinding/marinading process.  Thus, allows the moisture to penetrate deep into the pork chops and keeping the inside nice and moist. 

2) I used both soy sauce and fish sauce in the marinade to enhance the umami flavors.  If you’re not familiar with fish sauce, just keep in mind, don’t smell the fish sauce on it’s own.  Just close your eyes, pinch your nose and dump it in!  You’ll be happy that you did!

3) I take the pork chops out from the fridge an hour before cooking.  Thus, allows the meat to come closer to the room temperature and the chops will cook more evenly.

4) I pad dry and dust the outside of the pork chops with corn starch.  Thus, ensures a nice searing of the crust and seal in the moisture on the inside.

5) Do not overcook the pork chops!  After all these hard works, you want to make sure they are at the prefer doneness.  A meat thermometer should read 145F degree when inserted into the middle of the chops.  My 1-inch thick chops always done at 7 minutes on medium heat. 

6) Let them rest!  After removing the chops from heat, always let the meat rest for at least 5 minutes before cutting into them.  Thus, ensure the moisture inside the meat to redistribute, and minimized the juices from running out of the meat when you cut.  So, never cut your meat when they are still piping hot!

Check out the secrets on how to make these Umami Pan Seared Pork Chops.  They are golden brown on the outside, tender and juicy on the inside.  http://uTry.it


I hope you enjoy today’s recipe, special tips, and video tutorial!  Stay tuned for more yummy recipes and videos in future post.  Don’t forget to subscribe to my Youtube channel here.  That way, you won’t miss out on any video and you’ll be the first to know when I have a new tutorial published.

Ingredients and Tools used:
Chicken bouillon powder (
Click here for more information)
Blackberry preserves (
Click here for more information)
Toasted sesame oil (
Click here for more information)
White pepper powder  (
Click here for more information)
Garlic powder (
Click here for more information)
Light soy sauce (
Click here for more information)
Fish sauce (
Click here for more information)
ShaoXing wine (
Click here for more information)
Corn starch (
Click here for more information)
Vegetable oil (
Click here for more information)
Cast Iron Pan (
Click here for more information)


Saturday, February 27, 2016

Slow Cooker Recipe – Asian Style Pork Ribs 簡易慢燉鍋香辣排骨


Don’t you love your slow cooker?  I absolutely do, and often think that I don’t utilize it enough.  I’ve shared a Hearty Beef Stew recipe on my blog a while ago (click here for that recipe).  Today, I wanted to share another favorite slow cooker recipe with you:  Asian Style Pork Ribs 簡易慢燉鍋香辣排骨!

Check out how to make this quick and easy Slow Cooker Recipe – Asian Style Pork Ribs 簡易慢燉鍋香辣排骨  http://uTry.it

These Asian Style Pork Ribs are so easy to make.  Check out the step-by-step video tutorial at the top of this post and you’d agree!  These ribs are also aromatic.  The soy sauce and Korean Chili Paste (Gochu-jang) give these ribs the deep savory and slightly spicy flavors; the brown sugar gives them a hint of sweetness which balances well with the savory soy sauce; the orange juice truly brightens up the flavors of these ribs too!

Check out how to make this quick and easy Slow Cooker Recipe – Asian Style Pork Ribs 簡易慢燉鍋香辣排骨  http://uTry.it

There are quite a few ingredients on the list but they are all basic Asian pantry essentials.  If you love Asian recipes, these ingredients would be wonderful starting points to stock your pantry and get cooking.  These ingredients are usually available in most supermarkets, or Asian markets.  I’ll list the ingredients and where to buy at the end of the post for your reference.

Check out how to make this quick and easy Slow Cooker Recipe – Asian Style Pork Ribs 簡易慢燉鍋香辣排骨  http://uTry.it

Forget about take outs!  This recipe is so simple that you can basically get all the ingredients into the crock pot in the morning, and then relax and enjoy a wonderful dinner with your family after a long busy day.  These Asian Style Pork Ribs are absolutely finger licking good!  With a side vegetable dish and some steamed rice, you’re good to go!  Give them a try and I’m sure you and your family will love them as much as my family does.

Check out how to make this quick and easy Slow Cooker Recipe – Asian Style Pork Ribs 簡易慢燉鍋香辣排骨  http://uTry.it


Tools and ingredients used:
Ninja 3-in-1 Cooking System (click here for more information)
Grapeseed Oil (
click here for more information)
Light Soy Sauce (
click here for more information)
Rice Vinegar (
click here for more information)
ShaoXing Cooking Wine (
click here for more information)
Korean Chili Paste – Gochu Jang (
click here for more information)
Sesame Oil (
click here for more information)