Showing posts with label Classic Recipe. Show all posts

Friday, December 1, 2017

How to create a 3D Winter Wonderland - Classic Sugar Cookies with Royal Icing


Are you ready for the holiday baking season?  Traditionally, I have always been busy baking goodies for friends and family during the holidays!  What are your favorite things to share around the holidays?  This year, I have created these whimsical 3D Winter Wonderland Sugar Cookies.  Be sure to check out the tutorial above on how I make them.

How to create a 3D Winter Wonderland -  Classic Sugar Cookies with Royal Icing    http://uTry.it

These 3D cookies are made out of Classic Sugar Cookies and decorated with Royal Icing.  Not only these cookies are crispy (with a hint of butter and vanilla), they are also more sturdy and can hold up to the decorations better than other kind of cookies.   According to my Little Girl, these cookies are perfect for dunking in a cup of hot cocoa! Does she talk like a foodie or what?!  In addition to these Classic Sugar Cookies, I also made a variation of a chocolate flavored ones.

How to create a 3D Winter Wonderland -  Classic Sugar Cookies with Royal Icing    http://uTry.it


In this 3D Winter Wonderland, you will find Christmas Tree, Snowman, Reindeer and Santa’s Sleigh that are all made of cookies.  As shown in the video above, they are cut from from a 3D cookie cutter set that I bought online from awhile ago. 

How to create a 3D Winter Wonderland -  Classic Sugar Cookies with Royal Icing    http://uTry.it


How to create a 3D Winter Wonderland -  Classic Sugar Cookies with Royal Icing    http://uTry.it

In addition to Snowman and Christmas Trees, I also created a few gift box/present cookies to place in front of the Christmas Tree!  We’ve got to have some presents for the holidays, right?  The great news is that you don’t need a cookie cutter to make these gift boxes.  Check out my video tutorial and I’ll show you step by step on how to make them.  They are easier to make than they look, and they are super delicious with a layer of chocolate sugar cookie stacked in the middle! 

How to create a 3D Winter Wonderland -  Classic Sugar Cookies with Royal Icing    http://uTry.it

How to create a 3D Winter Wonderland -  Classic Sugar Cookies with Royal Icing    http://uTry.it


How to create a 3D Winter Wonderland -  Classic Sugar Cookies with Royal Icing    http://uTry.it

How to create a 3D Winter Wonderland -  Classic Sugar Cookies with Royal Icing    http://uTry.it

So, which one is your favorite?  I personally love the present/gift box and the Santa’s Sleigh cookies the best.  Best of all, just a few simple sprinkles and icing can transform these ordinary sugar cookies into something so amazing!  I hope you’ll give this recipe a try and make them for your family and loved ones.  My kids and I had so much fun decorating these cookies together.  They could be a fun holiday activities with your kiddos as well.  Stay tuned for more fun and festive holiday recipes!

How to create a 3D Winter Wonderland -  Classic Sugar Cookies with Royal Icing    http://uTry.it


Tools and Ingredients Used:
3D Christmas Cookie Cutter Set (Click here for more information)
Natural Food Coloring (Click here for more information)
Meringue Powder (Click here for more information)
Valrhona Unsweetened Cocoa Powder (
Click here for more information)
Silver Dragee (
Click here for more information)
Fall Color Sprinkle Pearls (
Click here for more information)
Christmas Sprinkle (
Click here for more information)
Star Shape Sprinkle (
Click here for more information)
Organic Vanilla Extract (
Click here for more information)
Kerrygold Butter (
Click here for more information)
Organic All-Purpose Flour (
Click here for more information)
Rolling Pin with Adjustable rings (
Click here for more information)
Pizza Roller (
Click here for more information)
Cooling Racks (
Click here for more information)
Rolling Mat (
Click here for more information)
Food Decorating Tongs/Tweezers (
Click here for more information)
Measuring Cup Set (
Click here for more information)
Stand Mixer (
Click here for more information)
Silpat (
Click here for more information)
Baking Sheets (
Click here for more information)


Disclosure: uTry.it is a participant in the Amazon Services LLC Associates Program, an affiliate advertising program designed to provide a means for sites to earn advertising fees by advertising and linking to Amazon.com.


Friday, August 25, 2017

How to Make Hawaiian Buns (Tang Zhong Method) 夏威夷麵包-湯種法


Do you love Hawaiian Buns?  My family is a big fan of these buns!  Today, I want to share this homemade copy cat recipe with you.  After several recipe testing, I have finally ended up with this amazing recipe that our family absolutely loved!  The verdict?  We all agreed that my homemade version is way better than the store bought ones!  After all, it’s quite difficult to beat freshly baked buns that are still warm right out of the oven.  This is especially true since these buns are made with all natural ingredients and packed with amazing sweet aromas!  When you bake these buns, your whole house would smell amazing, like a bakery.  As my Son puts it, these buns are simply irresistible! 

Hawaiian Buns (Tang Zhong Method) 夏威夷麵包-湯種法    http://uTry.it

If you had been following my blog for a while, you probably know that I like making bread and buns with the Tang Zhong Method 湯種法.  This Hawaiian Bun recipe is no exception.  Tang Zhong Method is a bread making method that involved a partially cooked dough added into the main bread dough.  This method yields the most amazing soft and fluffy texture of breads and buns.  The most amazing part is that the softness will last for a few days (that is if you haven’t finished these buns by then!)  You can read more about the science behind the Tang Zhong Method by clicking here

Hawaiian Buns (Tang Zhong Method) 夏威夷麵包-湯種法    http://uTry.it

For the unfinished portions, simply wrap them tightly in plastic wraps.  To reheat, simply unwrap the buns and heat them up for a few seconds in the microwave.  They will be warm and soft just like they are fresh out of the oven!  If you haven’t try the Tang Zhong method of making bread, I highly recommend that you give it a try.  Once you have done it, you would not go back!  
  
Hawaiian Buns (Tang Zhong Method) 夏威夷麵包-湯種法    http://uTry.it

To give these Hawaiian Buns their tropical flavor, I used pineapple juice in the bread dough.  They are slightly sweet because of the brown sugar and vanilla extract.  There’s no egg in the bread dough, but I added some custard powder to give these buns a hint richness of egg aromas.  I used custard powder quite often in a few of my other recipes.  It’s a more common ingredient in Asia countries.  Unfortunately,I haven’t seen them in the local supermarkets in the States yet and I always have to order them online.  I’ll list the ingredients and tools used in this recipe below this post for your convenience.

Hawaiian Buns (Tang Zhong Method) 夏威夷麵包-湯種法    http://uTry.it

Although these Hawaiian Buns are just perfect the way they are, they are even more irresistible if you put a little butter and let it melt in the middle!  Each bite is simply heavenly!  If you are a Hawaiian Buns lover, you’ve got to give this recipe a try and thank me later!  After trying this recipe, you’ll never go back to the packaged version!

Hawaiian Buns (Tang Zhong Method) 夏威夷麵包-湯種法    http://uTry.it

Thank you so much for visiting, stay tuned for more fresh and delicious recipe next week!  Remember, Eat, Drink, and Be Happy!

Ingredients and Tools Used:
9X13 Rectangular Baking Pan (Click here for more information)
Infrared Thermometer (Click here for more information)
Wooden Spatula (Click here for more information)
Dole’s 100% Pineapple Juice (
Click here for more information)
Active Dry Yeast (
Click here for more information)
Custard Powder (
Click here for more information)
Dry Milk Powder
(Click here for more information)
Kerrygold Salted Butter (
Click here for more information)
Measuring Spoons Set (
Click here for more information)
Kitchen Scale (
Click here for more information)
Dough/Bench Scraper (
Click here for more information)
Silicone Pastry Brush (
Click here for more information)
Brown Sugar (
Click here for more information)
Stand Mixer (
Click here for more information)
Cooling Racks (
Click here for more information)
Rolling Mat (
Click here for more information)
Rolling Pin (
Click here for more information)
Organic Vanilla Extract (
Click here for more information)
Heat Proof Measuring Cups (
Click here for more information)

Disclosure: uTry.it is a participant in the Amazon Services LLC Associates Program, an affiliate advertising program designed to provide a means for sites to earn advertising fees by advertising and linking to Amazon.com.


Saturday, December 3, 2016

How to Make Christmas Wreath and Christmas Tree Shortbread Cookies


How’s your holiday shopping so far?  I’m just glad that I did most of mine online these days.  I simply do not like the shopping malls' crowded parking lot nor the long lines at the check outs!  Are you the same?  Or do you think that’s part of the fun from holiday shopping?  Fortunately, some of my holiday gifts are going to be homemade edible gifts and DIYs that don’t require a trip to the mall. Gifts such as these adorable Classic Shortbread Cookies.      

Classic Shortbread Cookies – Christmas Wreath and Christmas Tree  http://uTry.it

As you can see, I decorated them as Christmas Wreaths and Christmas Trees for a more festive look.  I’ll list the cookie cutters and other tools that I used in this recipe, at the bottom of the post for your convenience.  These cookies are quite simple to make and lots of fun to decorate.  My kids had a blast decorating and eating their own creations. 

Classic Shortbread Cookies – Christmas Wreath and Christmas Tree  http://uTry.it

If you haven’t done so, please check out my video tutorial above.  You’ll see how easy it is to make these adorable cookies.  Best of all, I mostly just used chopped pistachios and dried cranberries for the decorations.  I simply love these natural and festive colors for the holidays!  Not to mention, they add some wonderful flavors and textures to the cookies.

Classic Shortbread Cookies – Christmas Wreath and Christmas Tree  http://uTry.it

There are only a few simple ingredients for this classic shortbread cookie recipe.  The key to a wonderful shortbread cookie is the butter!  Therefore, please use the best quality of butter that you can get your hands on.  They make a huge difference in the end product.  Also for your reference, you will find the butter that I trust and love... right below this post.

Classic Shortbread Cookies – Christmas Wreath and Christmas Tree  http://uTry.it

Baking and decorating cookies have became one of our holiday traditions.  We also bake and build gingerbread houses together.  If you haven’t check out my classic gingerbread cookie recipe from last week, simple click here.  You sure don’t want to miss that one!  What are some of your holiday traditions?  Share in the comment session below.  I can’t wait to hear from you. 

Classic Shortbread Cookies – Christmas Wreath and Christmas Tree  http://uTry.it

I have been baking these Classic Shortbread Cookies all year round and not just for the holidays because they are so delicious.  They are super buttery and a little crunchy, thanks to the pistachio nuts on top.  The pistachio adds a nice and subtle nutty flavor to these cookies.  Definitely a fun treat for holiday and everyday afternoon tea.  I hope you’ll give this recipe a try soon and add it to your holiday baking list.  Stay tuned for more festive holiday treats next week!  

Classic Shortbread Cookies – Christmas Wreath and Christmas Tree  http://uTry.it


Tools and Ingredients Used:
Scalloped Edges Round Cookie Cutter Set (Click here for more information)
Holiday Mini Cookie Cutter Set (
Click here for more information)
Star Shaped Sprinkles
(Click here for more information)
Silver Dragees (
Click here for more information)
Candy Cane Sprinkles (
Click here for more information)
Red Heart Sprinkle for Bowtie (
Click here for more information)
Multi Color Dragees as Ornamens (
Click here for more information)
Wilton #2 Small Round Piping Tip for Icing (
Click here for more information)
Silpat (
Click here for more information)
Cooling Racks (
Click here for more information)
Baking Sheets
(Click here for more information)
Food Decorating Tongs/Tweezers (
Click here for more information)
Meringue Powder (
Click here for more information)
Organic Vanilla Extract (
Click here for more information)
Kerrygold Butter (
Click here for more information)
Pistachios (
Click here for more information)
Dried Cranberries (
Click here for more information)
Powdered Sugar (
Click here for more information)

Current Giveaways:
1) Perfect Gift Wrapping Ideas Craft Book and Wrapping Paper (Open till December 4th, 2016)

2) Origami Zoo Kit (Open till December 18th, 2016)


Friday, April 8, 2016

Classic Vanilla Swiss Roll Cake (雲呢拿瑞士卷蛋糕)


If you’ve been following my blog for a while, I’m sure you know I’ve created my fair share of Swiss Roll Cakes.  So far, I’ve shared the recipes of Strawberry and Cream, Decorated Coffee, Yule Log, and Sakura, etc.  Today, we’re going back to basic.  Check out this Classic Vanilla Swiss Roll Cake (瑞士卷蛋糕) and the tutorial video above.


How to Make Vanilla Bean Swiss Roll (雲呢拿瑞士卷蛋糕)  with Step-by-step video tutorial.  Easy and foolproof Swiss Roll recipe.  http://uTry.it

All along, I thought my family is chocoholic!  The darker, the better!  However, since the day that I’ve made this Vanilla Swiss Roll, they’ve been asking me to make this cake, over and over again!  Seems like they’ve forgotten the chocolate option for this cake, which used to be their favorite! 


How to Make Vanilla Bean Swiss Roll (雲呢拿瑞士卷蛋糕)  with Step-by-step video tutorial.  Easy and foolproof Swiss Roll recipe.  http://uTry.it

There’s something about this basic vanilla cake that we all love.  I guess it’s just the simplicity that wins us over.  It’s made out of just a few basic ingredients that you probably have already in your pantry.  And you can simply taste each one of them, such as the sweet and slightly floral vanilla aroma, the rich and decadent egg flavor, and the silky and smooth freshly whipped cream, etc. 


How to Make Vanilla Bean Swiss Roll (雲呢拿瑞士卷蛋糕)  with Step-by-step video tutorial.  Easy and foolproof Swiss Roll recipe.  http://uTry.it

If you haven’t try any of my Swiss Roll recipe just yet, I’m sure this is the time to do so.  It’s basically a foolproof Swiss Roll Cake recipe that assures you the ease of rolling up your cake nice and easy without any cracks.  The cake texture is light and silky smooth.  Each bite melts in your mouth in heavenly goodness!  I wish I can share this cake with you by passing a slice through the monitor.      


How to Make Vanilla Bean Swiss Roll (雲呢拿瑞士卷蛋糕)  with Step-by-step video tutorial.  Easy and foolproof Swiss Roll recipe.  http://uTry.it

Give this recipe a try, I’m sure it’ll become your family’s favorite as well.  If you haven’t done so, please subscribe to my Youtube channel here.  That way, you won’t miss out on any video and you’ll be the first to know when I have a new tutorial published.  Thank you for stopping by today. Please stay tuned for more fun and easy recipe.  If you have any recipe request, simply leave a comment below and I’ll try by best to post them soon!      

How to Make Vanilla Bean Swiss Roll (雲呢拿瑞士卷蛋糕)  with Step-by-step video tutorial.  Easy and foolproof Swiss Roll recipe.  http://uTry.it


Tools and ingredient used:

10X15 Baking pan (Click here for more information)
Vanilla Bean Paste (Click here for more information)
Organic Heavy Cream (Click here for more information)


Friday, February 12, 2016

Home Sweet Home 3D Sugar Cookies – For Valentine’s Day!


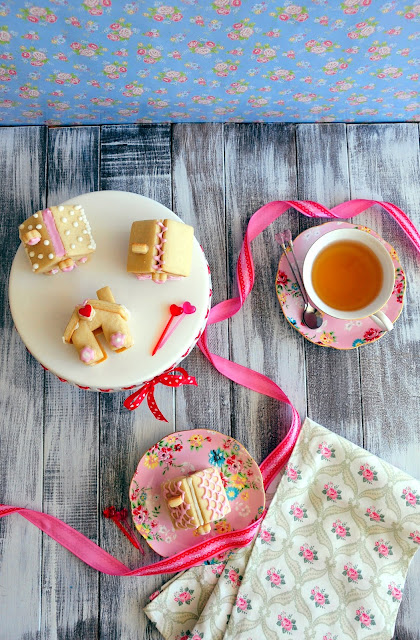
Another Valentine’s Day treat?  Why not?  Especially when they are as adorable as these Home Sweet Home 3D Sugar Cookies!  Check out the step-by-step video tutorial above and find out how to make them. They are super easy and you can decorate them however you like it.  I’ll list the tools that I used at the bottom of this post for your reference.

Check out how to make these adorable Home Sweet Home 3D Sugar Cookies for Valentine's Day with step-by-step video tutorial!  http://uTry.it


This post is actually a dedication to my Hubby for Valentine’s Day!  I might not have said it often enough, but I sure hope that he knows how much I appreciate and feel grateful for everything that he did for the family.  He is always very supportive and encouraging, especially when it comes to my work.  He taught me by example to be patience and have faith with the kids.  He works hard to provide for the family so I can work part-time from home and do what I love.  Because of him, we have this place that we feel loved and secured, a place that we can called home….a Home Sweet Home, in deed!  Now, you see why I created these cookies for Valentine’s Day! 


Check out how to make these adorable Home Sweet Home 3D Sugar Cookies for Valentine's Day with step-by-step video tutorial!  http://uTry.it


I actually used a 3D gingerbread house cookie cutter for these sugar cookies.  But who said I have to make gingerbread cookies in February, right?  I love that I can use the cookie cutter for more than just one thing!  


Check out how to make these adorable Home Sweet Home 3D Sugar Cookies for Valentine's Day with step-by-step video tutorial!  http://uTry.it   


There are many ways you can decorate these cookies too.  Besides using the 3D gingerbread house cookie cutter, I also used a mini flower and heart shaped cookie cutters to decorate these houses.  You can also use sprinkles (see the 1st picture above), or colored sugar to garnish them as well.


Check out how to make this adorable Home Sweet Home 3D Sugar Cookie with step-by-step video tutorial!  http://uTry.it


Serve it hanging over the tea cup (see the picture above) with rich and smooth hot chocolate and you're all set for a great afternoon tea!  (Click here for an easy and decadent homemade cocoa mix recipe.)


Check out how to make these adorable Home Sweet Home 3D Sugar Cookies for Valentine's Day with step-by-step video tutorial!  http://uTry.it

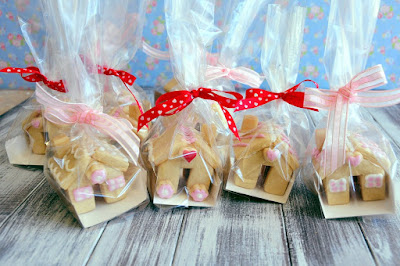
And of course, you can put them in treat bags and give them out to your Valentines!  They made wonderful homemade treats for sure.  Be prepared to hear oohs and aahs when you hand them out.


Check out how to make these adorable Home Sweet Home 3D Sugar Cookies for Valentine's Day with step-by-step video tutorial!  http://uTry.it


Thank you for stopping by today.  I hope you enjoy today’s post, recipe and video tutorial.  Stay tuned for more fun recipes in the near future.


Check out how to make these adorable Home Sweet Home 3D Sugar Cookies for Valentine's Day with step-by-step video tutorial!  http://uTry.it


Tools and Ingredients List:

3D Gingerbread House Cookie Cutter (Click Here for more information)

Mini Heart Shaped Cookie Cutter (Click Here for more information)
Mini Flower Shaped Cookie Cutter (Click Here for more information)
10-Inch Ribbon Cake Stand (Click her for more information)

Pastry Bag (Click Here for more information)
Wilton Decorating Tip No.2 Round (Click Here for more information)
Baking Sheets (Click Here for more information)
Silpat (Click Here for more information)
Stand Mixer (Click Here for more information)
Cooling Rack (Click Here for more information)
Vanilla Extract (Click Here for more information)


Thursday, December 24, 2015

Classic Bundt Cake--From Scratch


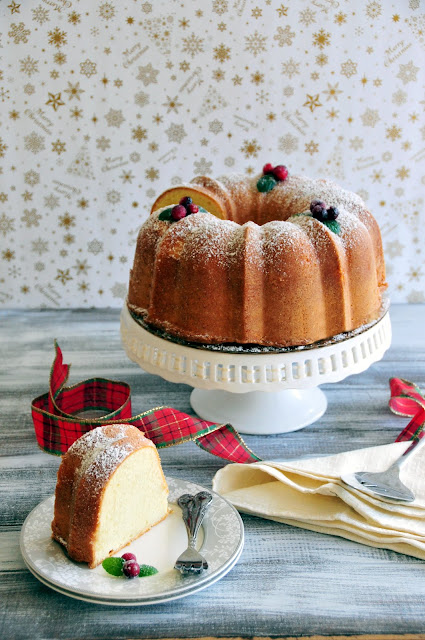
Did you have a chance to check out the Frosted Cranberries recipe and video tutorial from last week?  If not, simply click here to check it out.  Those cranberries make the most festive and gorgeous garnish on top of this Classic Bundy Cake?  Don't you agree?

Check out how to make this Classic Bundt Cake with step-by-step video tutorial.  It's gorgeous enough for your Holiday celebration, yet simple enough for everyday enjoyment.  http://uTry.it

It’s amazing how a few little edible gems and some fresh mint leaves can turn this simple cake into your best holiday dessert!  It’s gorgeous enough for the celebration, yet simple enough for everyday enjoyment.  Best of all, this cake can feed a village!  And yes, I make this cake quite often.  


Check out how to make this Classic Bundt Cake with step-by-step video tutorial.  It's gorgeous enough for your Holiday celebration, yet simple enough for everyday enjoyment.  http://uTry.it

This Classic Bundt Cake is wonderful when it’s freshly out of the oven.  You get the slightly crispy edges along with moist and tender interior.  But as I said, it’s a huge cake, and a small family like mine definitely won’t finish it all in a day, no matter how much we love cake!   The great news is, this cake freezes really well.   I usually let it completely cool to room temperature.  Slice the whole cake into desire thickness (usually around 1 1/2-inch).  Then, lay the slices flat into a tightly sealed freezer safe ziploc bag, and into the freezer they go.

Check out how to make this Classic Bundt Cake with step-by-step video tutorial.  It's gorgeous enough for your Holiday celebration, yet simple enough for everyday enjoyment.  http://uTry.it

 When I’m ready to serve them again, I take the desire number of slices I want.  Then, they go straight onto a non-stick saute pan.  You don’t need to grease the pan nor defrost the cake ahead of time.  Put on low heat and warm up the cake on both sides until the edges turn slightly golden brown and crispy.  You’ll get a nice crispy outer crust and super tender interior!  I say, they’re even better than the day it came fresh out of the oven!  Give this method a try and I’m sure you’ll love it too!

Check out how to make this Classic Bundt Cake with step-by-step video tutorial.  It's gorgeous enough for your Holiday celebration, yet simple enough for everyday enjoyment.  http://uTry.it

Last but not least, I want to wish you all a Blessed and wonderful Christmas!  It’s a wonderful time for most people, but please also remember that it could be hard for many out there who miss their loved ones.  Life is full of unexpected events.  So, cherish what you have and the people around you.   Give them an extra kiss, a tighter hug, and don’t forget to tell them that you love them!   
I’ll be back next week before the new year and share a fun appetizer/snack with you in case you’re throwing a party to ring-in the New Year!   Stay tuned!

Check out how to make this Classic Bundt Cake with step-by-step video tutorial.  It's gorgeous enough for your Holiday celebration, yet simple enough for everyday enjoyment.  http://uTry.it


Tools and ingredients used:

Classic 10-inch Bundt Cake Pan (click here for more information)
Mikasa Something Borrowed Desert Plates (Click here for more information)
10-Inch Ribbon Cake Stand (Click her for more information
)
Calphalon Nonstick 2-Piece Baking Sheet Set (Click her for more information)
KitchenAid Stand Mixer (Click here for more information)
Cake/Pie Server (Click here for more information)
Small Forks for Dessert (See similar product here)
Kerrygold Pure Unsalted Butter (Click here for more information)
Cooling Rack (Click here for more information)


Wednesday, November 26, 2014

Classic Cornbread—Happy Thanksgiving!


Classic Cornbread   http://uTry.it

During Summer, our family visited Orlando, Florida for vacation.  One of the restaurants that we dined at was called Whispering Canyon Cafe, which is located inside one of the Disney World Resort.  Don’t let the restaurant name fool you, there’s nothing quiet about that restaurant!  But the Kiddos and I had the most fun dining there.  Imagine having over 15 bottles of Ketchup on your table all at once upon request.  The whole restaurant, including the guests who dined there, would scream Ketchup for you and you’ll simply get a “special delivery” of ketchups!  My Kids still talk about that until now!    

Whispering Canyon Cafe

Also, how fun is it to run with 20 other kids around the restaurant tables with a Stick Pony in your hand right before dinner?  I’m sure your parents won’t think that’s a good idea anywhere else!  But it’s highly encouraged at the Whispering Canyon Cafe!  There are many more other fun activities and things happening when you dine there.  But you've got to be there to experience them yourselves!  So, if you happen to be in Florida for vacation or any other reason, be sure to reserve your table early.  They get booked up fast!  


Whispering Canyon Cafe

One of the most delicious item we've tried in that fun restaurant was the cornbread that comes with every meal.  It was slightly sweet, soft, moist and tender.  The corn flavor was wonderful and we always finish the whole mini loaf before the main course arrived.  Of course, I can’t help it but to recreate it at home.  My version used a combination of yellow corn meal, for the wonderful texture and corn flavor; along with some cake flour, for that soft and tender touch.  I also added some cream of corn, to keep it moist.  Plus, you also get the corn kernels throughout each piece because of the cream of corn in it.

Classic Cornbread   http://uTry.it

The batter is super simple to put together and it’s then baked in the cast iron pan, which you can bring up to the table and serve, how easy and smart, right?  Plus, the cast iron pan really give you a nice crispy crust that you can’t get from other baking pans.  If you take care of the cast iron pan, it simply last you for a life time.  Not to mention, it’s super affordable as well.  This cornbread is simple, yet scrumptious and satisfying.  You will definitely go for a second, or third!  Make one for your Thanksgiving gathering and share it with your loved ones.  It’ll make the perfect side dish! 


Classic Cornbread   http://uTry.it


Last but not least, I would like to wish you all a blessed Thanksgiving!  There are many many things in my life that I am thankful for, my health, my family, and my friends.  I'm also very grateful that we had the chance to go on a wonderful vacation last summer and created all those fun and warm memories together.  I'm also grateful for a loving and supportive Husband, who didn't complain about the dirty dishes and pans in the kitchen after I've tested recipes for the blog (okay, maybe just a dirty look! j/k)  But most of all, I am truly grateful to have each of you, my readers, who follow and visit my blog, and give me supports all the time.  So, thank you, from the bottom of my heart, and Happy Thanksgiving!   


Classic Cornbread   http://uTry.it


Props and Tools used in this post:

10-inch Seasoned Lodge Cast Iron Skillet (Click here for more information)
Wood Print Photography Backdrop (Click here to see similar product)
Cake/Pie Server (Click here for more information)
Core Bamboo Cutlery Set (Click here for more information)
Olive Wood Coaster Set (Click here for more information)
Red and White Checkers Cloth Napkins (Click here for more information)
Kel-Toy Jute Burlap Natural Table Topper (Click here for more information)