Showing posts with label Cakes. Show all posts

Friday, April 7, 2017

Unicorn Rainbow Mille Crêpe Cake 獨角馬彩虹法式薄餅千層蛋糕


If you want to see something magical, such as an unicorn flying over the rainbow, you’ve come to the right place!  Check out my video tutorial above and you’ll see that magic!  Okay, maybe I’m not really a magician, but I can certainly make a magical cake!

Unicorn Rainbow Mille Crêpe Cake 獨角獸彩虹法式薄餅千層蛋糕  http://YouTube.uTry.it

Have you been seeing everything Unicorn lately?  I sure have and there’s one particular “Unicorn Treat” that I saw on Pinterest that I couldn’t forget!  Yes, the Unicorn Rainbow Mille Crêpe Cake! 

Unicorn Rainbow Mille Crêpe Cake 獨角獸彩虹法式薄餅千層蛋糕  http://YouTube.uTry.it

According to the posts that I saw on the internet, there’s an unicorn themed café in Thailand that serves this unicorn cake.  It’s dreamy, whimsical, and definitely stole my heart!  Since I won’t be travelling to Thailand any time soon, my only solution to ease the craving is to recreate this stunning cake, based on the pictures I’ve seen on different social media websites.

Unicorn Rainbow Mille Crêpe Cake 獨角獸彩虹法式薄餅千層蛋糕  http://YouTube.uTry.itUnicorn Rainbow Mille Crêpe Cake 獨角獸彩虹法式薄餅千層蛋糕  http://YouTube.uTry.it

Let me reassure you, this cake tastes amazing and just as magical as it’s look.  I don’t know how the cake in the Thailand café tastes like, but I sure know mine tasted wonderful and all these layers are made with natural ingredients! 

Unicorn Rainbow Mille Crêpe Cake 獨角獸彩虹法式薄餅千層蛋糕  http://YouTube.uTry.it

I’m not great in cake decorating, so I tried to keep the design of this cake rather simple, just like the one I saw on the internet.  But with the interior of this cake being so stunning, it’s better to keep the outside of this cake simple.

Unicorn Rainbow Mille Crêpe Cake 獨角獸彩虹法式薄餅千層蛋糕  http://YouTube.uTry.it

It’s so exciting to cut into this cake to reveal all these different colors and layers!

Unicorn Rainbow Mille Crêpe Cake 獨角獸彩虹法式薄餅千層蛋糕  http://YouTube.uTry.it

There are 4 different flavors in these layers of crêpes.  The pink ones on top are strawberries, follow by lemon, then matcha green tea, and last but not least, blueberries on the bottom.  If you eat the crêpe layers separately, you can definitely taste each of the different flavors.  If you taste all these layers in one bite, you’ll get the hints of berries, along with the earthiness of the matcha, and a very refreshing citrus flavor from the lemon.  

Unicorn Rainbow Mille Crêpe Cake 獨角獸彩虹法式薄餅千層蛋糕  http://YouTube.uTry.it

If you have a spring party, celebration, or know someone who is crazy about rainbow or unicorn, you’ve got to make this cake!  It is somewhat time consuming to cook all these crêpe layers, but nothing too difficult at all.  If you follow my tips on the video tutorial and use the right tools, your crêpes and cake will turn out just as beautiful!

I hope you enjoy today’s post and tutorial.  If you haven’t done so, please subscribe to my Youtube channel here.  That way, you won’t miss out on any future videos and you’ll be the first to know when I have a new tutorial published.  Stay tuned for more fun and delicious recipes!


Link to All Natural Red Food Coloring Video:
https://goo.gl/qs4phF


Ingredients and Tools Used:

10-inch Ribbon Cake Stand (Click here for more information)
Marshmallow Twists (Click here for more information)
Pastel Color Butterflies Sprinkles (Click here for more information)
Mascarpone Cheese (Click here for more information)
Microplane for lemon zest (Click here for more information)
Organic Vanilla Extract (Click here for more information)
Horizon Organic Heavy Whipping Cream (Click here for more information)
Measuring Spoons Set (Click here for more information)


Friday, February 3, 2017

“Surprise Inside” Chocolate Bundt Cake With Strawberry Glaze - Valentine’s Day Dessert


Do you like surprises?  I think it’s a lot of fun and quite exciting to get a pleasant surprise from family and loved ones.  This Valentine’s Day, why not give your significant other a sweet surprise?  Let me present to you this gorgeous and delicious “Surprise Inside” Chocolate Bundt Cake With Strawberry Glaze! 

“Surprise Inside” Chocolate Bundt Cake With Strawberry Glaze -  Valentine’s Day Dessert   http://uTry.it

I’m not sure why, but chocolate and strawberries always make me think of Valentine’s Day!  In my humble opinion, I think they compliment each other really well.  To me, they are both romantic and sexy ingredients!  So, why not combine the two together for Valentine’s Day desserts, right? 

“Surprise Inside” Chocolate Bundt Cake With Strawberry Glaze -  Valentine’s Day Dessert   http://uTry.it

Check out my video tutorial above and I’ll walk you through step-by-step on how to make this amazing cake.  First, I started working on the “surprise” part of the cake, which consists of 2 sheets of strawberry cakes.  I added my homemade beet root natural food coloring to (try to) turn the cake pink.  However, the pink hue slightly faded after the first round of baking.  And the coloring mysteriously disappeared completely after the 2nd round of baking inside the bundt cake!  Oh well!  So, you might want to add more coloring than I did.  I’ll post the details and suggestions in the recipe below for your reference.

“Surprise Inside” Chocolate Bundt Cake With Strawberry Glaze -  Valentine’s Day Dessert   http://uTry.it

Even though the heart shaped cake inside didn’t stay pink as I intended it to be, it’s still a gorgeous and stunning cake to serve and enjoy.  And it’s really a surprise when you slice into the cake to reveal the heart shape inside!  Just keep in mind that when you add the heart shaped cake into the bundt pan, make sure to put it up-side down as it’ll be the right direction after you flip the bundt cake over.    

“Surprise Inside” Chocolate Bundt Cake With Strawberry Glaze -  Valentine’s Day Dessert   http://uTry.it

This chocolate bundt cake is rich in chocolate flavor and really moist!  I’m using my favorite Valrhona cocoa powder in the cake batter.  I’ve tried so many different brands of cocoa powder in the past, but seriously, Valrhona is the best!  In case if you’re wondering, no, this is NOT a sponsored post.  I just love this product and wanted to share with you.  So you don’t have to waste your hard-earned money on ingredients that don’t work as great!  I’ll list the ingredients below this post for your convenience.  The fresh strawberry glaze on top of this cake is really refreshing and delightful.  As I said, chocolate and strawberry really compliment each other well.

“Surprise Inside” Chocolate Bundt Cake With Strawberry Glaze -  Valentine’s Day Dessert   http://uTry.it

I hope you’ll try out this recipe and make this “Surprise Inside” Chocolate Bundt Cake for your loved ones this Valentine’s Day!  Stay tuned for more fun and yummy recipe!  Have a wonderful weekend ahead!


Ingredients and Tools used:
10-Inch Ribbon Cake Stand (Click her for more information)
Nordic Ware Bundt Pan (
Click here for more information)
10X15 Baking pan (
Click here for more information)
Organic Heavy Cream (
Click here for more information)
KitchenAid Stand Mixer (
Click here for more information)
Heart Shape Cookie Cutter (Click here for more information)
Cake/Pie Server (
Click here for more information)
Small Forks for Dessert (
See similar product here)
Valrhona Unsweetened Cocoa Powder (
Click here for more information)
Freeze Dried Strawberries (
Click here for more information)
Cream of Tartar (Click here for more information)
Cake Flour (Click here for more information)
Organic Vanilla Extract (Click here for more information)
Kerrygold Butter (Click here for more information)

Cooling Rack (
Click here for more information)
Silicone Spatula for Folding Ingredients (Click here for more information)


Saturday, January 28, 2017

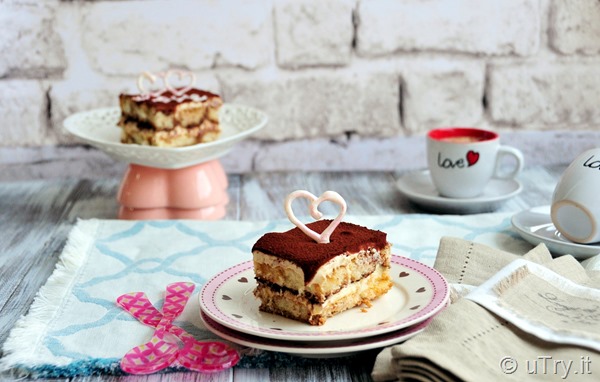
Classic Tiramisù – For Valentine’s Day


Have you check out my last blog post and video on how to make the parchment pastry bag and white chocolate decorations?  If not, click here to check it out!  I’m very excited to share today’s recipe with you.  It’s one of our family’s all time favorite dessert: Classic Tiramisù!

Classic Tiramisù – For Valentine’s Day  http://uTry.it

Tiramisù is an Italian (no-bake and layered) dessert usually made with ladyfingers, espresso, rum, egg yolks, mascarpone cheese, and cocoa powder, etc.  Check out my video tutorial and you’ll see how easy it is to prepare.  If you have concern consuming raw egg yolks, you may use pasteurized egg yolks instead.  You can find them in most major supermarkets in the States.  This Tiramisù is packed with wonderful espresso and chocolate flavors, along with a hint of rum.  We love this dessert because it’s not too sweet and has the right balance of flavors. 

Classic Tiramisù – For Valentine’s Day  http://uTry.it

Tiramisù means “pick me up” in Italian.  Why?  Because it’s texture is tender, soft, and fluffy.  The mascarpone cream in between the layers is silky smooth and melts in your mouth.  To ensure your cake will have the right texture, you need to start with the right ladyfingers.  Make sure to use the crispy one from Italy and not the soft, cake-y one from the U.S.! 

Classic Tiramisù – For Valentine’s Day  http://uTry.it

Also, be sure to check out my video tutorial on the “dipping time”.  Last but not least, after assembling the cake, let it rest in the refrigerator for at least 8 hours before serving!  I usually leave it in the fridge overnight.  That way, the ladyfingers will have enough time to soften and soak in all the flavors from the other ingredients.  Trust me, your patient will be rewarded! 

Classic Tiramisù – For Valentine’s Day  http://uTry.it

I’ll list all the ingredients and tools used below for your convenience!  I hope you’ll try out this recipe and share with your loved ones.  Stay tuned for more fun and sweet recipes.  Stay sweet!

Classic Tiramisù – For Valentine’s Day  http://uTry.it


Tools and Ingredients Used:

Ladyfingers
(Click here for more information)
Valrhona Unsweetened Cocoa Powder (
Click here for more information)
Mascarpone Cheese (
Click here for more information)
Heavy Cream (
Click here for more information)
9 x 13-inch Glass Baking Dish with Lid (
Click here for more information)
Stand Mixer (
Click here for more information)
Stainless Steel Spatula for Serving (
Click here for more information)
Silicone Spatula for Folding Ingredients (
Click here for more information)
Mixing Bowl Set (
Click here for more information)
Small Sift for Dusting (
Click here for more information)
 

Friday, January 27, 2017

How to Make Parchment Pastry Bag – for Cake Decorations


In just a few short weeks, it’ll be Valentine’s Day.  Do you and your sweetheart celebrate?  I usually make a special dinner and dessert at home to celebrate.  If you will be preparing a special dessert at home, I have a wonderful recipe for you coming very soon on the blog soon.  You’ve guessed it right, it’s the Classic Tiramisù that you see in the pictures below.  But before that, I wanted to show you how to make the white chocolate decorations on top first!

How to Make Parchment Pastry Bag – for Cake Decorations  http://uTry.it

Instead of using a regular pastry bag to pipe the chocolate decorations, a smaller one that’s made with parchment paper would be a better option in this case.  That way, you can use just a small amount of melted chocolate or icing instead of a big batch.  Besides, you can also cut out the size of the tip to tailor to your needs.  Remember! The bigger the cut, the thicker the line/drawing it will be for your decorations.  I’ll also post the link below on how to temper chocolate for your reference.   

How to Make Parchment Pastry Bag – for Cake Decorations  http://uTry.it

If you haven’t done so, be sure to check out the video tutorial above to see how to make the pastry bag.  It’s the perfect decorating tool for cakes and treats.  I hope you enjoy today’s quick video tutorial.  Stay tuned for the Tiramisù recipe soon. 

Don’t forget to subscribe to my YouTube channel here.  This way, you won’t miss out on any video and you’ll be the first to know when I have a new tutorial published. I share a new video tutorial/recipe every week.

How to Make Parchment Pastry Bag – for Cake Decorations  http://uTry.itq


Tools and Ingredients Used:

Parchment Pastry Bag (Click here for more Information)

White chocolate (Click here for more information)

Pink Pearl Dust (Click here for more information)


Click here to read more about tempering chocolate:
https://goo.gl/adYD17

Friday, May 13, 2016

Strawberry Cupcakes–From Scratch 草莓杯子蛋糕


What is your favorite ingredient to enjoy in Spring?  Is it corn, asparagus, peas, mangoes, berries, or all of the above?   I think my family’s favorite has to be strawberries!  During spring break, I took the kids to a nearby farm to pick their own strawberries.  It was a fun and yummy afternoon!


How to Make Strawberry Cupcakes–From Scratch 草莓杯子蛋糕  htto://uTry.it


We’ve picked 4 big baskets full of strawberries and really enjoyed them.  Besides eating them as is, I also made these delicious strawberry cupcakes, from scratch!


How to Make Strawberry Cupcakes–From Scratch 草莓杯子蛋糕  htto://uTry.it

I added fresh strawberries into the cake batter so that they are nice and moist.  Meanwhile, I mixed some fresh strawberry puree into the frosting so that they are slightly sweet and tart.  I also filled these cupcakes with some strawberry preserves in the center.  Be sure to check out the video tutorial on how to do that without any special equipment.  And of course, a slice of fresh strawberry on top as garnish to make it more festive.  These cupcakes are not too sweet but packed with wonderful strawberry flavors.  This frosting is probably one of the easiest one to prepare as well.


How to Make Strawberry Cupcakes–From Scratch 草莓杯子蛋糕  htto://uTry.it

These cutie cupcakes were baked in these individual cupcake liners (see link below on where to purchase).  But you can use regular cupcake pan and liners as well.  I’m sure they'll turn out just as delicious!  These strawberry cupcakes will be perfect for your Spring tea party, or just any afternoon tea time since they are so easy to prepare!

How to Make Strawberry Cupcakes–From Scratch 草莓杯子蛋糕  htto://uTry.it

What are your Spring favorite food or ingredients to enjoy?  Be sure to let me know in the comment below.  I can’t wait to hear from you!  Thank you for stopping by today.  Until next time, please take care.


How to Make Strawberry Cupcakes–From Scratch 草莓杯子蛋糕  htto://uTry.it


Tools used:

Owl Pink Paper Baking Cups (Click here for more information)
Organic Vanilla Extract (Click here for more information)
Kerrygold Butter (Click here for more information)
Baking Sheets (Click here for more information)


Wednesday, October 8, 2014

Marbled Bundt Cake


Marbled Bundt Cake  http://uTry.it

You might or might not know the fact that I adore vanilla!  But, I am sure you’ve noticed from my previous posts and recipes that my family loves chocolate, me included.  So, why not combine both flavors, into one gorgeous cake?  That’s exactly how this Marbled Bundt Cake was created. 

Marbled Bundt Cake  http://uTry.it

I originally made this cake plain, it’s the perfect flavor and texture for pound cake.  But to satisfy the chocoholics in this house, I added some Valrhona Unsweetened Cocoa Powder (Click here for more information) in part of the cake batter to create the marble effect.  Boy oh boy, not only the cake looks gorgeous with the marbling, the deep chocolate flavors really comes through as well.  That’s why I love Valrhona cocoa powder so much.

Marbled Bundt Cake  http://uTry.it

Let’s take a closer look at the side cut of this Marbled Bundt Cake (See picture below).  See the pretty chocolate-y swirls?  They are easy to create and I’ll show you how in just a minutes in the pictorial below.  But what I really want you to see is the overall texture of the cake.  It’s tender, soft and silky smooth.  What’s the secret?  I used cake flour for the cake, which yields a finer texture in the final product.  Also, there’s NO leavening agent (such as baking powder) used in my recipe, except for the eggs and air, if those count. 

Marbled Bundt Cake  http://uTry.it

So, to make a soft and moist cake that is not too dense, the secret is in the technique!  The initial creaming process of the butter and sugar is crucial.  When you beat the butter and sugar together, you’re also beating (combining) the air into the mixture.  You’ll see how light and fluffy the butter and sugar mixture will turn after beating for just 5 minutes.  And the color will also turn into pale yellow.   Besides the tender and smooth interiors, you also get the slightly crunchy crust on the edges, those are the best parts, in my opinion!  Since there are only a few ingredients in this recipe, as always, I highly recommend that you use the best quality ingredients as you can possibly find.  Why?  Because that makes a difference in your cake, a huge difference, really!  

Marbled Bundt Cake  http://uTry.it

Are you ready to follow me to the kitchen to see how I made this cake?  Come on over!

1) and 2) Butter and flour a 10-inch Bundt pan.
3) In the bowl of the stand mixer fitted with the paddle attachment, with medium speed, cream the butter, sugar and salt together for 5 minutes until light and fluffy.
4) Scrape the sides of the bowl to make sure the ingredients are well incorporated.


Marbled Bundt Cake  http://uTry.it

5) Add the vanilla extract,
6) then the eggs, one at a time.
7) and 8) Turn mixer to low, then add the cake flour and heavy cream, alternately; starting with flour and ending with flour. Scrape the sides of the bowl again if necessary. Mix until the batter is just fully incorporated.

Marbled Bundt Cake  http://uTry.it

9) Turn off the mixer and scoop out 2 cups of the batter into a large mixing bowl. With a rubber spatula, fold in the cocoa powder into the 2 cups batter. Until well incorporated.

10) Pour half of the original batter into the bottom of the pan.
11) Then, add the chocolate batter on top, you can dollop the chocolate batter in different corners of the pan.
12) Last, pour the remaining original batter on top.


Marbled Bundt Cake  http://uTry.it

13) With a butter knife, move around the batter to create the swirl/marbled patterns.
14)  This is how the cake batter looks like after you make the swirls.
15) Bake for 1 hour and 15 minutes, or until a skewer inserted in the middle of the cake and comes out clean. Cool on wiring rack for at least 30 minutes before removing from the pan.

16) Simply invert the cake onto the cake stand.  Dust with powder sugar if desired.  Enjoy!

***Note:  I’ve another Bundt cake pan but the indentation wasn’t as pretty as this one turned out.  So, here’s the information of the pan that I used, in case if you’re interested.  Nordic Ware Bundt Pan (Click here for more information)

Marbled Bundt Cake  http://uTry.it

There are quite a few steps to follow but all simple and easy ones.  I hope you’ll give this recipe a try.  If you like pound cakes, this recipe is definitely a keeper!  You’ll never go back to the store bought pound cakes after you’ve made this one.  So, tell me, are you a vanilla lover? Or chocolate lover?  Or like me, opt for a marbled pound cake and you’ve got the best of both world?  Can’t wait to hear from you in the comment below!

Marbled Bundt Cake  http://uTry.it


Props and Tools used in this post:
Mikasa Something Borrowed Desert Plates (Click here for more information)
10-Inch Ribbon Cake Stand (Click her for more information)
Nordic Ware Bundt Pan (Click here for more information)
Calphalon Nonstick 2-Piece Baking Sheet Set (Click her for more information)
KitchenAid Stand Mixer (Click here for more information)
Cake/Pie Server (Click here for more information)
Small Forks for Dessert (See similar product here)
Valrhona Unsweetened Cocoa Powder (Click here for more information)
Kerrygold Pure Unsalted Butter (Click here for more information)
Cooling Rack (Click here for more information)


Saturday, August 23, 2014

Mini Chocolate Muffins (迷你巧克力鬆餅) - Back to School Afternoon Treats

Mini Chocolate Muffins (迷你巧克力鬆餅)   http://utry.it

Many recipes on my blog were inspired by my Kids, and this Mini Chocolate Muffins recipe (迷你巧克力鬆餅) is no exception.  There was a breakfast event in my Baby Girl's class a while ago and someone brought mini chocolate chip muffins (the store-bought ones though).  After my Baby Girl finished the mini muffin, she immediately asked me if I can make some for her when we get home.  But she was very specific, she wanted a chocolate version with chocolate chips in them!  "What a Little Foodie I have!?" was what I thought at that time.

Mini Chocolate Muffins (迷你巧克力鬆餅)   http://utry.it


I'm glad that she "challenged" me and inspired me to test out new recipes.  These Mini Chocolate Muffins were some of the best muffins we've had.  I don't usually prepare muffins for breakfast, especially not for the Kids.  I prefer a savory breakfast 90% of the time (the occasional waffles and pancakes filled that 10%)!  But these mini muffins were very tender, light and fluffy.  Best of all, they were not overly sweet and in perfect mini sizes, a.k.a. perfect size for portion control!  And they are definitely the perfect after school treats.


Mini Chocolate Muffins (迷你巧克力鬆餅)   http://utry.it


These Mini Chocolate Muffins also double the duty as afternoon pick-me-ups for Mommy and Daddy!  With a  mini chocolate muffin and a cup of latte, or espresso, I've got the energy to tackle the rest of the day!  Boy, I truly miss my summer holidays!  The picture below shows you the inside of these muffins and how light and airy they are.


Mini Chocolate Muffins (迷你巧克力鬆餅)   http://utry.it

And yup....all gone in just minutes.  These are the perfect 1 or 2 biters, depending whose mouth you used as the measuring unit.

Mini Chocolate Muffins (迷你巧克力鬆餅)   http://utry.it


Interested to see how I made them?  Follow me to my kitchen and check them out.

1) Preheat the oven to 350 degrees F. Line mini cupcake pans with paper liners.

2) In the bowl of an electric mixer fitted with a paddle attachment, cream the butter and 2 sugars on high speed until light and fluffy.

3) Lower the speed to medium, add the egg, and then add the vanilla extract until incorporated.

4) Scrape down the sides of the mixing bowl when necessary.

5) In a separate bowl/measuring cup, whisk together the buttermilk, yogurt, and coffee.  Set aside.

6) In another large bowl, whisk together the flour, cocoa, baking soda, and salt.


Mini Chocolate Muffins (迷你巧克力鬆餅)   http://utry.it


7) & 8) On low speed, add the buttermilk mixture and the flour mixture alternately in thirds to the mixer bowl, beginning with the buttermilk mixture and ending with the flour mixture. Mix until use combined.

9) Gently fold in 2 tablespoons of chocolate chips.

10) With a small ice cream scoop (about a tablespoonful), divide the batter among the prepared mini cupcake pans.

11) Then, sprinkle the remaining 2 tablespoons of chocolate chips on top of the batter in the baking pan. Bake for 10 to 12 minutes, until a toothpick comes out clean.

12) Cool on wiring rack and enjoy.

Mini Chocolate Muffins (迷你巧克力鬆餅)   http://utry.it


As always, I used Valrhona unsweetened cocoa powder in this recipe, which made these chocolate muffins super dark and decadent.  I love the deep and chocolate-y taste from this cocoa powder.  These muffins are light and airy, yet, rich in chocolate aroma at the same time.  Whether you serve them for breakfast or afternoon tea is totally up to you; and I hope you'll give this recipe a try!  I guaranteed that they'll be a delicious one.


Mini Chocolate Muffins (迷你巧克力鬆餅)   http://utry.it


Tools and Props used in this post:

Wilton Mini Muffin Pan (Click here for product information)
Valrhona Unsweetened Cocoa Powder (Click here for more information)
Daisy Mini Muffin Paper Liners (Click here for more information)
KitchenAid Stand Mixer (Click here for more information)
Red Vanilla Wave-y Espresso Cups and Saucers Set (Click here for product information)
White Porcelain Dessert Spoons (Click here to see similar products)
Small Bamboo Basket (Click here to see similar product)


Sunday, June 22, 2014

Chocolate Tiramisu Layer Cake (No Bake!) 巧克力提拉米蘇三層蛋糕 (免烘)


Chocolate Tiramisu Layer Cake (No Bake!)   http://utry.it

My oven is on almost everyday, or every other day.  From homemade loaf bread, cookies, cupcakes, to roasted vegetables and chickens drumsticks, I certainly keep my oven quite busy.  But as the temperature rises, I do long for no bake treats.  After all, it’s not that fun to turn on the oven and adding more heat to the almost triple digit temperature out there.  This Chocolate Tiramisu Layer Cake will certainly holds a special spot in your fridge, then your tummy, and probably in your heart after you've tried a piece.  I especially love it when I don't have to turn on the oven in the summer to make a gorgeous cake.  After all, I have quite a few birthdays to celebrate in summer!

Chocolate Tiramisu Layer Cake (No Bake!)   http://utry.it

My Kids love Tiramisu, both the traditional one and the Strawberry version (recipe here).  However, I've got to keep it to just a tasting portion for the traditional ones because there’s coffee in it.  That’s the main reason why I created this Chocolate version of Tiramisu so everyone in the family can enjoy.  I guess it’s not news anymore that my whole family is chocoholic!  Um, I guess it runs in the family; especially, my Baby Girl, she loves dark chocolate way more than milk or white ones!  She’s definitely a little foodie.       

Chocolate Tiramisu Layer Cake (No Bake!)   http://utry.it

Since there’s no baking involved in this Chocolate Tiramisu Layer Cake, it is rather an easy cake to make.  All you need to do is have each element ready before you start layering and assembling the cake.  The ingredients are quite straight forward and pretty easy to find these days.  At the end of the post, I’ll list the links of the products that I used for your convenience so you know what to look for when you go shop.  The toughest part of this cake?  WAITING!  Yes, after you put the cake together, you have to let it chill in the refrigerator for at least 24 hours before serving.   That gives the lady fingers the time they needed to fully absorbed all the moisture and goodness, and softened up to cake like consistency.  If you ask me, I think it’s totally worth the wait!  

Chocolate Tiramisu Layer Cake (No Bake!)   http://utry.it

As you might already know.  Tiramisu in Italian means “pick me up”.  Traditionally, this famous dessert is made of ladyfingers (a very light weight and crispy cookies) dipped in a mixture of espresso and liquor, layered with a whipped mixture of egg yolks, cream and mascarpone cheese and cocoa powder.  The texture is so soft and fluffy, hence, it’s called “pick me up”.  So, the texture of this Chocolate Tiramisu Layer Cake is also very light, tender, soft and fluffy!  Yet, it’s rich and chocolate-y at the same time because of the dark cocoa powder that I used.  I love Valrhona's! Trust me on this one.  I've tried a fair share of cocoa powder and this one gives me the richest, darkest, and most chocolate-y taste!  The mascarpone cheese provided the silky, rich and creamy texture.  This dessert is rich and satisfying, but not overly sweet. 

Chocolate Tiramisu Layer Cake (No Bake!)   http://utry.it

As you can see from the pictures of the whole cake, I leave the sides of this cake with a rustic look and you can see all 3 layers of cream and the lady fingers as well.  You can make it smooth and seamless by smearing a thin layer of whipped mascarpone cream mixture to the side of the pan before soaking and lining the lady fingers.  You’ll see what I mean when we go over the pictorial below.  Ready to step into the kitchen with me?  Let’s go!

1) Grease the side and bottom of a 9-inch spring-form pan.
2) Line the bottom and sides of the pan with a piece of parchment paper, make sure the parchment paper is a little taller than the side of the pan by 1/2 to 1-inch.
3) Heat and whisk all the ingredients of the chocolate milk mixture until sugar dissolved.  Pour mixture into a shallow dish to let cool.
4) In the bowl of the stand mixer with the whisk attachment, beat the cream, vanilla, and powdered sugar until soft peak. 


Chocolate Tiramisu Layer Cake (No Bake!)   http://utry.it

5) Stop the mixer and add the mascarpone cheese.  Beat the mixture until medium peak forms.
6) Add the cocoa powder and beat until incorporated
7) Dip the lady fingers into the chocolate milk mixture, 1 to 2 second for both sides.  Do not dip too long or else your lady fingers will get too soggy.
8) Line the dipped lady fingers on the bottom of the prepared pan. You might need to break a piece to fill the gaps between the lady fingers.  You should be able to fit 12 pieces (100 grams) in a layer.


Chocolate Tiramisu Layer Cake (No Bake!)   http://utry.it

9) Spread 1/3 of the mascarpone cheese mixture on top of the lady fingers.  Spread evenly on top.
10) Dust 2 teaspoons of cocoa powder to cover the top.
11) Repeat 2 more layers by dipping more lady fingers into the chocolate milk mixture, follow by mascarpone mixture and cocoa powder.
12) Do not dust the very top of the final layer of mascarpone cream mixture. Cover with plastic wrap and refrigerated for at least 24 hours before serving.


Chocolate Tiramisu Layer Cake (No Bake!)   http://utry.it

13) When it’s ready to serve, remove the plastic wrap.
14) Remove the ring of the spring-form pan and the parchment paper on the sides.
15) Dust the top of the cake with 2 teaspoons of unsweetened cocoa powder
16) Decorate with a few fresh raspberries and fresh mint leaves and enjoy!


Chocolate Tiramisu Layer Cake (No Bake!)   http://utry.it

Pretty simple, right?  You’ll be amazed with how simple this cake is to prepare, yet got that wow factor and tasted just as amazing as it looks, if not better.  I hope you enjoy today’s recipe and give this cake a try.  You can come back and thank me later. 

Chocolate Tiramisu Layer Cake (No Bake!)   http://utry.it


Tools and Props used in this post:

9-inch Non-Stick Spring Form Pan (Click here for more information)
Ruffled Edges White Cake Stand (Click here to see similar product)
KitchenAid Stand Mixer (Click here for more information)
Cake/Pie Server (Click here for more information)
2 Tone Bamboo Cutting Board (See similar product here)
Small Forks for Dessert (See similar product here)
Italian Lady Fingers (Click here for more information)
Valrhona Unsweetened Cocoa Powder (Click here for more information)
Mascarpone Cheese (Click here for more information)
Cooking Spray (Click here for more information)