Showing posts with label Decorations. Show all posts

Saturday, January 28, 2017

Classic Tiramisù – For Valentine’s Day


Have you check out my last blog post and video on how to make the parchment pastry bag and white chocolate decorations?  If not, click here to check it out!  I’m very excited to share today’s recipe with you.  It’s one of our family’s all time favorite dessert: Classic Tiramisù!

Classic Tiramisù – For Valentine’s Day  http://uTry.it

Tiramisù is an Italian (no-bake and layered) dessert usually made with ladyfingers, espresso, rum, egg yolks, mascarpone cheese, and cocoa powder, etc.  Check out my video tutorial and you’ll see how easy it is to prepare.  If you have concern consuming raw egg yolks, you may use pasteurized egg yolks instead.  You can find them in most major supermarkets in the States.  This Tiramisù is packed with wonderful espresso and chocolate flavors, along with a hint of rum.  We love this dessert because it’s not too sweet and has the right balance of flavors. 

Classic Tiramisù – For Valentine’s Day  http://uTry.it

Tiramisù means “pick me up” in Italian.  Why?  Because it’s texture is tender, soft, and fluffy.  The mascarpone cream in between the layers is silky smooth and melts in your mouth.  To ensure your cake will have the right texture, you need to start with the right ladyfingers.  Make sure to use the crispy one from Italy and not the soft, cake-y one from the U.S.! 

Classic Tiramisù – For Valentine’s Day  http://uTry.it

Also, be sure to check out my video tutorial on the “dipping time”.  Last but not least, after assembling the cake, let it rest in the refrigerator for at least 8 hours before serving!  I usually leave it in the fridge overnight.  That way, the ladyfingers will have enough time to soften and soak in all the flavors from the other ingredients.  Trust me, your patient will be rewarded! 

Classic Tiramisù – For Valentine’s Day  http://uTry.it

I’ll list all the ingredients and tools used below for your convenience!  I hope you’ll try out this recipe and share with your loved ones.  Stay tuned for more fun and sweet recipes.  Stay sweet!

Classic Tiramisù – For Valentine’s Day  http://uTry.it


Tools and Ingredients Used:

Ladyfingers
(Click here for more information)
Valrhona Unsweetened Cocoa Powder (
Click here for more information)
Mascarpone Cheese (
Click here for more information)
Heavy Cream (
Click here for more information)
9 x 13-inch Glass Baking Dish with Lid (
Click here for more information)
Stand Mixer (
Click here for more information)
Stainless Steel Spatula for Serving (
Click here for more information)
Silicone Spatula for Folding Ingredients (
Click here for more information)
Mixing Bowl Set (
Click here for more information)
Small Sift for Dusting (
Click here for more information)
 

Friday, January 27, 2017

How to Make Parchment Pastry Bag – for Cake Decorations


In just a few short weeks, it’ll be Valentine’s Day.  Do you and your sweetheart celebrate?  I usually make a special dinner and dessert at home to celebrate.  If you will be preparing a special dessert at home, I have a wonderful recipe for you coming very soon on the blog soon.  You’ve guessed it right, it’s the Classic Tiramisù that you see in the pictures below.  But before that, I wanted to show you how to make the white chocolate decorations on top first!

How to Make Parchment Pastry Bag – for Cake Decorations  http://uTry.it

Instead of using a regular pastry bag to pipe the chocolate decorations, a smaller one that’s made with parchment paper would be a better option in this case.  That way, you can use just a small amount of melted chocolate or icing instead of a big batch.  Besides, you can also cut out the size of the tip to tailor to your needs.  Remember! The bigger the cut, the thicker the line/drawing it will be for your decorations.  I’ll also post the link below on how to temper chocolate for your reference.   

How to Make Parchment Pastry Bag – for Cake Decorations  http://uTry.it

If you haven’t done so, be sure to check out the video tutorial above to see how to make the pastry bag.  It’s the perfect decorating tool for cakes and treats.  I hope you enjoy today’s quick video tutorial.  Stay tuned for the Tiramisù recipe soon. 

Don’t forget to subscribe to my YouTube channel here.  This way, you won’t miss out on any video and you’ll be the first to know when I have a new tutorial published. I share a new video tutorial/recipe every week.

How to Make Parchment Pastry Bag – for Cake Decorations  http://uTry.itq


Tools and Ingredients Used:

Parchment Pastry Bag (Click here for more Information)

White chocolate (Click here for more information)

Pink Pearl Dust (Click here for more information)


Click here to read more about tempering chocolate:
https://goo.gl/adYD17

Friday, December 9, 2016

Christmas Fruit Tart with Meyer Lemon Mousse


Will you be hosting a Christmas party this year?  Or, will you be a guest at a friend’s or family member’s house?  Honestly, I enjoy being a guest more than hosting a party at my place.  One reason is that I don’t really have a backyard that is spacious enough to host parties.  The other reason is the tremendous amount effort needed, such as planning, preparation, and cleanup!  As a guest, I’m always happy to bring desserts!  And I’m sure any host would be pleased to see this festive and gorgeous Christmas Fruit Tart with Meyer Lemon Mousse!  But of course, you can still make this pretty fruit tart even if you’re hosting Christmas gatherings at your place.  This tart will make a beautiful centerpiece for sure.
 
How to Make Christmas Fruit Tart filled with Meyer Lemon Mousse (with video tutorial)  http://uTry.it
 
The crust of this tart is a simple cookie crust. It’s crunchy, buttery, and sturdy enough to hold up the Meyer Lemon Mousse fillings.  The Meyer Lemon Mousse filling is super easy to prepare.  It involves some mascarpone whipped cream and Meyer Lemon Curd.  Click here to check out my homemade Meyer Lemon Curd recipe.  If you want a short cut, it’s okay to use a store bought Lemon Curd as well.  After all, it’s the holiday and it’s alright to give yourself a break if you are in a hurry.  But the good news is that you can make the Meyer Lemon Curd ahead of time and they’ll last quite a long time in the fridge.  
 
How to Make Christmas Fruit Tart filled with Meyer Lemon Mousse (with video tutorial)  http://uTry.it
 
I used green grapes, pineapple, pomegranate seeds, and persimmon to garnish this tart.  It’s quite self explanatory in terms of how to arrange the fruit to form the Christmas Tree.  You can be creative and use other fruits that you like.  For example, kiwi slices for the tree, yellow peach for the star, and other small fruit as ornaments as well.  These are the fruits that I have on hand so I used them.  The fresh fruit compliment the Meyer Lemon Mousse perfectly.  It’s refreshing yet decadent at the same time.  The mousse filling has a light, fluffy and silky mouth-feel, which contrast wonderfully with the crunch cookie crust.  The pomegranate seeds add a little pop and tartness in this tart.  And its natural color simply brightens up the whole tart.
 
How to Make Christmas Fruit Tart filled with Meyer Lemon Mousse (with video tutorial)  http://uTry.it
 
It’s such a festive and simple dessert to enjoy!  I hope you’ll give this recipe a try and make it for your holiday celebration.  If you do try the recipe, don’t forget to leave me a message below or email me a picture on how it turned out.  I can’t wait to hear from you!  Stayed tuned for more fun and festive holiday treats next week.  
 
Tools and Ingredients Used:
 
Cooling Racks (Click here for more information)
Baking Sheets 
(Click here for more information)
Organic Vanilla Extract (Click here for more information)
Kerrygold
Butter 
(Click here for more information)
Powdered Sugar (Click here for more information)
Mascarpone Cheese (Click here for more information)
Rectangular Tart Pan (Click here for more information)
Parchment Paper  (Click here for more information)
Horizon Organic Heavy Whipping Cream (Click here for more information)
Pie Weight (Click here for more information)
Pastry Cutter (Click here for more information)
Pastry Bag (Click here for more information)
Wilton Closed Star 2D Pastry Tip (Click here for more information)

 
P.S. Current Giveaway: The Origami Zoo Kit (Open till December 18th, 2016)

 
How to Make Christmas Fruit Tart filled with Meyer Lemon Mousse (with video tutorial)  http://uTry.it


Friday, October 21, 2016

Autumn Leaf Tuile Cookies


Are you in the mood for Autumn, or Fall as that’s how we call it in the States?  My mind is definitely ready for it, but the Southern California temperature certainly didn’t think so!  Seems like we’re having an extended summer this year, again.  Seriously, I’m so ready to take out my coats and jackets already!


How to Make Autumn Leaf Tuile Cookies  http://uTry.it

So, before any of the coats, boots, or down filled jackets can get out of the closet, I’m at least filling up my belly with food that are fitted for the season!  Let me present to you, Autumn Leaf Tuile Cookies!  These cookies are quite easy and fun to make.  I love that they are light and crispy, that truly resemble the Autumn falling leaves, except tastier, I assumed (cos I never tasted a real leaf, of course)!   

How to Make Autumn Leaf Tuile Cookies  http://uTry.it

These cookies are delightful on their own.  They are crispy, light, buttery, and sweet, along with a hint of vanilla aroma.  I can easily enjoy a whole dozen in one sitting.

How to Make Autumn Leaf Tuile Cookies  http://uTry.it

However, they are even better if you use them on your Fall desserts!  They make the most beautiful topping for my Pumpkin Roll cake and add a nice crunch for contrast in texture.  I’ll share the video tutorial on how to make the pumpkin roll next week.  So stay tuned!  For now, let’s enjoy these gorgeous Autumn Leaf Tuile Cookies!  Have a Fall Fantasy Friday!

**Update:  Click here to check out the Pumpkin Roll Cake Recipe!***

How to Make Autumn Leaf Tuile Cookies  http://uTry.it


Tools and ingredients used:
Leaf Shaped Stencil (Click here for more information)
(Click here for more information)
Silpat (Click here for more information)
Cooling Racks (Click here for more information)
Baking Sheets (Click here for more information)
Silicone Cookie Spatula (Click here for more information)
Organic Vanilla Extract (Click here for more information)
Horizon Organic Heavy Whipping Cream (Click here for more information)
Kerrygold Butter (Click here for more information)
Offset Spatula (Click here for more information)


Friday, December 18, 2015

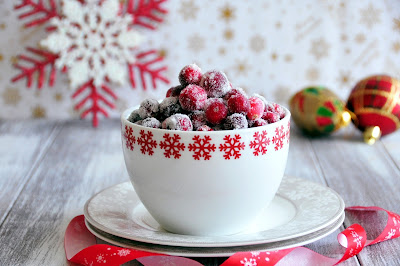
Frosted Cranberries (Candied Cranberries)


Are you ready for the holidays?  I can’t wait to spend some time with my family and friends.  We all need some time off, I guess.  Today, I wanted to share this easy recipe with you that will make your holiday treats a lot more festive! Say hello to these Frosted Cranberries!  They are gorgeous, festive, edible jewels, in my opinion.  Best of all, they are quite easy to make.  Be sure to check out my YouTube video above for the step-by-step instructions.   

How to make Frosted Cranberries (Candied Cranberries) with video tutorial. Festive holiday treats and garnisd.   http://uTry.it


These Frosted Cranberries are made with the fresh ones, not frozen.  If you’ve tried a fresh cranberry without anything else, you know they taste super sour.  That’s why you usually see them dried or turned into sauces.  For the same reason, these frosted edible jewels are perfect with the sugar coating!  The sweet and tart taste balance each other out really well.  I used some vanilla sugar in the soaking syrup (click here to see the vanilla sugar recipe).  Or, you can simply use regular sugar.


How to make Frosted Cranberries (Candied Cranberries) with video tutorial. Festive holiday treats and garnisd.   http://uTry.it

So besides eating these candied cranberries as is, you can also use them as a festive holiday garnish for your cakes and treats. 

How to make Frosted Cranberries (Candied Cranberries) with video tutorial. Festive holiday treats and garnisd.   http://uTry.it


They turn a regular bundt cake into a festive holiday centerpieces!  The Frosted Cranberries are also great in punches and cocktails!  I’ll post the Classic Bundt Cake (picture above) recipe on my next post.  So please stay tuned!

How to make Frosted Cranberries (Candied Cranberries) with video tutorial. Festive holiday treats and garnisd.   http://uTry.it


Thank you for stopping by today. I hope you enjoy the post and the recipe.  Until next time, please take care and stay warm!


How to make Frosted Cranberries (Candied Cranberries) with video tutorial. Festive holiday treats and garnisd.   http://uTry.it


Friday, April 3, 2015

How to Decorate Easter Eggs in 1 Minute

How to Decorate Easter Eggs in 1 Minute  It's the easiest and most gorgeous centerpiece for Easter!  http://uTry.it

Are you ready for Easter?  I certainly am and can’t wait to go Easter Egg Hunts with my Kids!  If you’re having a party or gathering, you've got to check out my video tutorial on "How to Decorate Easter Eggs in 1 minute!" video clip.  Aren't these decorated eggs gorgeous?  Let me tell you a secret (or 2)!  These beautiful decorated eggs are super easy to make and there’s no real eggs involved!  Shhhhh….no one has to know that they are so easy to make.  Hey, I always say I’m not a crafty person!  But if I can make these gorgeous eggs, so can you!

How to Decorate Easter Eggs in 1 Minute  It's the easiest and most gorgeous centerpiece for Easter!  http://uTry.it

So, here are a few things that you will need for this project.  First of all, the Dyeable Craft Eggs, of course (see picture below).  I got them from a local craft store and they are super realistic!  The shells’ texture really feel like the texture from the real eggs!  Honestly, I thought of making these decorated eggs with the real eggs by emptying the egg whites and yolks from the shells, clean up, dry out, etc.  But, the real eggs shell are so fragile and probably won’t last as long as these craft eggs.  So, craft eggs win!  Also, you’ll need a few floral printed paper napkins, a pair of scissors and some decoupage glue.  The decoupage glue that I used already comes with a brush attached inside the cap, so convenient!  You can also get a nest from the craft store to put the eggs in, but that is totally optional.  These eggs will look just as beautiful in your Easter baskets, or anywhere, really!

How to Decorate Easter Eggs in 1 Minute  It's the easiest and most gorgeous centerpiece for Easter!  http://uTry.it

One more tip, when you choose your floral paper napkins, try to get one that has the white background.  They will come out seamlessly when you put them on the egg shells.  Here we go, check out my video tutorial below on how to make these gorgeous eggs!


Super easy, isn't it?  My Kids also helped me to decorate some of the eggs.  We had so much fun.  I can’t wait to make more with them over the weekend.  I hope you enjoyed watching my video tutorial.  If you haven’t done so, please subscribe to my Youtube channel here.  You’ll be the first to know when I have new video tutorials published.

How to Decorate Easter Eggs in 1 Minute  It's the easiest and most gorgeous centerpiece for Easter!  http://uTry.it

I want to wish you and your family a fun and blessed Easter Holiday!  Stay tuned for more fun recipe, crafts, video tutorials and giveaways!


Tools used in this post:
Decoupage Glue (click here for more information)
Floral Paper Napkins (Click here for similar product)
Natural Twig Bird Nest (Click here for similar product)


Sunday, June 22, 2014

Chocolate Tiramisu Layer Cake (No Bake!) 巧克力提拉米蘇三層蛋糕 (免烘)


Chocolate Tiramisu Layer Cake (No Bake!)   http://utry.it

My oven is on almost everyday, or every other day.  From homemade loaf bread, cookies, cupcakes, to roasted vegetables and chickens drumsticks, I certainly keep my oven quite busy.  But as the temperature rises, I do long for no bake treats.  After all, it’s not that fun to turn on the oven and adding more heat to the almost triple digit temperature out there.  This Chocolate Tiramisu Layer Cake will certainly holds a special spot in your fridge, then your tummy, and probably in your heart after you've tried a piece.  I especially love it when I don't have to turn on the oven in the summer to make a gorgeous cake.  After all, I have quite a few birthdays to celebrate in summer!

Chocolate Tiramisu Layer Cake (No Bake!)   http://utry.it

My Kids love Tiramisu, both the traditional one and the Strawberry version (recipe here).  However, I've got to keep it to just a tasting portion for the traditional ones because there’s coffee in it.  That’s the main reason why I created this Chocolate version of Tiramisu so everyone in the family can enjoy.  I guess it’s not news anymore that my whole family is chocoholic!  Um, I guess it runs in the family; especially, my Baby Girl, she loves dark chocolate way more than milk or white ones!  She’s definitely a little foodie.       

Chocolate Tiramisu Layer Cake (No Bake!)   http://utry.it

Since there’s no baking involved in this Chocolate Tiramisu Layer Cake, it is rather an easy cake to make.  All you need to do is have each element ready before you start layering and assembling the cake.  The ingredients are quite straight forward and pretty easy to find these days.  At the end of the post, I’ll list the links of the products that I used for your convenience so you know what to look for when you go shop.  The toughest part of this cake?  WAITING!  Yes, after you put the cake together, you have to let it chill in the refrigerator for at least 24 hours before serving.   That gives the lady fingers the time they needed to fully absorbed all the moisture and goodness, and softened up to cake like consistency.  If you ask me, I think it’s totally worth the wait!  

Chocolate Tiramisu Layer Cake (No Bake!)   http://utry.it

As you might already know.  Tiramisu in Italian means “pick me up”.  Traditionally, this famous dessert is made of ladyfingers (a very light weight and crispy cookies) dipped in a mixture of espresso and liquor, layered with a whipped mixture of egg yolks, cream and mascarpone cheese and cocoa powder.  The texture is so soft and fluffy, hence, it’s called “pick me up”.  So, the texture of this Chocolate Tiramisu Layer Cake is also very light, tender, soft and fluffy!  Yet, it’s rich and chocolate-y at the same time because of the dark cocoa powder that I used.  I love Valrhona's! Trust me on this one.  I've tried a fair share of cocoa powder and this one gives me the richest, darkest, and most chocolate-y taste!  The mascarpone cheese provided the silky, rich and creamy texture.  This dessert is rich and satisfying, but not overly sweet. 

Chocolate Tiramisu Layer Cake (No Bake!)   http://utry.it

As you can see from the pictures of the whole cake, I leave the sides of this cake with a rustic look and you can see all 3 layers of cream and the lady fingers as well.  You can make it smooth and seamless by smearing a thin layer of whipped mascarpone cream mixture to the side of the pan before soaking and lining the lady fingers.  You’ll see what I mean when we go over the pictorial below.  Ready to step into the kitchen with me?  Let’s go!

1) Grease the side and bottom of a 9-inch spring-form pan.
2) Line the bottom and sides of the pan with a piece of parchment paper, make sure the parchment paper is a little taller than the side of the pan by 1/2 to 1-inch.
3) Heat and whisk all the ingredients of the chocolate milk mixture until sugar dissolved.  Pour mixture into a shallow dish to let cool.
4) In the bowl of the stand mixer with the whisk attachment, beat the cream, vanilla, and powdered sugar until soft peak. 


Chocolate Tiramisu Layer Cake (No Bake!)   http://utry.it

5) Stop the mixer and add the mascarpone cheese.  Beat the mixture until medium peak forms.
6) Add the cocoa powder and beat until incorporated
7) Dip the lady fingers into the chocolate milk mixture, 1 to 2 second for both sides.  Do not dip too long or else your lady fingers will get too soggy.
8) Line the dipped lady fingers on the bottom of the prepared pan. You might need to break a piece to fill the gaps between the lady fingers.  You should be able to fit 12 pieces (100 grams) in a layer.


Chocolate Tiramisu Layer Cake (No Bake!)   http://utry.it

9) Spread 1/3 of the mascarpone cheese mixture on top of the lady fingers.  Spread evenly on top.
10) Dust 2 teaspoons of cocoa powder to cover the top.
11) Repeat 2 more layers by dipping more lady fingers into the chocolate milk mixture, follow by mascarpone mixture and cocoa powder.
12) Do not dust the very top of the final layer of mascarpone cream mixture. Cover with plastic wrap and refrigerated for at least 24 hours before serving.


Chocolate Tiramisu Layer Cake (No Bake!)   http://utry.it

13) When it’s ready to serve, remove the plastic wrap.
14) Remove the ring of the spring-form pan and the parchment paper on the sides.
15) Dust the top of the cake with 2 teaspoons of unsweetened cocoa powder
16) Decorate with a few fresh raspberries and fresh mint leaves and enjoy!


Chocolate Tiramisu Layer Cake (No Bake!)   http://utry.it

Pretty simple, right?  You’ll be amazed with how simple this cake is to prepare, yet got that wow factor and tasted just as amazing as it looks, if not better.  I hope you enjoy today’s recipe and give this cake a try.  You can come back and thank me later. 

Chocolate Tiramisu Layer Cake (No Bake!)   http://utry.it


Tools and Props used in this post:

9-inch Non-Stick Spring Form Pan (Click here for more information)
Ruffled Edges White Cake Stand (Click here to see similar product)
KitchenAid Stand Mixer (Click here for more information)
Cake/Pie Server (Click here for more information)
2 Tone Bamboo Cutting Board (See similar product here)
Small Forks for Dessert (See similar product here)
Italian Lady Fingers (Click here for more information)
Valrhona Unsweetened Cocoa Powder (Click here for more information)
Mascarpone Cheese (Click here for more information)
Cooking Spray (Click here for more information)
 

Saturday, October 27, 2012

Smoky Chocolate Almond Torte—With Pictorial


193edited

As the Holiday season fast approaching, we all can use a few potluck and gathering recipes, right?  Today, I have this excellent dessert recipe for you.  Not only it looks elegant and sophisticated, it tastes wonderful as well.  Best of all, you can make this torte ahead of time, so no stressing-out on the day you need to serve this dessert.  Shhh….I won’t tell it’s so easy to make.  Let your guests think you spend hours in the kitchen to pull this together.  You can use the hours you didn't spend to enjoy a cocktail or take a nap!  ahem….

210edited

This Smoky Chocolate Almond Torte might look complicated and involved a few steps.  But they are all quite simple steps to follow.  I'll show you in the step-by-step pictorial below. 

175edited

Before we go to the pictorial, I want to show you the different layers of this Smoky Chocolate Almond Torte (see picture right below).  First, you get the Almond Butter Swirls on top, contrasting the Dark Chocolate Garnache to create that beautiful pattern.  The next layer is the creamy Almond Butter mixed with Crunchy Smoke Almonds, I absolutely love that contrasting texture when you bite into it.  Of course, we can always use a little bit more Chocolate Chips in between.  Last but not least, the whole Torte is build on the crunchy and flaky Chocolate Crust. 

253Layers

I’m telling you, each bite is heavenly.  Just make sure you get a little bit of everything all in one bite.  hm….It’s rich and decadent.  Definitely a treat for any chocolate lover.

267edited

Want to check out how I made it?  Come over to the kitchen with me.

1) Mix the chocolate crust ingredients in the stand mixer.  Wrap and chill the dough before rolling.  Line a clean surface with plastic wrap and lightly dust with flour. 

2) Line a clean surface with a large piece of plastic wrap, lightly dust the wrap with some flour. Place the dough on the wrap, lightly dust the top of the dough with more flour and cover the dough with another piece of plastic wrap. Roll the dough into a 7-by-16-inch rectangle. Remove the top plastic wrap and flip rolled dough onto a 4 1/2-by-14-inch rectangular tart pan with a removable bottom.

3) Gently press the dough into the pan. It’s okay of the dough tears, gently patch it back. Roll the rolling pin on top of tart pan to remove excess dough. Place the dough in the freezer for 30 minutes to firm up.  Preheat oven to 350F degree. Line the crust with parchment paper and fill with beans or pie weight. Bake for 20 minutes and lift the parchment paper to remove the weight.

4) Prick dough with a fork and bake for another 10 minutes. Let cool on a wiring rack.  When the crust is cooled. Prepare the fillings.

Pictorial A

5)  This is the almond butter that I used.  In a microwave safe bowl, heat the almond butter until fluid and runny, about 30 seconds
.
6) and 7) Pour onto cooled crust and smooth with the back of a spoon.

8) Sprinkle the almonds and chocolate chips on top and gently press them into the almond butter. Place the torte in the freezer for 10 minutes to firm up.

Meanwhile, prepare the ganache and swirls.

Pictorial B

9) In a small sauce pan, heat the cream until simmer. Remove from heat and add the salt, coffee, dark chocolate and cayenne pepper.

10) Stir until smooth. Let the chocolate ganache sit for about 8 minutes to cool off.

11)  and 12) Then, pour the chocolate ganache onto the tart and smooth the surface with the back of a spoon.


Pictorial C

13) In a microwave safe bowl, heat the almond butter until runny, about 10 seconds. Fill a disposable pastry bag with the warmed almond butter and snip off the end of the bag.

14) Pipe the almond butter diagonally with zigzag lines across the torte.

15) and 16) With a toothpick, draw over the almond butter lines perpendicularly in a zigzag motion.  Refrigerate torte until set, about one hour. Cut into wedges and enjoy.

Pictorial D

Pretty simple, right?  You’re actually just baking the crust and the rest are very simple to assemble.  I hope you’ll give this Smoky Chocolate Almond Torte a try.  It’s elegant enough to serve at dinner parties and simple enough to make on weekdays (yeah, that’s what I did).  Whether you’re the host of a party or an attendee, this Smoky Chocolate Almond Torte (and you) sure will be the crowd pleaser and get all the spot light if you share this with others.  Until next time, take care.

235edited-1


Wednesday, December 14, 2011

The Christmas Tree is Finally Up!

320edited--a

Yeah, it finally feels more like Christmas when the tree is up.  Smile I know, I can’t believe Christmas is only around 10 days from today.  I’m so glad we have the tree up over the weekend. 

It’s Baby Girl’s first time decorating/hanging ornaments on the tree.   Daddy was showing her how it’s done. 

232edited

Then, she did some on her own…with her favorite Hello Kitty ornaments that she got from Target.  ^^

242edited

Then, Little Gentleman’s turn.

294edited

Here are some close up's of the ornaments.

237edited

Hello Kitty…

239edtie

More Hello Kitty…

258edited

Hello Kitty again?  Oh well, but this one is pretty adorable.
Smile
249edited

Up next, Little Gentleman’s favorite, Mickey Mouse.

265edited

Another Baby Girl’s favorite, Minnie Mouse.

271edited

Mickey’s presents.

274edited

More Mickey Mouse…

278edited

Up next are the elegant collection with crystals.  I love these bells.

333edited

The presents are cute too.

336edited

Oh no, the reindeer is eating my tree!  Who forgot to feed him? 
Smile with tongue out
338edited

I love this church as well.

345edited

Last but not least, a shot with all the lights out except for the tree’s own light.  It’s peaceful and beautiful.  I really love this shot.  Is the tree set up in your house yet?  If not, what are you waiting for?  It’s better that you get it done sooner so you can enjoy it longer.  You’ll have to put it away again before you know it!  Winking smile  

014edtied