Showing posts with label Pictures. Show all posts

Sunday, June 22, 2014

Chocolate Tiramisu Layer Cake (No Bake!) 巧克力提拉米蘇三層蛋糕 (免烘)


Chocolate Tiramisu Layer Cake (No Bake!)   http://utry.it

My oven is on almost everyday, or every other day.  From homemade loaf bread, cookies, cupcakes, to roasted vegetables and chickens drumsticks, I certainly keep my oven quite busy.  But as the temperature rises, I do long for no bake treats.  After all, it’s not that fun to turn on the oven and adding more heat to the almost triple digit temperature out there.  This Chocolate Tiramisu Layer Cake will certainly holds a special spot in your fridge, then your tummy, and probably in your heart after you've tried a piece.  I especially love it when I don't have to turn on the oven in the summer to make a gorgeous cake.  After all, I have quite a few birthdays to celebrate in summer!

Chocolate Tiramisu Layer Cake (No Bake!)   http://utry.it

My Kids love Tiramisu, both the traditional one and the Strawberry version (recipe here).  However, I've got to keep it to just a tasting portion for the traditional ones because there’s coffee in it.  That’s the main reason why I created this Chocolate version of Tiramisu so everyone in the family can enjoy.  I guess it’s not news anymore that my whole family is chocoholic!  Um, I guess it runs in the family; especially, my Baby Girl, she loves dark chocolate way more than milk or white ones!  She’s definitely a little foodie.       

Chocolate Tiramisu Layer Cake (No Bake!)   http://utry.it

Since there’s no baking involved in this Chocolate Tiramisu Layer Cake, it is rather an easy cake to make.  All you need to do is have each element ready before you start layering and assembling the cake.  The ingredients are quite straight forward and pretty easy to find these days.  At the end of the post, I’ll list the links of the products that I used for your convenience so you know what to look for when you go shop.  The toughest part of this cake?  WAITING!  Yes, after you put the cake together, you have to let it chill in the refrigerator for at least 24 hours before serving.   That gives the lady fingers the time they needed to fully absorbed all the moisture and goodness, and softened up to cake like consistency.  If you ask me, I think it’s totally worth the wait!  

Chocolate Tiramisu Layer Cake (No Bake!)   http://utry.it

As you might already know.  Tiramisu in Italian means “pick me up”.  Traditionally, this famous dessert is made of ladyfingers (a very light weight and crispy cookies) dipped in a mixture of espresso and liquor, layered with a whipped mixture of egg yolks, cream and mascarpone cheese and cocoa powder.  The texture is so soft and fluffy, hence, it’s called “pick me up”.  So, the texture of this Chocolate Tiramisu Layer Cake is also very light, tender, soft and fluffy!  Yet, it’s rich and chocolate-y at the same time because of the dark cocoa powder that I used.  I love Valrhona's! Trust me on this one.  I've tried a fair share of cocoa powder and this one gives me the richest, darkest, and most chocolate-y taste!  The mascarpone cheese provided the silky, rich and creamy texture.  This dessert is rich and satisfying, but not overly sweet. 

Chocolate Tiramisu Layer Cake (No Bake!)   http://utry.it

As you can see from the pictures of the whole cake, I leave the sides of this cake with a rustic look and you can see all 3 layers of cream and the lady fingers as well.  You can make it smooth and seamless by smearing a thin layer of whipped mascarpone cream mixture to the side of the pan before soaking and lining the lady fingers.  You’ll see what I mean when we go over the pictorial below.  Ready to step into the kitchen with me?  Let’s go!

1) Grease the side and bottom of a 9-inch spring-form pan.
2) Line the bottom and sides of the pan with a piece of parchment paper, make sure the parchment paper is a little taller than the side of the pan by 1/2 to 1-inch.
3) Heat and whisk all the ingredients of the chocolate milk mixture until sugar dissolved.  Pour mixture into a shallow dish to let cool.
4) In the bowl of the stand mixer with the whisk attachment, beat the cream, vanilla, and powdered sugar until soft peak. 


Chocolate Tiramisu Layer Cake (No Bake!)   http://utry.it

5) Stop the mixer and add the mascarpone cheese.  Beat the mixture until medium peak forms.
6) Add the cocoa powder and beat until incorporated
7) Dip the lady fingers into the chocolate milk mixture, 1 to 2 second for both sides.  Do not dip too long or else your lady fingers will get too soggy.
8) Line the dipped lady fingers on the bottom of the prepared pan. You might need to break a piece to fill the gaps between the lady fingers.  You should be able to fit 12 pieces (100 grams) in a layer.


Chocolate Tiramisu Layer Cake (No Bake!)   http://utry.it

9) Spread 1/3 of the mascarpone cheese mixture on top of the lady fingers.  Spread evenly on top.
10) Dust 2 teaspoons of cocoa powder to cover the top.
11) Repeat 2 more layers by dipping more lady fingers into the chocolate milk mixture, follow by mascarpone mixture and cocoa powder.
12) Do not dust the very top of the final layer of mascarpone cream mixture. Cover with plastic wrap and refrigerated for at least 24 hours before serving.


Chocolate Tiramisu Layer Cake (No Bake!)   http://utry.it

13) When it’s ready to serve, remove the plastic wrap.
14) Remove the ring of the spring-form pan and the parchment paper on the sides.
15) Dust the top of the cake with 2 teaspoons of unsweetened cocoa powder
16) Decorate with a few fresh raspberries and fresh mint leaves and enjoy!


Chocolate Tiramisu Layer Cake (No Bake!)   http://utry.it

Pretty simple, right?  You’ll be amazed with how simple this cake is to prepare, yet got that wow factor and tasted just as amazing as it looks, if not better.  I hope you enjoy today’s recipe and give this cake a try.  You can come back and thank me later. 

Chocolate Tiramisu Layer Cake (No Bake!)   http://utry.it


Tools and Props used in this post:

9-inch Non-Stick Spring Form Pan (Click here for more information)
Ruffled Edges White Cake Stand (Click here to see similar product)
KitchenAid Stand Mixer (Click here for more information)
Cake/Pie Server (Click here for more information)
2 Tone Bamboo Cutting Board (See similar product here)
Small Forks for Dessert (See similar product here)
Italian Lady Fingers (Click here for more information)
Valrhona Unsweetened Cocoa Powder (Click here for more information)
Mascarpone Cheese (Click here for more information)
Cooking Spray (Click here for more information)
 

Saturday, June 7, 2014

Mixed Fruit Iced Tea (冰鎮水果茶) and a Giveaway!


Mixed Fruit Iced Tea (冰鎮水果茶) http://uTry.it

The official first day of summer is June 21st this year!  Seriously?  I thought summer has arrived 2 months ago.  Well, at least in Los Angeles, it has!  That’s why I’ve been posting Shaved Ice, detox soup, salad, and icy treats recipes on my blog and Facebook page.  I hope you like them all so far.  And today, I have another refreshing and delightful treat for you, Mixed Fruit Iced Tea (冰鎮水果茶).  Plus, a wonderful giveaway that you don’t want to miss, more to that in just a minute.  Have I grabbed your attention yet?

Mixed Fruit Iced Tea (冰鎮水果茶) http://uTry.it

The first time when I tried a sweetened fruit tea was during a visit to Taiwan.  I felt in love with the tea right away.  It’s fruity, refreshing, slightly sweet, and packed with wonderful aroma.  What’s not to love, isn’t it?  Of course, I can’t help it but to replicate it at home.  And I found the tea leaves and a secret ingredient that can take this lovely drink to the next level.  The kind folks at Singing Dog Vanilla sent me a collection of their vanilla tea leaves to try out along with their latest product, the Vanilla Coconut Palm Sugar!

Mixed Fruit Iced Tea (冰鎮水果茶) http://uTry.it

I have to say, the Vanilla Coconut Palm Sugar is the bomb!  You can taste each element from it and the aroma is so complex, yet, each aroma compliments each other.  This is the secret ingredient that I used, to flavor the Mixed Fruit Ice Tea.  Okay, I guess there’s no more secret now.

Mixed Fruit Iced Tea (冰鎮水果茶) http://uTry.it

I’ve always loved Singing Dog’s Vanilla Tea.  I’ve used their Vanilla Blackberry Sage Tea and made a berry version of this tea and it was so wonderful.  Take a look at the tea leaves in the picture below.  You can see the vanilla bean pieces among the tea leaves.  The vanilla aroma would slowly releases while you steep your tea.  You simply can’t get this gourmet vanilla bean aroma from anything else.  It’s sweet, fragrant and oh so soothing.

Mixed Fruit Iced Tea (冰鎮水果茶) http://uTry.it

Each package of Singing Dog Vanilla Tea comes with a reusable tea bag for steeping. 

Mixed Fruit Iced Tea (冰鎮水果茶) http://uTry.it

And the plastic bag comes with a re-sealable tape to assure freshness with the remaining tea leaves, how thoughtful! 

Mixed Fruit Iced Tea (冰鎮水果茶) http://uTry.it

The traditional fruit tea usually calls for using black tea as a base.  In this recipe, I used the Singing Dog Vanilla Black Assam Tea.  A one cup serving of tea requires 1 teaspoon of tea leave.  Since I’m making a concentrated tea mixture (for a large pitcher), I used 2 tablespoons of tea leaves.  Here’s how I made it.  First, fill the tea bag with the tea leaves, then place the tea bag in a large heat proof pitcher along with the Vanilla Coconut Palm Sugar. 

Mixed Fruit Iced Tea (冰鎮水果茶) http://uTry.it

This time, I chose the fruits that are commonly used to make Taiwanese Mixed Fruit Tea.  They are apple, lime, nectarine, and lemon.  You can basically use any kind of fruit you prefer or in season.  Simply pick three to four of your favorite fruit and include a citrus one in there.  The tang from the citrus will brightens up the tea.

Mixed Fruit Iced Tea (冰鎮水果茶) http://uTry.it

Next pour in hot water and let the mixture steep for 5 minutes.  Stir with a wooden spoon until sugar dissolved.  Then, remove the tea bag and discard the tea leaves.  Rinse and dry the tea bag for future use.  Next, pour in some apple juice and ice cubes.

Mixed Fruit Iced Tea (冰鎮水果茶) http://uTry.it

As simple as that, and your Mixed Fruit Iced Tea is ready for your enjoyment!


Mixed Fruit Iced Tea (冰鎮水果茶) http://uTry.it

This will be the most refreshing drink for the summer!  The tea is slightly sweetened and not overly sweet.  The fruits will retain their natural sweetness and as they steep with the tea leaves, they will  release their wonderful flavors into the tea.  You can taste the wonderful vanilla bean and see the little specks in your tea as well.  The subtle coconut and palm sugar flavors give this tea depth, and compliment the black tea and fruit wonderfully.  

Mixed Fruit Iced Tea (冰鎮水果茶) http://uTry.it

And the best part of my photo shoot always comes at the end when I can finally enjoy my iced cold drink in these steamy hot days!  Ahhh…..so good!

Mixed Fruit Iced Tea (冰鎮水果茶) http://uTry.it

What is better than enjoying the Mixed Fruit Iced Tea in the hot summer days?  It certainly is enjoying my fruit tea while I can share my recipe and these awesome ingredients and products with you! Yes, it’s Giveaway time!

Singing Dog Giveaway   http://uTry.it


How about winning a set of Vanilla Black Assam Tea (2 oz) AND the Vanilla Coconut Palm Sugar (2.5 oz), as shown in the picture above, courtesy of the kind folks at Singing Dog Vanilla!?  And there will be 3 winners.  Thank you Singing Dog Vanilla for providing the giveaway.  Here’s how to enter.

This giveaway is over!

To enter the giveaway, simply leave a comment on this post and tell me what’s your favorite fruit.   Please also leave your email address so I can contact you if you are one of the 3 lucky winners.

3 lucky uTry.it readers will win the Vanilla Black Assam Tea AND the Vanilla Coconut Palm Sugar. This Giveaway is open worldwide.  Deadline to enter is June 15th by midnight PST. Winner will be selected through Random.org and announce shortly after the giveaway is closed.  Prizes will be shipped out directly by Singing Dog Vanilla.


For extra entries, do any or all of the following (simply leave a separate comment for each extra entry):

1) “Like” Singing Dog Vanilla on their Facebook Page, click here.

2) "Like" uTry.it's Facebook Page, click here.
3) Follow Singing Dog Vanilla on Pinterest, click here.
4) Add me to your Google+ circle here.
5) Share this giveaway on Facebook (with a link back to this post please)
6) Pin a picture from this post onto Pinterest.

Good luck everyone!   


Props and Tools used in this post:

Weck Jars with lids (Click here for more information)
Blue Paper Straws (Click here for more information)
Classic Glass Pitcher (Click here to see similar product)
Long Wooden Spoon (Click here to see similar product)
Measuring Spoons Set (Click here for more information)
Two Tone Bamboo Cutting Board (Click her to see similar product)


Disclaimer: I received the Singing Dog Vanilla Teas and Vanilla Coconut Palm Sugar free of charge for the purpose of this review. I was not compensated in any other way.  All opinions are 100% my own and always will be.


Wednesday, April 23, 2014

Cream White Corn Soup with Crispy Prosciutto


Creamy Sweet Corn Soup with Crispy Prosciutto  http://utry.it  @utry.it

I grew up with creamy corn soup since I was little, did you?  It's probably one of my best friends at the dinner table (or late night supper) in my college years as well!  Unfortunately, those that I had devoured without the slightest hint of hesitation were limited to the canned version. ahem....


136edited

I have to say, I loved the canned version, too.  That was kind of like comfort food to me.  So, why make it from scratch, you might ask?  It's simply because that's the difference between a pretty good soup, and a totally awesome one!  Yes, try it once with the fresh corns and you'll never turn your head back to the canned isle in the supermarket, ever again!  And really, there isn't a lot more work to do to put this fresh Creamy White Corn Soup together compared to the canned version.  So, that little step of chopping the fresh corn kernels off the cobs is well worth the investment of your time. 


Creamy Sweet Corn Soup with Crispy Prosciutto  http://utry.it  @utry.it

There’s a little secret in making this soup nice and thick, creamy without using too much cream.  Ready for the secret?  The natural starch from the fresh corn.  To be more specific, the starch between the corn kennels and the cobs.  So, make sure to scrape the cob real good to release the starchy power!  Oh, there’s one more thing, my childhood version of this soup didn’t have the fancy crispy prosciutto on top, of course.  But that’s a wonderful addition and simply turning this soup from homemade comforts to somewhat gourmet. 


Creamy Sweet Corn Soup with Crispy Prosciutto  http://utry.it  @utry.it

Want to see how I make this Creamy White Corn Soup with Crispy Prosciutto?  Follow me to the kitchen!

1) Preheat oven to 375 degree F.  Place prosciutto on a silpat/parchment paper lined baking pan. Bake for 9 to 11 minutes.

2) Remove from heat and let cool on wiring rack.


3) Simply make sure each corn kennel is nice and plum, and not dried up.  Don’t be afraid to peek inside the husk.  And only remove the husk right before cooking.  That would keep your corns nice and fresh for the longest time.

4) Cut corn kernels off the cobs.  


Pictorial 1


5) M
ake sure to scrape the starch off the cobs as you cut.

6) In a large saucepan, bring the corn and chicken stock to a boil. Lower the heat and let the soup simmer for 5 minutes.  I used a low sodium chicken broth, you can use anything you like, even vegetable stock would be nice in here as well.

7) Remove the soup from heat, with a handheld blender, puree the soup to your prefer consistency. You can also do that with a blender or food processor too.


8)
Season the soup with granulated garlic, parsley, white pepper and salt, to taste.

Pictorial 2

9) In a small bowl, mix the corn starch and water together until smooth and no big lumps.

10) If you used a blender, return soup to the saucepan and reheat. 
Slowly add the corn starch slurry while gently stirring the soup.  Let soup return to a boil.

11) Then, remove from heat and stir in the cream.

12) Ladle soup into bowls and crumble cooled prosciutto on top. Enjoy!


Pictorial 3


You might noticed that I used white corns here.  I think they are sweeter than the yellow ones.  But of course, you can use either, or both.  The natural sweetness from the corns is amazing.  The crispy and salty prosciutto on top compliment this creamy soup perfectly.  I hope you’ll take advantage of the sweet corn season (From May through October) and give this recipe a try.   Do you have a favorite corn recipe?  Don’t forget to share in the comment below.  I would love to try them too.


Creamy Sweet Corn Soup with Crispy Prosciutto  http://utry.it  @utry.it


Props and Tools used in this post:

Small Bamboo Spoon (Click here to see similar product)

Shoji Paper Roll Up Window Blinds used as backdrop (Click here to see product information)

Cuisinart 2-Speed Immersion Hand Blender (Click here for more information)
Silpat Baking Mat (Click here for more information)
OXO Measuring cups (Click here for more information)


Saturday, August 31, 2013

Grilled Ribeye Steaks with Vanilla Coffee Rub and a Giveaway


Grilled Ribeye Steaks with Vanilla Coffee Rub and a Giveaway!  http://uTry.it 
It's the Labor Day Weekend in the States.  Which means, it's time to firing up the grill and enjoy some BBQ goodness.  Today, I have a very special recipe for you, Grilled Ribeye Steaks with Vanilla Coffee Rub.  Most of us relate vanilla, or vanilla beans, with desserts or sweet treats only.  However, vanilla works just as beautifully in savory food, in my opinion.  This Grilled Ribeye Steaks with Vanilla Coffee Rub is one of them!  I’ll get into the details in just a minutes.  But first, I want to introduce you to some wonderful products that I used in this recipe.

Grilled Ribeye Steaks with Vanilla Coffee Rub and a Giveaway!  http://uTry.it

Still remember my Vanilla Dream Cake recipe?  If not, you've got to check out that recipe here.  In that recipe, I used Singing Dog Vanilla Bean Paste and infused their Vanilla Blackberry Sage tea into the cake.  Boy oh boy, that was really one dreamy cake to indulge.

Recently, the kind folks at Singing Dog Vanilla sent me the Organic Ground Vanilla Coffee and Vanilla Salt to try out.  You might wonder, how did the vanilla infused into the coffee beans?  Well, that was the same question I had in mind.  And quoted from Singing Dog’s website, “Our Organic whole bean/ground coffee is flavored with real organic vanilla beans.  No fake sugary flavors or syrups - just real vanilla beans.”  Click here to check out their site for more information.  I really love the fact that there are real vanilla beans in each bag (ground or whole, respectively), and nothing artificial!  I used the ground vanilla coffee to make the spice rub for my Ribeye steaks.  If you use this vanilla coffee for drinking, the whole house would be infused with vanilla and coffee fragrant after brewing.  I love the subtle vanilla aroma in my coffee and it brings a kind of gourmet sweetness that you can’t get from sugar at all.  

Grilled Ribeye Steaks with Vanilla Coffee Rub and a Giveaway!  http://uTry.it

Up next is the Vanilla Salt.  Check out the ingredient of this salt. Ingredients: Murray River Salt from Australia and Organic Ground Vanilla from Indonesia.  And let me tell you, this is the perfect example of “less is more”!  The salt itself is super flaky and you can see the specks of vanilla beans all through out the salt.  It’s saltiness is softer than kosher salt and you get the distinct sweet aroma from the vanilla beans. 

Grilled Ribeye Steaks with Vanilla Coffee Rub and a Giveaway!  http://uTry.it

Want to find out how I prepare the Vanilla Coffee Rub for the Ribeye steaks?  It’s super easy and the flavor is wonderful.  The coffee rub developed the most fragrant crust on my steaks and sealed in the juices; leaving my steaks juicy, tender and succulent.   

Grilled Ribeye Steaks with Vanilla Coffee Rub and a Giveaway!  http://uTry.it

Here’s what you need for the coffee rub: Vanilla coffee (of course!), smoked paprika, brown sugar, granulated garlic, vanilla salt, black pepper, and red pepper flakes.  (Please check the measurements of each ingredient in the recipe at the end of the post.)  


Ingredients for Grilled Ribeye Steaks with Vanilla Coffee Rub and a Giveaway!  http://uTry.it

Mix all the ingredient with a fork and you’re done with the rub!  Super easy, isn't it?  Yup, my kids can do this too.  And let me tell you.  This rub is so good that I doubled the recipe and keep it in an air tight container for future use.  That way, I can have them on-hand at any time and they sure will make a wonderful homemade gifts!  Your friends will sure be impressed with this coffee rub for sure!

Ingredients forGrilled Ribeye Steaks with Vanilla Coffee Rub and a Giveaway!  http://uTry.it

Up next, give the steaks some love.  Gently rub some olive oil on the steaks.  We can all use a massage any time of the day, right?!

Grilled Ribeye Steaks with Vanilla Coffee Rub and a Giveaway!  http://uTry.it

Then, sprinkle on the coffee rub, all over the steaks!  Be generous, it’s all good stuffs!  Then, let the steaks hang out in the fridge to get happy, I mean to marinade, for 2 hours, before grilling.

Grilled Ribeye Steaks with Vanilla Coffee Rub

Isn't that a lovely crust of grill marks on the steaks?  Make sure to let your steaks rest for 10 minutes before cutting so the juice stays inside the steak and not running all over your board!

Grilled Ribeye Steaks with Vanilla Coffee Rub and a Giveaway!  http://uTry.it
 
I simply serve this ribeye steaks with a side salad, some lettuces, and homegrown tomatoes.  It was one satisfying meal.  Of course, I always have room for dessert.  But that will be covered in another post. 
So, are you ready to make your own Vanilla Coffee Rub and indulge in some succulent steaks?  Of course, you can purchase the vanilla coffee and vanilla salt here, if you can’t wait any longer.  However, I’m hosting a giveaway, courtesy of the generous people from Singing Dog Vanilla.  This is one giveaway you don’t want to miss out!  Check out the giveaway details below.
 
Grilled Ribeye Steaks with Vanilla Coffee Rub and a Giveaway!  http://uTry.it


Giveaway Details:
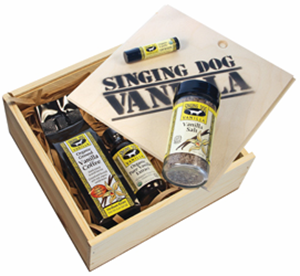
2 (Two) uTry.it readers will win a Vanilla Lover's Gift Set, one set to each winner (as shown in the picture below. Each gift set values at U.S.D. $31.25). Each Vanilla Lover’s Gift Set includes:

1 Organic Vanilla Coffee (2 oz) flavored only with real vanilla beans;
1 Organic Vanilla Lip Balm;
1 Organic Pure Vanilla Extract (2 oz.) for cooking; and
1 Vanilla Salt,2 oz.


Lover set

This Giveaway is open my Readers worldwide.  Deadline to enter is September 15th, 2013 by midnight PST. Winner will be selected through Random.org and announce shortly after the giveaway is closed. Prizes will be shipped out directly by Singing Dog Vanilla.

To enter this giveaway, simply leave a comment below telling me what is your favorite cut of meat.  Is it a ribeye steak, a New York steak, a Porterhouse, or something else?  If you are a vegetarian, or don’t eat beef, simply leave a message just to say hi, or tell me you want to win this giveaway.

This giveaway is now closed!  Thank you everyone who participated in this giveaway.  Please see the winner announcement post for names of winners.


For extra entries, do any or all of the following (simply leave a separate comment for each extra entry):

1) “Like” Singing Dog Vanilla on their Facebook Page, click here.
2) "Like" uTry.it's Facebook Page, click here.
3) Pin a picture from this post onto your Pinterest board.
4) Follow Singing Dog Vanilla on Pinterest, click here.
5) Add me to your Google+ circle here.
6) Share this giveaway on Facebook (with a link back to this post please)
7) Share this giveaway on Twitter (with a link back to this post please)

Good luck everyone! And stay tuned for an awesome dessert recipe on my next post featuring the Vanilla Coffee and Vanilla Salt.

Disclaimer: I received the Singing Dog Vanilla Coffee Tea and Vanilla salt free of charge for the purpose of this review. And Singing Dog Vanilla is sponsoring the prizes for this giveaway.  All opinions are 100% my own and always will be. 

Monday, April 8, 2013

Mexican Egg Benedict Recipe and Some Exciting News


1060edited

My family members are big fans of Egg Benedict!  We have it for breakfast quite often.  Instead of the same old Egg Benedict, I make different variations all the time, such as this hearty, yet refreshing Mexican Egg Benedict. 

1048edited

The traditional Egg Benedict consists of two halves of an English muffin, topped with ham or bacon, poached eggs, and Hollandaise sauce. Those are good, but this Mexican Egg Benedict is even better!

1072edited

My Mexican Egg Benedict consists of toasted English muffin, topped with ground beef seasoned with taco seasonings; then covered with grated Jarlsberg Cheese (it’s mild and nutty) and sliced Avocados from Mexico (super smooth and creamy).  Then I topped it with a perfectly poached egg, a drizzle of salsa, a sprinkle of fresh cilantro, and served with a couple of lime wedges.  If that doesn't sound like the perfect breakfast, I don’t know what does.  I think Mamma is always right, breakfast is the most important meal of the day and let’s make sure we all eat well.

1078edited


The sweepstakes is now over!  Thank you for your participation. 
Before we head over to the recipe and pictorial, I want to tell you about some exciting news!  So, are you ready?  I bet you are.  Here are the juicy details.  I’m joining Kitchen PLAY’s Breakfast Duos event, featuring Jarlsberg cheese and Avocados from Mexico.  It’s a great party that you don’t want to miss.  Yes, you are invited to the Breakfast Duos Twitter Party!  Best of all, it’s free to join and there is a treasure hunt at the party.  So, please follow all of the ten Breakfast Duos posts here and collect the clues about Jarlsberg and Avocados from Mexico that are included. They could be your ticket to winning one of six fabulous prizes at the Twitter Party (valued at approximately $100 each).  And my friends and readers, here’s is my clue for you:  Jarlsberg is available in a wheel, in a loaf, and in deli slices.  So, what are you waiting for?  Simply click here to register for the Twitter Party.

Jarlsberg & Avocado (FINAL)

Wait, that’s not all, Avocado from Mexico is running an awesome sweepstakes and here is some of the information:
-Enter to win $2000 worth of cookware and other great prizes including free groceries!
-Over 500 prizes will be awarded
-You can enter on the Avocados From Mexico
breakfast sweepstakes page

-Hurry, sweepstake ends April 14th!
For more information and to enter the sweepstakes, please click here.

Please also join Avocado from Mexico’s Facebook page here and follow all of their exciting news.

1098edited

Alright, now that I've got all those exciting news covered, let’s check out more pictures of this scrumptious Mexican Egg Benedict, shall we?

1122edited

I love poached eggs and I can probably make one with my eyes closed, or not.  I love that the gorgeous yolk runs all over and mixes with the rest of the ingredients.   

1132edited

Here’s how I make these beautiful Mexican Egg Benedict. 
1) Split the English muffins in half and toast them to golden brown and crispy.
2) Grate the Jarlsberg cheese, set aside.
3) With a wooden spatula, break the ground beef into small pieces as they brown in the skillet.
4)  Then, add the taco seasoning package.  Set beef aside.

Pictorial


Next, we get the poached eggs ready.  Here’s how to make the perfect poached egg:

1) Bring a small pot of water to a simmer, NOT boil, just simmer.
2) Add about a teaspoon of vinegar into the water. 
3) Stir with a wooden spoon in one direction to create the circular motion in the water.
4) Gently slide the egg into the water.  (Note: it’s better to crack the egg into a small bowl first instead of cracking the egg directly into the water to prevent breakage)
5) Let the egg cook for 2 minutes, the circular motion in the water will help fold in the egg white.  Then, gently flip the egg and cook for another minute or two, until the egg white is set and the yolk is still soft.
6) With a slotted spoon, remove the egg from the water and gently tap on a paper towel to remove excess water.

Note: I usually poach two to three eggs at a time.

How to make perfectly Poached Eggs


Last but not least, let's get the avocado slices ready.  Here’s how to cut the avocado to get the perfect slices:

1) With a sharp knife, run the knife over and around the skin of the avocado to split it in half.
2) Gently twist the two sides and it’ll split in two halves.
3) Tap the knife into the pit and twist.
4) The pit should come right off.
5) Slice the flesh of the avocado; be careful not to cut through the skin.
6) With a large spoon placed between the flesh and the skin scoop the flesh out.  You should get perfectly sliced avocados.

How to Slice an Avocado

Now that we've got all the ingredients ready, here’s how to assemble the Mexican Egg Benedict:

1) Place the toasted English muffin on the serving plate.
2) Spoon the cooked ground beef on top in a single layer, as much or as little as you want.
3) Sprinkle a layer of grated Jarlsberg cheese on top.  The heat from the ground beef will melt it slightly.
4) Place a few slices of Avocado on top.
5) Top with the poached egg.
6) Drizzle the salsa, sprinkle some fresh cilantro leave on top, and serve with a couple of lime wedges, enjoy!

Assembling the Mexican Egg Benefict

Pretty simple, isn't it?  I hope you all enjoy today’s recipe and give it a try soon.  I know you'll love it.  Please don’t forget to register for the twitter party and sign up for the sweepstakes!  Good luck everyone.

1152edited


Disclosure:  This is a sponsored post for Kitchen PLAY, Jarlsberg cheese and Avocados from Mexico.  All opinions are 100% my own.