Showing posts with label Fruit. Show all posts

Saturday, March 25, 2017

Mixed Fruits Jelly Cake (櫻花雜果大菜糕):


Spring is finally here!  I hope you’re enjoying the warmer weather of the season like I do.  Today, I’ve a whimsical and super fun recipe prepared for you to welcome Spring!  Check out this Mixed Fruit Jelly Cake (櫻花雜果大菜糕) recipe.  It’s gorgeous, refreshing, and definitely a perfect treat for your tea party or any typical afternoon tea!  It’s gorgeous enough for gatherings and simple enough to prepare even on a weekday!

Mixed Fruit Jelly Cake (櫻花雜果大菜糕)   http://uTry.it

This is a 2-layers dessert, the bottom layer is a Sakura (Cherry Blossom) milk jelly layer.  I used Sakura paste to flavor this layer and enhanced the color with my homemade beet root natural food coloring.  I’ll list the ingredients and link to the beet root color recipe at the end of the post for your convenience.  In this recipe, I used some milk in the Sakura layer.  You can substitute with soy milk or almond milk for a vegan version.

Mixed Fruit Jelly Cake (櫻花雜果大菜糕)   http://uTry.it

The top layer of this dessert is a simple clear jelly.  But before I added the jelly, I arranged some mixed fruits in between the 2 layers.  I used strawberries, blueberries, green grapes and tangerines for a variety of colors and flavors.  You can simply choose any fresh fruit that you enjoy. 

Mixed Fruit Jelly Cake (櫻花雜果大菜糕)   http://uTry.it

If you’ve already watched my video tutorial, you’ll see the Jelly cake mold that I used for this recipe.  It’s originally made for creating “sushi cake”!  Of course I couldn’t help but used it to make a dessert dish with this mold first! However, I think a sushi in cake form would be something different and just as refreshing and delicious too!  What do you think?  Interested to see a tutorial on that?  Simply leave me a message on this post to let me know and you might get your wish granted! 

Mixed Fruit Jelly Cake (櫻花雜果大菜糕)   http://uTry.it

I hope you enjoy today’s recipe and tutorial.  Thank you for reading and stay tuned for more fun and easy recipe next week!

Mixed Fruit Jelly Cake (櫻花雜果大菜糕)   http://uTry.it


Ingredients and Tools Used:
Jelly Cake Mold (Click here for more information)
Sakura Cherry Blossom An Paste
 (Click here for more information)

Agar-Agar Powder (Click here for more information)

Edible Gold Leaves (Click here for more information)


Friday, December 9, 2016

Christmas Fruit Tart with Meyer Lemon Mousse


Will you be hosting a Christmas party this year?  Or, will you be a guest at a friend’s or family member’s house?  Honestly, I enjoy being a guest more than hosting a party at my place.  One reason is that I don’t really have a backyard that is spacious enough to host parties.  The other reason is the tremendous amount effort needed, such as planning, preparation, and cleanup!  As a guest, I’m always happy to bring desserts!  And I’m sure any host would be pleased to see this festive and gorgeous Christmas Fruit Tart with Meyer Lemon Mousse!  But of course, you can still make this pretty fruit tart even if you’re hosting Christmas gatherings at your place.  This tart will make a beautiful centerpiece for sure.
 
How to Make Christmas Fruit Tart filled with Meyer Lemon Mousse (with video tutorial)  http://uTry.it
 
The crust of this tart is a simple cookie crust. It’s crunchy, buttery, and sturdy enough to hold up the Meyer Lemon Mousse fillings.  The Meyer Lemon Mousse filling is super easy to prepare.  It involves some mascarpone whipped cream and Meyer Lemon Curd.  Click here to check out my homemade Meyer Lemon Curd recipe.  If you want a short cut, it’s okay to use a store bought Lemon Curd as well.  After all, it’s the holiday and it’s alright to give yourself a break if you are in a hurry.  But the good news is that you can make the Meyer Lemon Curd ahead of time and they’ll last quite a long time in the fridge.  
 
How to Make Christmas Fruit Tart filled with Meyer Lemon Mousse (with video tutorial)  http://uTry.it
 
I used green grapes, pineapple, pomegranate seeds, and persimmon to garnish this tart.  It’s quite self explanatory in terms of how to arrange the fruit to form the Christmas Tree.  You can be creative and use other fruits that you like.  For example, kiwi slices for the tree, yellow peach for the star, and other small fruit as ornaments as well.  These are the fruits that I have on hand so I used them.  The fresh fruit compliment the Meyer Lemon Mousse perfectly.  It’s refreshing yet decadent at the same time.  The mousse filling has a light, fluffy and silky mouth-feel, which contrast wonderfully with the crunch cookie crust.  The pomegranate seeds add a little pop and tartness in this tart.  And its natural color simply brightens up the whole tart.
 
How to Make Christmas Fruit Tart filled with Meyer Lemon Mousse (with video tutorial)  http://uTry.it
 
It’s such a festive and simple dessert to enjoy!  I hope you’ll give this recipe a try and make it for your holiday celebration.  If you do try the recipe, don’t forget to leave me a message below or email me a picture on how it turned out.  I can’t wait to hear from you!  Stayed tuned for more fun and festive holiday treats next week.  
 
Tools and Ingredients Used:
 
Cooling Racks (Click here for more information)
Baking Sheets 
(Click here for more information)
Organic Vanilla Extract (Click here for more information)
Kerrygold
Butter 
(Click here for more information)
Powdered Sugar (Click here for more information)
Mascarpone Cheese (Click here for more information)
Rectangular Tart Pan (Click here for more information)
Parchment Paper  (Click here for more information)
Horizon Organic Heavy Whipping Cream (Click here for more information)
Pie Weight (Click here for more information)
Pastry Cutter (Click here for more information)
Pastry Bag (Click here for more information)
Wilton Closed Star 2D Pastry Tip (Click here for more information)

 
P.S. Current Giveaway: The Origami Zoo Kit (Open till December 18th, 2016)

 
How to Make Christmas Fruit Tart filled with Meyer Lemon Mousse (with video tutorial)  http://uTry.it


Friday, June 10, 2016

5 Different Flavors Homemade Gummy Bears 自家製小熊軟糖 (五種口味)


Are you ready for the summer?  I’ve been looking forward to our summer holiday since April! Ha!  Our family truly enjoy the summer holidays!  We love the days when we can sleep in, hang out by the pool or at the beach, cook something fun in the kitchen together, learn something, go somewhere adventurous, maybe explore places we’ve never step foot in, or simply doing nothing all day long!  But, I’m not so looking forward to the summer heat, both mentally and physically!

5 Different Flavors Homemade Gummy Bears 自家製小熊軟糖 (五種口味)  http://uTry.it


Today, I’ve got not just one cool recipe to share with you, but 5!   Check out these 5 Different Flavors Homemade Gummy Bears 自家製小熊軟糖 (五種口味)!  Not only they are fun to look at, fun to eat, they are truly quite fun to make as well!

5 Different Flavors Homemade Gummy Bears 自家製小熊軟糖 (五種口味)  http://uTry.it

 As you can see from the video tutorial above, I’ve got this cute little gummy bear silicone mold that comes with the dropper, that’s so convenience to use (I’ll also put the shopping link at the end of this post for your reference).  This mold gives nice details to the finish products, as you can see the eyes and toes of the gummy bears clearly! I think that’s totally awesome!  My Little Girl actually helped me made these gummy bears while I was testing the recipes!  We had a blast in the kitchen together!

5 Different Flavors Homemade Gummy Bears 自家製小熊軟糖 (五種口味)  http://uTry.it

Check out the recipes on how to make these 5 Different Flavors Homemade Gummy Bears, located at the bottom of this post.  The flavors are Lemon, Lime, Orange, Strawberry, and Blackberry, all made with fresh fruits and their juices!  These are not only delicious and fun, but actually good for you because they are packed with vitamin C and anti-oxidant!  I used a little cooking spray to grease my air tight container (for storage) so that the gummy won’t stick together.  If you plan to finish the gummy bears in a day or two, leave them at room temperature.  Otherwise, it might be a good idea to keep them in the fridge as they contain fresh fruits.  Just keep in mind that the texture might be firmer if you keep them in the fridge.   

5 Different Flavors Homemade Gummy Bears 自家製小熊軟糖 (五種口味)  http://uTry.it

As you can see from the picture above, I used up my entire collection of silicone mold!  Yes, you can definitely put these gummy in any molds you like, even just a rectangular tray if you don’t have a mold (you can see from my video above).  You can then cut the gummy out into different shapes with a cookie cutter.  I’ll list some of my favorite molds and cutters at the end of the post for your reference.


5 Different Flavors Homemade Gummy Bears 自家製小熊軟糖 (五種口味)  http://uTry.it

I hope you enjoy today’s recipes and tutorial!  Make some treats to celebrate the summer!  Whether you’ll be taking a trip, going on summer camps, relaxing at home, I wish you all a wonderful and fruitful Summer Holiday ahead!


Tools and Ingredients Used:

Gummy Bear Mold (Click here for more information)

Microplane Zester (Click here for more information)
Unflavored Gelatin Powder (Click here for more information)
Heat Proof Measuring Cups (Click here for more information)
Measuring Spoons Set (Click here for more information)
Star Shape Cookie Cutter Set (Click here for more information)Small Flower and Heart Cookie Cutter Set (Click here for more information)
Android Silicone Ice Cube Tray (Click here for more information)
OXO Egg Turner (Click here for more information)
Pyrex Small Glass Food Storage Set (Click here for more information)Silicone Mold - 6 Small Designs (Click here for more information)


Friday, May 20, 2016

Fresh Mango Crêpe 芒果法式薄餅


Not long ago, I shared a recipe and video tutorial with you for Mango Crêpe Cake.  If you haven’t check that out yet, simply click here.  That is one stunning cake to be shared on special occasions.  But for a more day to day dessert or treat, this Fresh Mango Crêpe 芒果法式薄餅 would be the perfect choice.  Not only it has all the flavor from the Mango Crêpe Cake, but it’s much easier and less time consuming to prepare.

How to Make Fresh Mango Crêpe 芒果法式薄餅 with step by step video tutorial.   http://uTry.it

There’s a cafe on the Westside that sells crêpes that my kids and I loved so much!  Whenever we visited the area, we always enjoy our afternoon tea there.  But they are not cheap at all, charging at $8+ for a crêpe?  That could easily be the price of a meal!  So, for economic reason, I make them at home now. Best of all, I know what I’m putting into them and they are always wholesome!  Watch the video tutorial and you’ll agree with me on how easy it is to prepare these crêpes. 

How to Make Fresh Mango Crêpe 芒果法式薄餅 with step by step video tutorial.   http://uTry.it

As far as I’m concerned, I’m taking full advantage of this mango season!  It’s way too short and I know I’ll be looking forward to these sweet, tender, and juicy Atulfo mangos when the season is all over!  So, don’t wait any longer, go grab a basket of mangos and make these Fresh Mango Crêpe to share with your family!  Thanks for stopping by today.  Until next time, please take care and eat well!


How to Make Fresh Mango Crêpe 芒果法式薄餅 with step by step video tutorial.   http://uTry.it


Tools and Ingredients Used:

Crepe Pan (click here for more information)
Crepe Spreader (
click here for more information)
Crepe Maker (
click here for more information)
Ninja Blender (
click here for more information)
Heavy Whipping Cream (
Click here for more information)
OXO Egg Turner (
Click here for more information)
Organic Vanilla Extract (
Click here for more information)
Kerrygold Butter (Click here for more information)
Core Bamboo 3-Piece Cutlery Set  (Click here to see product information)


How to Make Fresh Mango Crêpe 芒果法式薄餅 with step by step video tutorial.   http://uTry.it


Friday, December 4, 2015

How to Make Raspberry Panna Cotta


I can’t quite believe it’s December already!  Time has past by a little too quickly this year, in my opinion.  Are you ready for the holidays?  If you’re looking for an entertaining, or a made-for-party, dessert recipe, you’ve stopped by at the right place at the perfect time.  Check out these gorgeous Raspberry Panna Cotta and I’m sure you’ll agree.  Click on the YouTube video above to watch the step-by-step video tutorial on how to make them.

Check out how to make Raspberry Panna Cotta with step-by-step video tutorial!  It's refreshing an very festive for the holiday.  Perfect recipe for entertaining.  http://uTry.it


The raspberry layer is slightly sweet and tart.  It’s super refreshing and packed with the floral fragrant of raspberries.  It pairs really well with the smooth and sweet vanilla bean panna cotta layer.  The red and white layers are so festive.  These gorgeous colors simply put me in the happy holiday mood. 

Check out how to make Raspberry Panna Cotta with step-by-step video tutorial!  It's refreshing an very festive for the holiday.  Perfect recipe for entertaining.  http://uTry.it


We’ve been tuning in to different radio stations when we’re on the road, and the Christmas songs always make me smile.  It’s probably one of the best time of the year for most people.  At the same time, I remember those who are less fortunate out there.  Just last week, I heard on the radio that a couple (whom preferred to remain anonymous) donated 500K to the Salvation Army!  It was probably one of the best news I’ve heard all year long!  That really touched me that there are still generous and kind people out there.  I know most of us don’t have that kind of money to donate, but there are many other things that we can do to help.  From pantry items to gently used clothes donated to your local non-profit organizations; or simply purchase a “Grab ‘N Give” bag at the grocery check out.  These are just some of the many ways that we can give-back to the community.

Check out how to make Raspberry Panna Cotta with step-by-step video tutorial!  It's refreshing an very festive for the holiday.  Perfect recipe for entertaining.  http://uTry.it

To me, it’s a privilege that I have the ability to help others, even in the smallest scale.  This holiday season, I want to encourage you to do the same.  It always makes me feel happy to know that a small gesture can bring big smiles on someone’s face.  

Check out how to make Raspberry Panna Cotta with step-by-step video tutorial!  It's refreshing an very festive for the holiday.  Perfect recipe for entertaining.  http://uTry.it


Last but not least, thank you for reading and stopping by my blog.  I hope you like today’s post and recipe.  I’ll be sharing more holiday recipes soon.  Stay tuned.

P.S.: Don't forget to enter the current Giveaways:

$100 Visa Gift Card Giveaway (Open to U.S. only, ending 12/31/2015)
Ultimate Paper Airplanes for Kids (Open Worldwide, ending 12/6/2015)


Check out how to make Raspberry Panna Cotta with step-by-step video tutorial!  It's refreshing an very festive for the holiday.  Perfect recipe for entertaining.  http://uTry.it


Tools and Ingredients used:

Libby Small Dessert Cups Set: (More information here)
Wilton Mini Muffin Pan: (More information here)
Pyrex 4 Cups Heat Proof Measuring Cup: (More information here)
Vanilla Bean Paste: (More information here)
Unflavored Gelatin Powder: (More information here)

Organic Cane Sugar (Click here for more information)

Wood Print Photography Backdrop (Click here to see similar product)


Monday, September 22, 2014

How to Remove Seeds from Pomegranate, the Easy Way


How to Remove Seeds from Pomegranate, the Easy Way    http://uTry.it

It’s the pomegranate season and I’m so excited!  It’s one of the super fruit that is packed with vitamins and antioxidant.  You can eat it straight, add it on salad for a crunchy pop, or turn it into juice and make a smoothie.  I’ve always love pomegranate but it is not the most easy fruit to eat.  If you’ve tried it before, you know what I mean.  It has a rather hard shell to start with, after cutting it up, the seeds (the edible parts) are all surrounded by a white and bitter membrane!  So, I’m going to show you how to take those little jewels out of the shell, the easy way.

How to Remove Seeds from Pomegranate, the Easy Way    http://uTry.it

1) Wash and pat dry the shell of the fruit.  With a sharp knife, cut the pomegranate in half.

2) Hold the pomegranate cut side down over a large mixing bowl.  With the flat side of a meat tenderizer, gently tap on the shell of the pomegranate.

3) After a minute, the seeds will be all out from the shell! 

How to Remove Seeds from Pomegranate, the Easy Way    http://uTry.it

Super easy, isn’t it?  I hope you like this method and will give it a try soon.  Do you have another easy way to remove the seeds as well?  Or a recipe using the pomegranate?  I would love to hear from you.


How to Remove Seeds from Pomegranate, the Easy Way    http://uTry.it

Tuesday, September 16, 2014

How to Cut a Watermelon, the Right Way

My kids love watermelon and we have plenty throughout the year, especially in the summer.  I always love to try different ways to cut and serve them.  In the pass, I simply cut them into triangles slices or cubes.  Or, cut the watermelon in half and serve it straight with spoons.  Of course, that can get a little messy and juices drip all over the place.  Until, I've learn the right way to cut the watermelon!  Alright, maybe there is no “right” or “wrong” way to cut a watermelon.  But, there’s certainly the messy way, verses the easy and fun way to cut and to serve watermelons. 

So, here’s how I do it now.  It’s life changing and I bet you won’t go back to any old ways that you've done after trying this quick and easy method.

1) I always wash and dry the skin of the melon before I cut.

2) With a sharp knife, cut the watermelon in half

3) Place the melon cut side down and cut vertical slices, about 1-inch thick.  Try to keep the melon in shape while you cut.

How to Cut a Watermelon, the Right Way   http://uTry.it

4) Then, turn the melon 90 degree, and cut vertically again, 1-inch apart to create the “square” patterns

5) You’re now ready to serve!  My Little Girl calls this a watermelon puzzle! Smarty pants!

6) My Little Boy calls these watermelon sticks, great description!

How to Cut a Watermelon, the Right Way   http://uTry.it

You can definitely play a puzzle game before eating.  I certainly love these watermelon sticks, they are so easy to eat and no mess at all.  I say they are pretty fun to serve for parties and gatherings as well.  I hope you’ll give this fun, quick and easy way of cutting watermelon a try.  If you do, please let me know how you like this new method!  Do you have a special way to cut yours?  Please share!  Stay tuned for more fun recipes and how-to in my future posts.  

How to Cut a Watermelon, the Right Way   http://uTry.it

Saturday, August 16, 2014

Watermelon and Lime Popsicle


Watermelon and Lime Popsicle  http://uTry.it

Are you having a great summer so far?  The Kids and I are definitely having lots of fun!  From play dates at the park, visiting the library, summer swimming camps, picking herbs and summer veggies in the  garden, and last but not least, cooking and prepping food in the kitchen together!  All are simple activities and we’re taking them all in and enjoying a relax time without the hectic schedules and pressure of homework, just yet!   One of the recipes we made often is this Watermelon and Lime Popsicle.  We love our watermelon in the summer and this is a great way to enjoy a healthy frozen treat.

Watermelon and Lime Popsicle  http://uTry.it

Pretty much, this is a recipe inspired and created by my Little boy. He definitely loves the Zoku pop maker and we utilized it to the max!  One day, he simply asked if we can try blending the watermelons and make them as popsicle!?  Oh yes, of course Baby!   It was one of the best Pops in a while.  Besides just watermelon, I added some fresh lime juice to brightens up the flavor and they turned out to be amazing!

My Zoku

There are only a few ingredients in this pop, and let me reassure you, simplicity is the best!  I added a thin slice of fresh lime before pouring in the watermelon puree to the pop maker for a little decoration and extra texture and tartness, but that’s totally optional.  I hope you like today’s recipe.   Wish you all a wonderful rest of the summer!  Stay Cool!

Watermelon and Lime Popsicle  http://uTry.it


Props and Tools used in this post:
Zoku Pop Maker (Please click here for more information)
Traditional Pop Molds (Please click here for more information)
Mini Colorful Spoons (Click here to see similar product)


Saturday, August 2, 2014

How to Make the Fluffiest French Herbs Scrambled Eggs—France Vacation Inspired Recipe


French Breakfast with Herbs Omelette—France Vacation Inspired Recipe  http://uTry.it

I shared the above picture on Instagram while I was in France.  Yes, I was well-fed during my travel!  My Hubby surely knows how to keep me happy! ha!  I’m glad to report, most of my breakfasts were included as part of the hotel accommodations (some with extra fees, of course).  They were mostly all you can eat and the selections includes a wide varieties of choices and my picture above only shows part of my breakfast.  Yup, I usually went back for seconds (for fruit or yogurt), including my espresso doublé (double espresso)!

French Breakfast with Herbs Omelette—France Vacation Inspired Recipe  http://uTry.it

Breakfast is the most important meal of the day (I probably said it like 432,856 times in the past)!  A well balanced breakfast will fuel your body with nutrient and energies you need to start the day right.  Well, at least that’s what we aimed for, right?  I surely missed my French breakfast…. actually, I missed all the lunches, snacks, and dinners as well!   But let’s tackle them one at a time.  Here's how I made the fluffiest and most tender French Herbs Scrambled Eggs you’ll ever tried!  Follow me to the kitchen!

1) In a small bowl, whisk the eggs, milk and salt together with a fork, until well combined.  Preheat an 8-inch nonstick saute pan over medium heat.  Add the butter and swirl in the pan until butter is melted. 

2) Pour in the egg mixture and let it cook for a few seconds. 

3) With a heat proof rubber spatula, gently stir the egg mixture and then swirl the eggs in the pan to make a nice round appearance.  


French Breakfast with Herbs Omelette—France Vacation Inspired Recipe  http://uTry.it


4) Sprinkle in the fresh herbs.

5) Gently stir/fold the egg mixture again. Continue cooking for about 30 seconds to a minute.

6) I usually cook the eggs until it’s 98% done and still slightly wet.  When it’s completely cooked in the pan, I considered that’s over-cooked when it’s transferred to the plate!   Flip the eggs, and place on serving plate. 

I've just show you all the secrets on how to make the fluffiest and most tender French Herbs Scrambled Eggs!  The most important tip is not to over cook the eggs!  This scrumptious breakfast was ready in less than 30 minutes, including prepping time.  So, there’s no excuse not to treat yourself and your family a wonderful meal to kick start the day, the right way!  I hope that you love today’s post, tips, and recipe.  Thank you for reading and please stay tuned for more tips and recipe. 


French Breakfast with Herbs Omelette—France Vacation Inspired Recipe  http://uTry.it


Props and Tools used in this post:

8-inch Calphalon Nonstick Omelette Pans (Click here for more information)
Heat Resistant Omelette Turner (Click here for more information)
Husband and Wife Coffee Mug (Click here for more information)


Wednesday, July 9, 2014

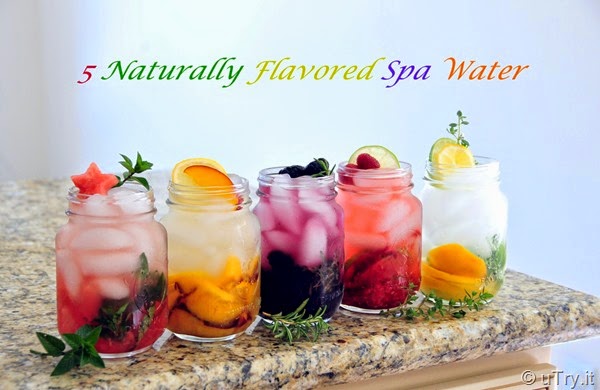
5 Naturally Flavored Spa Water


5 Naturally Flavored Spa Water    http://utry.it

Do you love hanging out at the Spa?  Imagine having a totally relax day to detox; treat yourself to a nice long body wrap or massage; maybe even a little pampering pedicure!  These all sound wonderful and I believe we all deserve a little time off to unwind from our hectic lives, every once in a while.  I love going for a spa day with my girlfriends; hanging out at the steam room or Jacuzzi while sipping a little spa water and chit chat away.  But with the Kiddos off from school in the summer, it’s hard for me to “escape”!  But at least, I can make some spa water and day dream a little at home.   

5 Naturally Flavored Spa Water    http://utry.it

I’m sure you are all familiar with the typical spa water, which usually is pretty much adding a few slices of cucumber or lemon wedges into ice cold water to keep you stay hydrated while you enjoy the Spa facilities.  Today, I wanted to share 5 different spa water recipes with you, all naturally flavored with fresh fruit and herbs.

They’re pretty much an upgraded spa water compared to the typical ones you get from the Spa (with just a few stingy slices of cucumbers? Come on! We can do better than that.)  Best of all, these are really refreshing and super easy to prepare.   Some even say these types of spa water help your body to detox.  Detox or not, I’m not too sure.  All I know is that they are a feast to your eyes and very delicious.  Plus, you can use any fruit and/or herbs that you like or in season.

5 Naturally Flavored Spa Water    http://utry.it

Follow me to my Spa Kitchen and see how I prepare these Spa Water:

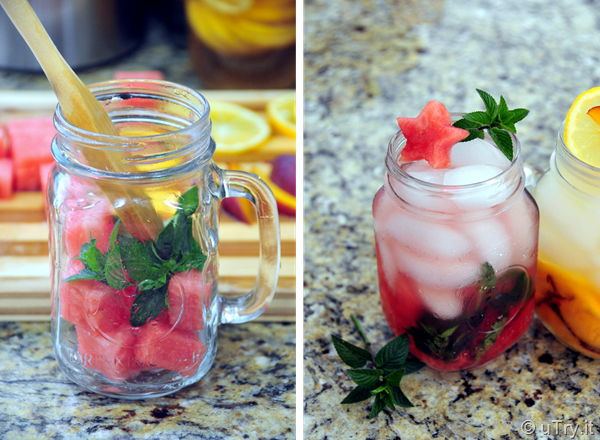
1) In a mason jar or mug, fill the jar 1/3 full with your choice of fruit and herb, then muddle with a wooden spoon
2) Fill the jar with ice cubes
3) Then, fill the jar with filtered water or chilled sparkling water, enjoy!


5 Naturally Flavored Spa Water    http://utry.it

Super easy, isn't it?  Here are the different versions that I've prepared.

The picture below shows you the Watermelon and Mint Spa Water. Simply cut the watermelon in cubes and add a spring of mint and muddle away.  It’s watermelon season right now and this is super refreshing.  The natural sweetness from the watermelon really flavors the water and the mint adds a nice cooling factor.
5 Naturally Flavored Spa Water    http://utry.it

Up next is the Nectarine and Meyer Lemon Spa Water.  I happen to have these ingredients in the fridge so why not?  This combination turned out really great as the sweetness from the nectarine compliment the tartness from the Meyer Lemon really well.  Both fruits add its own mild tone of floral aroma to this water.


5 Naturally Flavored Spa Water    http://utry.it


The third one I wanted to share with you is the Blackberry and Rosemary Spa Water.  Isn't the color gorgeous?  I adore the earthy aroma from the rosemary and the blackberries really stand up to their own flavor and not overpowered by the rosemary.

5 Naturally Flavored Spa Water    http://utry.it


Up next is the Raspberry and Lime Spa Water.  The color contrast alone is a feast to the eyes.  The raspberries I have are super sweet with just a hint of tartness, perfect combination with the lime.

5 Naturally Flavored Spa Water    http://utry.it

Last but not least, Meyer Lemon, Lime and Thyme Spa Water.  If you don’t have Meyer Lemon, you can use regular lemon in this one as well.  Or add a slice of orange to add more citrus flavor. I love the refreshing and floral tone from the Meyer Lemon and the lemony fresh thyme really adds more depth to this drink.

5 Naturally Flavored Spa Water    http://utry.it


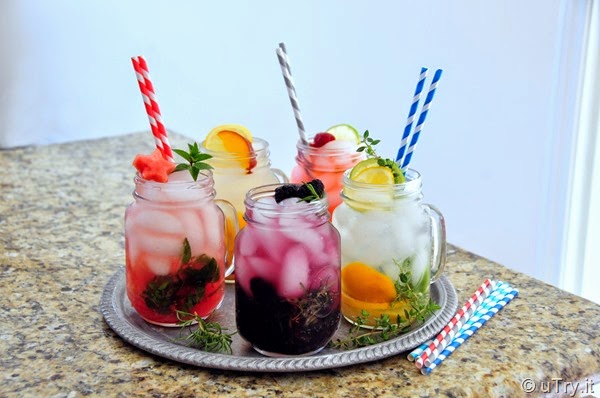
I love these mason drinking jars, you can get them from here.  I prefer using glass jars because I do not want to mix citrus (think about acid) with plastic containers.  Another option is that you can use a large pitcher to make a bigger portion as well.  These are perfect for drinking throughout the day to stay hydrated, as well as for summer parties!  Aren't they festive and vibrant?  They are totally delightful to drink and you know they are good for you, too.  Plus, these are way healthier than drinking sodas!  


5 Naturally Flavored Spa Water    http://utry.it

Another reason why I love these mason drinking jars?  I can close them tight with a lid if I don’t drink them right away.  You can keep it in the fridge for up to 2 or 3 days and the flavor will infuse the water even more.  And I can just grab one and go….and usually that means going to the park with the kiddos.  Love how portable and convenient they are.


5 Naturally Flavored Spa Water    http://utry.it

I hope you enjoy today’s post and recipes.  Stay cool, stay hydrated, and stay beautiful!  Wish you all a fun and fantastic summer holiday!


5 Naturally Flavored Spa Water    http://utry.it


Tools and Prop used in this post:
Mason Drinking Jars with Handle (Click here for more information)
Mason Jar Lids (Click here for more information)
Blue Paper Straws (Click here for more information)
Red Paper Straws (Click here for more information)
Grey Paper Straws  (Click here for more information)
Aqua Paper Straws (Click here for more information)